Applications for correct operation of OTG
Even when all components are working correctly, it is sometimes impossible to record or reset information.
This may be due to Android or iOS security auto-locking. In this case, it is recommended to install an application that will help cope with the situation. Important! This application works with Android version 3.1 and higher. StickMount is an application that will help you cope with incorrect performance
StickMount is absolutely free, you can download it from Irbis, Asus, Huawei, Lenovo, Prestigio, Zifro and other Chinese crafts. For the application to function, you need to be “awarded” with superuser rights (root rights)
StickMount is an application that will help you deal with incorrect performance. StickMount is absolutely free, you can download it from Irbis, Asus, Huawei, Lenovo, Prestigio, Zifro and other Chinese crafts. For the application to function, you need to be “awarded” with superuser rights (root rights).
Before installing the program, you need to connect the drive to the tablet in advance, and during installation you need to confirm superuser rights. During the unpacking process, a special folder will be created in the root of the laptop computer where all the data for the Flash card will be stored. After installing the application and confirming all functions, you can safely use all the capabilities of the connected MicroSD card via an adapter.
For correct data exchange and convenient use, it is recommended to install any file manager (the most popular Total Comander).
A few more simple tips and tricks.
To free up some more memory on your tablet, you can completely remove updates in less-used system applications. Each person will most likely have their own set, but as an option it could be, for example, “Google Speech Synthesizer”. In the device settings, on the “Applications” tab, go to its page and click on the “Uninstall updates” button.
In addition, it would not be superfluous to indicate an SD card as the preferred installation location. This option is usually located in the settings on the “Memory” tab.
By the way, it’s extremely rare, but a problem arises when some application stubbornly refuses to be installed. In this case, you can try removing the SD card from the device or simply change the option I mentioned to install from “SD card” to “Internal memory”. Before execution, you need to make sure that there is enough internal memory to complete the operation.
I would like to draw your attention to the fact that you need to monitor the state of the internal memory:
- If there is less than 30 -50 Megabytes of free space available, then certain problems may arise with installing applications.
- It would also be a good idea to periodically look into the Google Play market and monitor the progress of automatic application updates. If necessary, everything should be done manually.
- Don't forget to close applications running in the background.
- It's best to remove apps you don't use.
Common Problems
As has already been found out, problems when connecting external memory drives to the tablet can be physical and software. If the first option is, for example:
- Flash card failure;
- Damage to the USB-OTG cable;
- Broken micro-USB connector.
In this case, physical intervention will be required: replacement or repair, each case has its own choice. As a rule, it is very difficult to restore a flash drive; it is easier to buy a new cord, and take the connector to a service center for replacement.
Software problems
Some users believe that by inserting a flash card into the device and you can immediately work with it, as a rule, this is not true. First of all, the drive must be formatted in FAT32, because Android processes data in a very specific way.
You should also check the maximum storage size that the device can support. In this case, only using a less capacious flash drive will help. The problem may also lie in a low version of the Android OS, which does not yet provide modules for working with external devices.
In the era of wireless technologies, it is already becoming a bad taste to use standard connectors, so you should pay attention to wireless external drives, which will become a convenient alternative to standard flash drives.
How to connect a memory card to a tablet?
If you have chosen a tablet with a slot for memory cards (usually Micro SD), then you just need to select a drive that is suitable in size for your requirements and insert it into the slot, which is located somewhere on the case. As a rule, it is located on the side edges, under a protective cap.
Please note that it is better to insert a memory card when the device is turned off. All new devices support hot-swapping of external drives, but this slightly reduces the lifespan of their use.
Features of operating systems
When working together, it is extremely important to take into account the characteristics of each device. Most modern developers are trying to create an “ecosystem”, so they add touches that are incompatible with the standards of other manufacturers
For different operating systems you have to install suitable programs. Let's look at the most popular examples.
Android
The Android operating environment is the easiest to use, since initially the creators took the open Linux kernel and adjusted the code to suit the needs and requests of people. For interaction, a cable, a drive and a file manager are enough (otherwise the tablet will not see the connected element). Also, branded adapters from Samsung, Asus or Lenovo, which eliminate the need to use cables or cords, have become very popular at the moment.
Important point! Galaxy Nexus 7 or Nexus 10 cannot use free file programs. To reproduce information correctly, you will have to download and install the Nexus Media Importer application. There is no such problem in the Samsung Galaxy Tab series and others.
Windows
Users of tablets running Windows OS can be called lucky; almost all models come from the factory with a standard USB output, which makes the task extremely easy even for dummies: just insert the drive the right way into a laptop computer. Windows will automatically install the drivers into the system, and you can see the files in Explorer.
In addition, it is possible to connect smartphones, printers, cameras, mice, keyboards and other peripherals to the USB port.
If there are no connectors on the model’s body, you should check the docking station (keyboard) - a USB connector may be built in there. Well, if the connector is nowhere to be found, you should use the step-by-step instructions. You may need to purchase a cable.
iOS
To use two elements together, it is recommended to purchase a cable, one end of which has a Lighting connector, and the other a USB output that connects to a laptop computer. Further, the connection principle is no different from the standard one. In addition to connecting via cable, it is possible to purchase official adapters from Apple - Leef IBridge or JetDrive Go, which can directly and simultaneously interact with iPads.
It will be necessary to install a Jadebreak, but this will immediately void the warranty. Plus, you will need to additionally download the iFile tweak, which will help you bypass all restrictions and make it possible to transfer files directly to the gadget.
Install an SD card
Step 1: Insert
- Find out if your phone has an SD card slot and where it is located. To do this, visit the manufacturer's website.
- Turn off your phone.
- Remove the SD card tray or the back cover of the device (depending on your model). If necessary, lift the tab that holds the card.
- Place the SD card in the slot. If you raised the retaining tab, lower it.
- Reinstall the SD card tray or back cover of the device.
Step 2: Set up
- A notification will appear when you insert the SD card.
- Click Configure.
- Select the desired storage type.
- Removable storage An SD card can be moved to another device along with all the files stored on it (such as photos and music). Applications cannot be moved to a removable drive.
- Internal storage The SD card can store apps and data only for this phone. If you insert the card into another device, all data on it will be deleted. After this, the card can be used on a new phone.
- Follow the onscreen instructions to set up your SD card.
- When finished, click Finish.
Method 4 - hardware solution to the problem of saving photos to a memory card
If the previous methods did not help save images to a memory card, then perhaps the problem lies in the phone itself, since the memory module is the weak point of the device and its operation can easily be disrupted, for example, if the smartphone is dropped. It would be a good idea to check this by doing the following:
- Turn off the phone and remove the memory card;
- Turn it on and take a test shot;
- Turn off the device again, insert a memory card and start it;
- Try to photograph something again.
After completing these steps, the failure is usually eliminated and subsequent images are saved to the SD card.
We looked at the main reasons for the problem of saving photos to a memory card, and ways to resolve it on Android gadgets. I hope the article helped you in troubleshooting this problem.
We'll tell you why we can't transfer files and other data to a Samsung memory card
If there is not enough space in the internal storage of your smartphone, then you need to clean it and delete unnecessary photos, music, videos and other files. The question of how to transfer data to a Samsung memory card is solved quite simply.
To transfer data to a Samsung memory card, it is convenient to use the Samsung “My Files” utility - it is similar to Windows “Explorer”. You can find this program in the Samsung folder located on the device. Before this, you will need to connect your smartphone to your PC using a USB interface.
- Fighting slowness - what to do if the tablet has no internal memory left?
How to transfer data from a Samsung smartphone to a memory card
Open the “My Files” utility. Select “Device Memory” - all folders with files stored in the internal storage of the device will be visible here. You need to find the folders that take up the most space. To do this, you need to select any folder and wait a few seconds - a square or circle will appear next to the folder.
After selecting the required file, in the upper right corner, click on the “Options” item (icon in the form of three dots) and select the “Properties” or “Information” item - if this item is located at the bottom of the screen, then click on the “Options” item " no need
The space that the folder occupies in the internal storage of the device will be indicated in the “Size” item. If a folder is found that takes up more than 100 MB, then it is better to transfer it to a memory card. Basically, the heaviest files are stored in the “DCIM” folder - this is where photos and videos are stored by default. Downloads are located in the “Download” folder by default.
Especially for you: The best wirelles headphones for Apple smartphones: is there life after AirPods?
The “WhatsApp”, “Viber”, “Telegram” folders store files received from chats. Music is stored in the "Music" folder. Manually solving the question of how to transfer data to a Samsung memory card will thus take much longer - you will have to independently select the files that need to be transferred
To move files to a memory card through the “My Files” application, select the folder again, open “Options” and select “Move”, and then select “Memory Card”. If you need to delete a file, select “Delete” accordingly.
Moving is available not only for folders, but also for individual files stored in such folders. Options related to moving files can be found at the bottom of the screen.
What folder are installed applications in?
By default, all applications are installed to internal storage. The folder name usually matches the application name.
Why can't I transfer an application to a memory card?
Not all applications can be transferred to a memory card. This way you cannot copy system applications; those previously installed by the system cannot be transferred.
Even if the application was created by a third-party developer, it may not be transferred to removable media - if the developer did not provide such an option.
Especially for you: Stripes appeared on the Samsung TV screen: how to remove them
How to transfer an application to a memory card
Transferring an application to a Samsung memory card often raises a lot of questions. But in practice it can be solved quite simply. To transfer the application, follow these steps:
- Open Settings.
- Tap the "Applications" item.
- Select “Application Manager”; if there is no such item, then simply select the application that needs to be transferred. he is. If it is not there, then you need to find the transfer application in the list.
- Select the “Memory” item; if it is not there, tap “Move to memory card” or “Memory card”. The problem of how to transfer data to a Samsung memory card is almost solved - after selecting the required file, all that remains is to tap “Transfer to memory card” or “Move”.
After transferring an application to a removable carry, it will not work if the memory card is removed from the device.
I don’t have the “Move to memory card” option or the “Change” option is missing.
If the above points are missing, then perhaps the device does not provide the ability to transfer applications.
To check if your device can transfer applications to a memory card, you need to download the game “Bejeweled Classic”, which can be found in the Play Store. After installation, you need to check whether there is an option “Move to memory card” in the “Application Manager” settings
This solves the problem of how to transfer data to a Samsung memory card - as you can see, everything is quite simple. All you need to do is choose the appropriate method for transferring data to removable media.
Recommendations if all else fails
Situations arise when none of the above methods gave the desired result, but you need to connect gadgets together. In this case, you should use additional methods.
Use a micro-SD card
A simple but effective method that is not suitable for all models (Apple gadgets and devices a priori cannot use an additional memory card); there will be no such problems with Android. Advantages: large volume and no additional cables and cords. You can also copy photos, music from the memory card and view the content on the tablet.
Upload files to the cloud
A convenient way for people who constantly need the same data will do without memory media.
The three most famous services:
- Yandex.Disk
- Google Drive
- DropBox
However, interaction with information storage locations has limitations and is only available when connected to the Internet. And most importantly, don’t forget your password. The most convenient cloud storage scheme is for the product of Apple and Google.
Instructions:
- Open the site
- Register
- Specify the file
- Click download
- If desired, you receive a ready-made link, copy it and forward it to the user.
Send a message on a social network
The option is simpler, has less protection than file hosting services. Suitable for users who are often away from home. It has a significant disadvantage: you cannot edit information online (you will have to download, change and re-upload). You should carefully manage your own profile so that you can access it from all devices.
Why doesn't the computer see the Micro SD memory card?
Today, the method of storing data on portable flash drives has gained quite a lot of popularity. And now all flash drive manufacturers are struggling to create the smallest in size and largest in memory capacity flash drives; Micro SD cards occupy the leading position in the minimum sizes. Micro SD flash cards are currently the smallest data storage devices that have been put into mass production. Due to their very fragile structure, these drives quite often become unusable due to physical damage or incorrect completion of work with such flash drives.
How to connect a flash drive to an Android gadget via OTG
OTG is a USB-microUSB adapter, a replacement for a USB cable with a Card Reader device. Takes up little space - no more than a standard flash drive. In this case, the flash drive must be formatted in FAT32 - not everything is going smoothly with the NTFS file system for the Android operating system.
There is a more difficult way: install a special Android application that allows your smartphone or tablet to work with NTFS media. So, these can be exFAT/NTFS for Total Commander, Paragon NTFS & HFS+ and their analogues.
- The OTG adapter must have a USB connector for the USB flash drive plug. This is exactly what you need. Most modern Android devices do not have a miniUSB connector, but a microUSB connector. Find an OTG adapter of the required standard in the store. The OTG adapter is available both as a solid device and as a special microUSB cable.
- After connecting the flash drive, launch the “File Manager” on your device - its contents should be displayed at the address '/sdcard/usbStorage'.
If the flash drive is not readable, you need special Android applications. Some of them require Root rights.
How to get Root access
Applications that allow you to get Root access without using a computer: FramaRoot, Universal Androot, Visionary+, GingerBreak, z4root, BaiduRoot, Romaster SU, Towelroot, RootDashi, 360 Root, etc.
Applications that “hack” Root via PC: SuperOneClick, Unrevoked, GenoTools, vRoot, MTKDroidTools, etc.
Remember that by obtaining Root rights, you lose the supplier’s warranty and risk harming your gadget.
Another way is to change the licensed Android firmware to a “custom” one with unattached Root access.
How to clear a memory card on Samsung
We found out how to connect a memory card to a Samsung phone; the cleaning process is even simpler. Formatting leads to complete cleaning, no files will remain.
- Algorithm:
- open “Settings” - “Storage”;
- select the device and switch it to removable storage mode;
- Tap “Format”.
MicroSD devices for storing information are a convenient way to expand the capabilities of a smartphone or tablet. The selection is carried out according to technical characteristics, taking into account the manufacturer’s recommendations.
Last update date: 11-06-2021
Appearance
Since, as a tablet model, it is a representative of the A series, you won’t see anything special in terms of design.
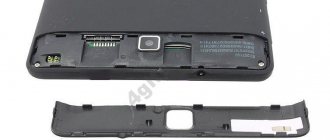
On the front panel there is a 0.3 MP camera for video communication and the company logo. In the upper left corner of the rear panel there is a peephole for the main 2 MP camera. The top end of the device, in addition to its aesthetic function, also secures the glass display protection.
There are slots and control keys on all four sides of the gadget. On the top end there is a 3.5 mm audio output and a slot for micro-USB, and on the bottom there is a microphone. On the right side of the device there is a volume key and a power button for the tablet.
At the top of the left side of the Lenovo A3300 there is a double slot for a memory card and a mini-SIM card, covered with a non-removable cover.
What's the catch
MicroSD cards are not as fast as the built-in memory of a smartphone. So don't waste your money on cheaper ones and instead buy yourself memory cards with reasonable read throughput. Extreme Pro and MicroSD from Sandisk turned out to be, in our opinion, the best in terms of price/quality ratio. With 74MB/s write throughput, you shouldn't experience any lag. Such cards are best suited for installation as internal memory
Interestingly, only the LG G4 was able to read the extended memory correctly. Samsung showed an unnaturally large amount of occupied memory, and Sony's memory was even negative. However, we didn't have any complications, and even when we were connected to the computer, we were able to access all of our data properly, although we could only see a general part of the memory and not a specific part. Difficulties arose only when the system was updated (see above).
View files or applications stored on the memory card
On your phone you can view a list of all files and applications. In addition, Android allows you to find out how much free space is left on the SD card.
If you selected “Internal memory” when setting up the drive
- Go to your device's settings.
- Select Memory.
- Select a memory card from the list.
- Now you can see the amount of space used, as well as how much drive memory is still free. By selecting different categories, you can view which files have been downloaded to the SD card.
If you selected “Removable storage” when setting up the drive
- Pull out the control panel by moving your finger across the smartphone screen from top to bottom.
- Click the "Open" button under the active notification about installing a memory card.
How to transfer files from phone to memory card
The vast majority of users buy a MicroSD card in order to free up the internal memory of the device. It quickly becomes filled with photos, videos and music. All these files can be easily transferred to an external drive.
The operation is performed both through the built-in file manager and through third-party applications like FileManager+. Regardless of the chosen method, the instructions will be the same:
- Open your file manager.
- Select phone memory.
- Find the file you are interested in, then hold your finger on its name for a couple of seconds.
- In the pop-up panel, select Move.
- Specify any save folder located on the SD card.
- Click "Insert".
To save time, it is recommended to move files not individually, but as entire folders. It's much faster. And, fortunately, a similar function is supported in any Explorer.
Using memory cards
Today, few people can imagine their life without tablets. These electronic devices have become cheaper and more powerful, and their storage capacity has become more spacious. The first and most important accessory that a user purchases with a tablet is a memory card. Without a drive, it is impossible to fully use the tablet.
Built-in memory is not always enough. By expanding the memory, the tablet's capabilities increase several times: from now on, the user can install more games and applications from the Play Market or a third-party resource; can record more music on the tablet, more videos.
Many users make mistakes. In order not to make a mistake and purchase a 100% suitable memory card for your tablet, you need to take into account several extremely important points.
Speed classes
Although many drives may look the same, there is an important point that you should always pay attention to. Speed is the most important parameter that you should pay attention to before purchasing a drive.
The higher the speed, the faster the tablet will be able to save information, play large video files, etc.
Speed is the most important parameter that you should pay attention to before purchasing a drive. The higher the speed, the faster the tablet will be able to save information, play large video files, etc.
Card classes and their write speed are presented in the table
Please note that read speeds may be higher than advertised, but write speeds are typically always as advertised
| SD Class | Write speed |
| SD Class 2 | From 2 MB/s and above |
| SD Class 4 | From 4 MB/s |
| SD Class 6 | From 6 MB/s |
| SD Class 10 | From 10 MB/s |
| SD Class 12 | From 12 MB/s |
| SD Class 16 | From 16 MB/s |
Many new users get confused when they come across the “SDHC” designation when choosing a drive for their device. You need to know what the SDHC format is and what advantages it has. SDHC is the next generation of regular SD cards, respectively, MicroSDHC are smaller drives used by most modern tablets. This format supports up to 32 GB, which means you can store more information in the same card size.
Attention: before purchasing, be sure to make sure that the capacity of the card you are purchasing is supported by your tablet!
A common mistake made by users is to buy a card and later find out that the tablet does not support this capacity. Study the characteristics of the tablet before you go to the store to buy a drive!
Generations of memory cards
There are several generations of memory cards for tablets and other devices. They are listed below in order of backward compatibility. That is, if the device works with SDHC flash drives, then it will be compatible with SD, but will not be able to recognize the SDXC card.
- SD is the most common and accessible digital card format, the maximum capacity is 4 GB, and the data transfer speed is 12.5 MB/s;
- SDHC is the next type, where the maximum information capacity is 32 GB, and the information transfer speed is also 12.5 MB/s;
- SDXC is a later, new generation format that does not work with all operating systems, but provides a maximum capacity of up to 2 TB of information and a data transfer speed of 25 MB/s.
Here the characteristics indicate the maximum permissible capacity values, but they will not always be the same. Exact information can be found on the manufacturer’s official website in the specifications of the selected memory card model or on a special sticker with characteristics on the packaging.
Also, with the help of an adapter, you can use cards of other formats
What to do if Huawei MediaPad stops seeing the memory card
So, why doesn't Huawei MediaPad see the flash drive? Strictly speaking, the problem when the tablet does not see the memory card can be divided into the following popular causes and breakdowns:
The memory card contact in the tablet's flash reader has come loose. The memory card has burned out. The memory card is not visible due to file system corruption. The tablet does not see the memory card due to a broken flash reader (the connector where you insert the flash drive).
What to do, how to check if the card is burned out or the problem is in the tablet? To begin with, just restart the tablet, such a simple operation may well be enough and the flash drive will work again. Now let's look at all the cases when the Huawei MediaPad stopped seeing the flash drive in order. First of all, check the memory card on another device. This can be done using a card reader connected to a computer or laptop, or another tablet that supports the same memory card format.
It is worth noting that almost all modern gadgets work with Micro SD or Micro SDHC memory cards. Accordingly, the testing device must support this memory card format.
If a contact in the tablet comes off and the memory card appears, then disappears, you can try to bend the card a little. If the memory card cannot be seen and is completely unreadable on a card reader or other device, then it is likely the cause of the breakdown and most likely it has burned out. In this case, you will most likely have to buy a new memory card. If the tablet no longer sees the flash drive, but the memory card is somehow detected by the computer, then the failure may lie in the gadget itself. In this case, you cannot do without a trip to a service center or repair shop.
Let's figure out what you can do at home and how to try to resurrect the card.
How to safely remove a memory card
Removing the SD card purely mechanically requires the reverse of installing it in the phone. However, this is not enough to safely remove the media. There are 2 ways to remove a memory card without the risk of unpleasant consequences.
First way
Suitable if among the settings there is one responsible for safely removing the SD card. The algorithm is simple.
- Go to the "Settings" menu.
- Among the settings, find the “Memory” section and open it. You will see information about the memory card.
- Scroll through the section and find the “Remove SD card” option.
- Review the information that appears in the warning window. It will concern the possible loss of data from the card. If your SD card was turned on as an external drive when mounting the file system, all the necessary data will be saved on it when turned off. If you choose to use it as internal memory, then all data from it will be lost if it is moved to another device.
- Wait a few seconds: during this time the card will be unmounted. You will see a notification that it can be removed.
- Carefully remove the card from the slot.
Second way
Used if the phone settings do not include the one that is responsible for safely removing the memory card. The procedure here is even simpler.
- Press the Power button and select Power Off.
- Wait a few seconds: during this time, the operating system will automatically disable applications associated with the card and unmount the SD card itself.
- Carefully remove the card from the slot.
Please be aware that until you put the memory card back into the device, some smartphone applications may not work. This means that application data was stored on the drive. By plugging the memory card back in, you will activate these applications and continue to use them as before.
The following recommendations will help you correctly perform the steps of inserting and removing a memory card, as well as fit it into the memory system on your smartphone. Do not forget that even simple manipulations with a smartphone require a certain degree of accuracy and adherence to the procedure.
Please rate the article:
- 2016-11-05
- 67114
Computers and Internet
There are many moments in every person’s life that you want to save in photos or videos. But to share them with friends, you need to know how to insert a memory card into a computer or camera, as well as how to transfer photos and videos from a memory card to a computer. For those who do not know this procedure and are embarrassed to ask others, I will now tell you in great detail.
IN
How to transfer photos to your computer?
IN
A memory card is the same flash drive, which has the shape of a rectangular plate with contacts. Memory cards come in different sizes, memory capacity, and data transfer speed. It would not be amiss to recall here that for cameras you can use memory cards of speed class 4, and for video cameras and video recorders - no lower than class 10. All of the listed devices have special programs for transferring photos and videos to a computer, when connected through the special cords that come with them. But this method is complex and confusing. The easiest way is to transfer photos and videos to your computer by connecting the device’s memory card directly to the computer.
IN
There are many memory cards, but 2 types of them are used most often.
IN
IN
The first kind is SDHC card, and the other kind is micro SDHC card.B
IN
IN
Most laptops, tablets, and phones have a slot for one or both of these cards. The slot looks like a narrow slot 2.5 cm wide.
IN
IN
A standard SDHC card has contacts on one side and a cut corner. This is done so that the card can only be inserted into the slot on one side. If you insert a card into a slot and it does not want to fit, do not use force under any circumstances. Just turn it 180° to the other side. If the card is inserted correctly, it should click into place and you will hear a soft click.
IN
IN
In order to remove a memory card from the slot, you need to press it a little with your finger, and it will come out of the slot a couple of millimeters. Then you can pull it out of the slot.B
IN
The memory card is inserted and removed in the same way, both on a laptop and on photo and video devices.
To connect a micro SDHC card to the slot, you need to have a special adapter, which can be purchased complete with the card. You need to insert this card into the adapter; on one side it has a small slot. The micro SDHC card can also only be inserted into the adapter from one side. For this purpose, it has a special protrusion on the side. You need to insert such a card into the adapter so that the contacts on the adapter and on the card are on top. The card with adapter can then be inserted into the standard card slot.B
IN
IN
Desktop computers do not have slots for connecting memory cards. Therefore, in order to connect non-standard cards to a laptop, or any other cards to a computer, you need to purchase a special device called a card reader. On one side it has slots for connecting various memory cards, and on the other there is a USB connector.
IN
IN
To connect a memory card to a desktop computer or a laptop that does not have a card slot, you need to insert the memory card into the appropriate slot in the card reader, then connect the USB connector of the card reader to the computer via the USB input.B
IN
When you connect a memory card, the computer emits a characteristic signal, and a flash drive icon appears on the monitor’s taskbar.
IN
Then you need to open the My Computer window. To do this, click the left mouse button twice in a row on the My Computer icon. Find the memory card icon in the window that opens. The memory card has the English letters SD in its name. Now you need to double-click on it with the left mouse button. There are 3 folders in the window that opens. Typically, a folder called “DCIM” contains photos, a folder called “MP_ROOT” contains videos, a folder called “PRIVATE” contains work files and should not interest you.
IN
IN
Click on the first folder 2 times with the left mouse button, on the folder that opens you need to click 2 times with the left mouse button again. Photos open in the window. Hold down the “Ctrl” key on your keyboard and click once with the left mouse button on the photos you need to transfer. Photos are highlighted in blue. Having finished making your selection, release the “Ctrl” key, right-click on one of the selected photos once and select “Copy” from the drop-down menu. If you want the photos to be deleted from the memory card after transfer, you need to select the “Cut” option.
IN
Video. How to select a file. How to select all files or several.
IN
IN
IN
Then select the location where you want to transfer the photo. This could be your desktop or one of your computer's drives. Let's say you selected "Desktop". If there is no photo folder in the selected location, then create one. To do this, on the desktop, right-click once, and in the drop-down menu select “Create” in “Folder”. Give the folder a name, for example “Photos”. Then double-click on this folder with the left mouse button, it opens. Right-click in the window that opens once and select the “Insert” menu item. All photos were copied to the computer and also remained on the memory card.B
IN
By opening the next folder with videos on the memory card, using the same steps you can also transfer them to your computer.B
IN
To transfer files to a memory card from a computer, you need to repeat the same steps, only starting with the required folder on the computer.
IN
Video. How to insert a memory card?
IN
Rating: (votes: 1)
Saving applications to a memory card for Android 2.2 4.2.2
Everything here is extremely simple and trivial:
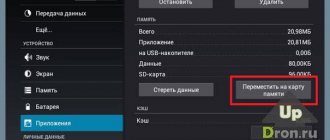
1. Everyone also goes to the menu and looks for “Settings” - the icon, as a rule, resembles a mechanism in its appearance - there should be no problems finding it;
2. Then we look for the “Memory” sub-item. In our case, it is located between “Screen” and “Battery”. The menu may vary depending on the device manufacturer. The screenshot shows an example of a clean version of Android, without shells that are pre-installed at the factory;
3. And now the most important thing - tap once on the “SD card” position, located below the inscription: “Default recording disk”. Instead, it should appear round or ticking;
Video information about replacing the internal SD card with an external Micro SD. All actions on the tablet
You do.
a memory card on Android
MicroSD. Traveling.
4. Profit! Now all applications downloaded through the Play Market will be automatically installed in the external memory.
By the way, if the flash drive is slow, and there are some, then applications may not work correctly. So get a good SD card - don't skimp.
What to do with devices running Android KitKat and higher?
Unfortunately, if you don't get Root rights, you won't be able to do it. Google has officially refused to support this feature in new versions of the operating system. The point is that cloud services are becoming more common, and running out of memory shouldn't be an issue as a result. But in our country there is no such high-speed Internet as in the USA, and the cost of traffic is not cheap, so the clouds are not in demand.
Can I somehow make sure that applications are automatically installed on the memory card? As we said above, this is real.
If you have a tablet from one of the Chinese companies, then it probably already has built-in Root rights, but with other manufacturers you will have to redo it. Naturally, during the course of this article we cannot tell you about obtaining them, because the process for each gadget is unique - instructions can only be placed in a multi-volume book. But, well, it doesn't matter.
You can contact a professional to have Ruth's rights installed, or you can do it yourself at home. The last option is the most risky; there is a chance to turn your gadget into a so-called “brick” and will only be able to restore it in one of the service centers. However, if you have already had a similar procedure, there are no problems. In extreme cases, by the vastness of the Internet in the appendage, you can find solutions to these same problems. So, keep experimenting!
- What we have moved quite far from the main topic of the article. So, back to the instructions: Any of the possible ways (blinking, unlocking bootloader, etc.) gets root privileges;
- Go to Google Play;
- In the search bar we write: “SDFix: KitKat Writable MicroSD” is an assistant application that will be useful to us in the future. Install it. We hope no one has to explain this to anyone? Just click once on the “Install” button, and the process will go into automatic mode, then a shortcut will appear in the launch menu;
- We open it and see a bunch of, most likely incomprehensible, inscriptions in English. There is no need to translate them - everything is resolved in a few clicks;
- Click Continue as shown in the first screenshot;
- We note the agreement that by clicking the "Continue" button, the device will be slightly modified;
- We wait a couple of minutes until the orange screen changes to green.
- On the green screen we are informed that automatic installation of applications on the SD card has been successfully enabled.
Actually, that's all. And the most difficult thing in this whole business is obtaining the rights to the roots. Luckily, the Internet has step-by-step instructions for every gadget that has ever hit the store shelves, and our website has plenty of instructions.
How to connect memory cards to computers
The first thing to note is that the process is almost no different from connecting a regular flash drive. The main problem is the lack of a suitable connector: while most modern laptops have slots for SD or even microSD cards, this is very rare on desktop computers.
Connect the memory card to a PC or laptop
In most cases, you won’t be able to insert a memory card directly into a desktop computer; you will need to purchase a special device - a card reader. There are both adapters with one connector for common card formats (Compact Flash, SD and microSD), and those that combine slots for connecting each of them.
Card readers connect to computers via regular USB, so they are compatible with any PC running the current version of Windows.
On laptops everything is somewhat simpler. Most models have a memory card slot - it looks like this.
The slot location and supported formats depend on your laptop model, so we recommend that you check the device's specifications first. In addition, microSD cards are usually sold complete with adapters for full-size SD - such adapters can be used to connect microSD to laptops or card readers that do not have a suitable slot.
We are done with the nuances, and now we move directly to the algorithm of the procedure.
- Insert the memory card into the appropriate slot of your card reader or laptop connector. If you are using a laptop, go straight to Step 3.
- Connect the card reader to a free USB port on your computer or to a hub connector.
- As a rule, memory cards connected through a slot or adapter should be recognized as regular flash drives. When connecting the card to the computer for the first time, you need to wait a little while Windows recognizes the new media and installs the drivers.
- If your OS allows autorun, you will see a window like this.
Select the "Open folder to view files" option to see the contents of the memory card in Explorer.
- If autorun is disabled, go to the Start menu and click on Computer. When the connected storage manager window opens, look for your card in the “Devices with removable media” block - it is designated as “Removable device”.
To open the map to view files, simply double-click on the device name.
If you have any difficulties, please pay attention to the point below.
Possible problems and their solutions
Sometimes connecting a memory card to a PC or laptop has problems. Let's look at the most common of them.
The card is not recognized. This situation is possible for a number of different reasons. The simplest solution is to try reconnecting the card reader to a different USB connector or removing and inserting the card in the card reader slot. If it doesn't help, then refer to this article.
A prompt appears to format the card. Most likely, there was a failure in the file system. The problem is known, as are its solutions. You can find them in the corresponding manual.
The error “This device cannot start (Code 10)” appears. Purely a software problem. Ways to solve it are described in the article below.
To summarize, we remind you - to avoid problems, use only products from trusted manufacturers!
Thank the author and share the article on social networks.
SD cards will remain a popular data storage format for a long time. The standard has become very firmly entrenched in the photo and video equipment market, and therefore there was, is and will continue to be a need for card readers. From time to time, users encounter problems with the operation of SD cards (or card readers) in computers running Windows 10. The card is inserted into the appropriate port, but the computer cannot recognize it and the SD card is not displayed in Explorer. This is a very common and quite annoying problem, which, fortunately, is very easy to fix in the vast majority of cases. In this article you will find some tips that will help you if your computer does not see the memory card.
Although in this manual we are mainly talking about SD cards (the larger ones), the instructions are also relevant for microSD cards. Modern computers (Surface tablets, for example) have recently been often equipped with microSD slots. The tips described in the article are also relevant for these devices.
Wireless external drive
External storage media usually require a special USB port to connect to mobile or desktop computer devices. However, the Wireless HDD does not need such a port, since its connection uses Bluetooth technology or a wireless Wi-Fi connection. The tablet user has wireless access to files stored on the hard drive, or the ability to send files from the computer to the drive.
Such a device is fully compatible with any device, even one that does not have a USB connector. It is worth noting that recently there are more and more connectorless gadgets, which means that it is definitely worth taking a closer look at the Wireless HDD.
This wireless external hard drive has its own power supply, and as long as its battery is charged, it can be used. By the way, the connection is password-protected, so no one else will see the data. After connecting the tablet, a dialog box pops up on the screen, which contains all the necessary information to perform subsequent actions. To protect the disk from outside connections, WiFiSlax is activated. The battery life of the Wireless HDD directly depends on the intensity of the disk's work; on average, it is 6 hours; in standby mode, the device can be used for 20 hours.
The disadvantages of such an extremely convenient device include its relatively high cost, which will certainly decrease over time.
Let's talk about sizes
All memory cards are available in standard sizes. There are three of them in total, each of which is intended for use on certain devices:
- MicroSD is one of the most popular storage formats, which is often used in phones, tablets, players and other portable devices. It is compact and the size is only 1.1×1.5 cm;
- MiniSD - not as popular a type as the previous one, larger in size - 2.5x2 cm. Found in MP3 players and some phone models;
- SD is the most popular and actively used flash drive size. It is used when working with cameras, tablets, video cameras and recorders, as well as laptops and even computers. Standard size – 3.2×2.4 cm.
First of all, find out which card standard is compatible with your device
IMPORTANT. If you are going to buy a microSD along with an adapter and use it as a standard SD card, then it is better not to do this
Most often, micro-flash drives work slower than standard ones, so it will not be possible to record and play back, for example, FullHD video using such media. So listen to manufacturers' recommendations regarding removable storage devices and buy only those that are compatible with your devices.
What to do if your computer does not see the memory card
Most information today is stored on flash cards. Photos or movies, documents or other information on the microSD card can be easily read through the adapter in the laptop. If problems arise with the reading device, information exchange becomes impossible, which creates many problems for the user. Today, of all types of portable memory cards, the most convenient and widely used are microSD flash cards. They are used in phones, smartphones, players, tablets, cameras and other portable and computer equipment. To read data from microSD, you need an adapter, which is usually included with the flash card you purchase.
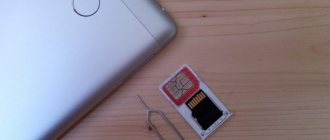
How to insert a SIM card into a Huawei tablet
To insert a SIM card into a Huawei tablet, you will have to:
- Turn off the device (optional, but recommended).
- Open the cover or remove the slot using the method described above.
- Place the card in the designated place.
- Return the slot to its original place, close the lid, turn on the phone.
After which the user will have the opportunity to make calls, go online, show friends what is happening around them via video link and use cellular communications.
It is worth adding that installing a memory card (microsd), if the device allows this, occurs in a similar way. Owners of gadgets will have to perform similar actions and install a flash drive in the slot intended for this.
After purchasing a tablet with SIM card support, many users sometimes find it difficult to understand the device. Most often, users do not know how to insert a SIM card into the tablet or how to remove it from the device. At a quick glance, it seems that everything is very simple and banal. But in practice it happens differently. Any awkward movement can damage your Huawei tablet. This means that it’s better not to take risks, but you need to learn how to handle the SIM card tray.
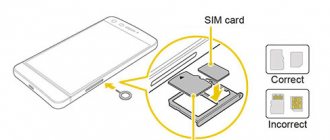
How to properly insert an SD card into a smartphone
- turn off your phone;
- Pull out the card tray (often done using the paperclip key included with the phone) or remove the back cover and remove the battery;
- lift the special tab designed to hold the card (if available);
- insert the card correctly, using the outline of the slot or tray as a guide;
- lower the retaining tab (if equipped);
- push the tray in or return the battery and close the back cover of the case;
- turn your phone back on.
How to connect a flash drive as internal memory
Before connecting the drive, you need to transfer all important information from it. During the setup process, it will be completely cleared and the data will not be returned.
First of all, you need to go to Settings, and then go to the “Storage and storage” section, where you should click on the SD card.
Next, you need to select “Configure” and click “Internal memory”. Immediately after this, the device will warn the user that all information will be deleted and it will become impossible to read it on other devices without full formatting.
Here you need to select “Clean and format” and wait for the memory cleaning process to complete. You may then receive a message indicating that the media is running slowly. As a rule, this means that the flash drive used is not of very good quality and its use as device storage may also affect the performance of the smartphone itself. For good and fast performance, it is recommended to use UHS Speed Class 3 (U3) drives.
After formatting is completed, the smartphone will ask you to transfer information, you should agree with this and wait until the work is completed. After the transfer, the work of turning the flash drive into internal memory will be almost complete; all that remains is to reboot the device.
Common problems
Difficulties may arise during the installation process, and you may not be able to install Micro SD the first time. Or you can install it, but the phone does not see the memory card. The main problems can be summarized as follows:
- Flash drive failure. Try installing it on another mobile device. If difficulties arise here, then replacement is required.
- Formatting errors. Use the file system that is used on your smartphone. Most often FAT32 is needed.
- The drive was installed with an error. It's hard to make a mistake, but theoretically you can install the device upside down. To prevent this from happening, it is important to pay special attention.
In difficult situations, a factory reset or contacting support may be required. In the first case, go to Settings, and then System and updates. Find Reset and select Factory Restore. As for the second way, dial 8-800-70-016-77 and get expert advice.
In the comments, describe what difficulties you encountered and what tips you recommend following in order to correctly install a flash drive on Honor 7A or smartphones of other models.
Specifications and design
Specification:
- Display – 10.1 inches, resolution 1920×1200 (16:10), IPS
- OS – Android 4.0, modification – Ice Cream Sandwich
- Processor – 1.2 GHz, HiSilicon K3V2 (Cortex A9 (quad))
- RAM – 2 GB
- Internal memory – 16 GB, support for SD memory cards 32 GB (SDHC) and SDXC (up to 64 GB, NTFS file system)
- Cameras – front 1.3 MP, rear 8 MP
- Wireless networks – Wi-fi, 3G, Bluetooth 3.0
- Navigation - GPS
- Battery – 6600 mAh lithium polymer battery (up to 8 hours at medium brightness and without network)
- Additionally: built-in speaker, built-in microphone, headphone or microphone jack, LED flash, accelerometer, gravity module, USB-host keyboard as one of the options.
Specifications
There is little information about the processor with which the tablet was released, it is known that it is 4-core, is Huawei’s own development based on the Cortex A9 architecture, clock frequency 1.2/1.5 GHz, and according to the developers, it is even slightly ahead of its main competitor Tegra 3 in performance . The tablet is one of the few with 2 GB of RAM, which will allow tablet applications with any resource requirements to run without lag. The internal memory on the tablet is 16 GB with support for memory cards up to 32 GB (SDHC) and SDXC cards up to 64 GB. A keyboard dock can be purchased as an additional option.
The tablet supports Wi-fi and Bluetooth wireless networks. The presence of a built-in 3G modem is determined by the buyer. Navigation is carried out by the American GPS system. Video formats: MPEG-4, WMV-9, H.264, VC-1, MP4, RM, 3GP, 3G2, RMVB, MOV, ASF. Supported audio: FLAC, MP3, WMA, APE, OGG, WAV, RA. Text: XLS, TXT, PPT, DOC, FB2. If you are interested in the tablet, but have doubts, then you should type in a search engine “Huawei Media Pad 10 tablet reviews” and read reviews from users.
Design and decoration
The 10-inch tablet comes in one color option – white. The design is elegant and not flashy. The 10.1-inch display is surrounded by a black frame without touch buttons and framed by a white body. Above the display is a front 1.3 MP camera. The tablet is well protected from mechanical damage, due to the fact that almost the entire back of the tablet is covered by an aluminum case with a white plastic insert in the rear camera area. This matte insert is one of the disadvantages of the tablet - it gets easily soiled (after a short use the tablet looks untidy).
Front view
The tablet dimensions are 257.4×175.9 mm
At the same time, it is ultra thin (only 8.8 mm) and, which is important for operation, the lightest among its competitors (580 g). The assembly of the Huawei mediapad 10 fhd 3g tablet is of high quality, there are no backlashes or creaks during use, and the back aluminum cover is not deformed
Back view
1st layout of elements
2nd layout of elements