How to disassemble a Huawei tablet and is it possible to do it? Each manufacturer provides different device designs. Some can be disassembled, others cannot. Most often, the question of the possibility of disassembly arises when the device needs repair. Many home craftsmen prefer to value their gadgets themselves rather than take them to a service center or specialists. Therefore, we have compiled step-by-step instructions about the capabilities and features of disassembling digital gadgets from this company.
Analysis of the algorithm
In the most general case, we simply find a place where we can insert a plastic card. Usually this place is located near the volume buttons. We need to carefully, prying up the edge, detach the front and back parts of the tablet, releasing the fastenings. Sometimes you can use a pick instead of a card.
With this method of opening the case, nothing will be damaged; feel free to move the card along the case and the latches will open
But you need to be very careful - in many models, especially those made in China, manufacturers love to hide the bolt fasteners. Before starting work, be sure to make sure that there are none. Moderate force should be used. If the latch does not budge, check additionally to see if there are any fasteners in this place. Sometimes they can be disguised as stickers or under places that imitate part of the touchpad.
It doesn’t matter which manufacturer your tablet is from - Asus, Samsung, Lenovo or Prestigio - in all cases the algorithm of actions will be the same.
After you have managed to walk around the entire perimeter, do not rush to pull off the lid. First, make sure that there are no cables going to it; if there are, disconnect them if necessary.
The tablet is open, and we can begin the work we need - replacing the battery or any other parts, cleaning the device from dust.
How to remove the back cover of a Huawei tablet
Most modern media pads and tablet computers come with a solid body, which means it will be impossible to remove the rear cable without special tools. To open the gadget you will need:
- plastic card;
- screwdrivers;
- hair dryer;
- special vacuum suction cup.
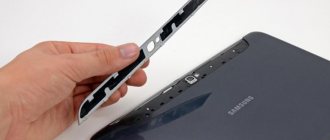
First, warm up the rear housing a little with a construction or regular hairdryer so that the sealant and glue become softer. However, do not turn on the hot air flow, as this will damage the parts and chips. When the train is warm enough, apply the suction cup sharply and firmly to its upper side. When you are sure that it is firmly connected to the surface, begin to gently pull it back. Next, we consider how to open a Huawei tablet:
- begin to smoothly pull the suction cup at an angle;
- when the upper corners begin to open, insert a plastic card or any other flat insert there that will prevent the parts from closing again;
- When opening, do not pull the cover, as cables and contacts are often attached to it.
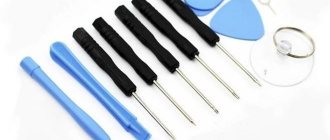
What you will need during disassembly
Screwdrivers
These are the most necessary things, since without them it is impossible to carefully open the tablet . You can, of course, use a knife. But then there is a high probability of damaging the screws. A set of screwdrivers is inexpensive. It can also be used to disassemble other devices.
Plastic spatula
It is required to detach the back cover and other elements . It is also convenient for disconnecting cables on the board.
If you don’t have such a spatula, it doesn’t matter.
Advice! An unnecessary plastic card can replace the spatula. It is advisable to grind one edge down on a whetstone. This will make it much more convenient to disassemble the tablet.
Soldering gun
This device is used for soldering small board components . It can also be used to separate the touch part of the screen, since in most cases it is glued with glue.
Thin knife
These tools are convenient for working with components that you could not separate with a regular knife. Its main advantage is its thin blade, because it can get to hard-to-reach places.
Wire cutters
When disassembling, you most likely will not need this tool. But in some cases, the manufacturer glues some parts so tightly that it is impossible to do without such a tool. Before using wire cutters, you should definitely think about whether you can later return the bitten off component to working condition.
Tweezers
We recommend picking up almost all small parts with tweezers , since, firstly, it is much more convenient than using your hands. Secondly, if you take the board components with your hands, sebum from your fingers will remain on them. Although this is not dangerous for all components, we still would not advise you to take risks.
Scotch
It will be useful to us already at the assembly stage, since some cables, microcontrollers, and touchscreens are glued with tape.
How to disassemble a tablet: general instructions
It is worth noting that to carry out such an operation you will need to arm yourself with special tools. They are quite easy to find in any electronics store or even in the market. Before disassembling the tablet, you need to prepare a set of thin screwdrivers, which includes a straight and Phillips screwdriver, as well as tweezers and a metal spatula. In some cases, you may also need a hex screwdriver, although such screws are not very often found on tablets, it is worth preparing it so that you do not have to look for it when the device is already at the disassembly stage.
How to open the tablet
First of all, when disassembling the tablet, the back cover is removed. After this, the main parts will appear in front of you: board, battery, etc. Now we will tell you how to properly dismantle the back cover.
Removing the cover
Many tablets have slots on the side for SIM cards and a flash drive. They are closed with special caps; they should be disconnected first. This is done to make it easier for us to remove the cover.
Next, you should unscrew all the screws located along the edges that secure the cover. Be sure to check the slots for flash drives and SIM cards . Often additional fixing screws are located in these places.
Important! We recommend placing the screws for attaching the lid into a plastic bottle cap. When you unscrew the tablet board, these screws need to be placed in another cover.
This is done so as not to confuse them. Because if you tighten other screws, you can damage the threads.
Removing the cover
Next, using a plastic spatula or card, you need to pry off the latches of the rear wall. To do this, place the tablet with the screen facing you. Then carefully insert the spatula into the gap between the body and the cover .
You need to insert the scapula until you hear a characteristic click.
Preliminary preparation
Before starting work, you must turn off the tablet and remove all SIM cards and USB drives from it. If this is not done, the cover may not come off or even break the cards or mounts. Pay attention to cleanliness - we will get inside the device and we don’t need excess dust, much less dirt, there.
You need to remove all SIM cards and USB drives from your computer device
We will need screwdrivers (most likely a Phillips head) and a plastic card (which you don't mind).
Disassembling the tablet
After removing the cover, further disassembly can be carried out. We will tell you how to disassemble the device.
Disabling loops and wires
- Carefully inspect all cables and connectors on the tablet’s motherboard. Pay special attention to the type of fastening, in this case, when disconnecting you will not damage the cable.
- Using tweezers, disconnect all cables from the motherboard. The easiest way to detach is the vibration motor, SIM card slots and flash drives, microphone, speakers, aux jack (for connecting headphones), and camera.
- If the cable is glued to the board, then first of all you need to warm it up with a soldering hair dryer so as not to damage it. A temperature of 60° will be sufficient . It is not necessary to warm it up too much, as some components are sensitive to high temperatures.
Attention! Be sure to record the order in which you disconnect components and cables. Then you can assemble the tablet in the correct order.
Disconnecting the battery
Unlike smartphones, the battery in tablets is almost always non-removable. It is connected using several wires. At the end there is usually a connector that connects to the motherboard.
- First, disconnect the battery connector from the motherboard. Only after this can you unscrew the battery mounting screws.
- If it is glued with double-sided tape, you will have to peel it off with your hands.
- The use of a soldering gun is not recommended. Since heating a battery is a rather dangerous activity.
Removing the motherboard
When you have disconnected all components and cables, then it is the turn of the main circuit - the motherboard. This is the main part, as it houses the processor, graphics accelerator, RAM and other important chips.
- Make sure all cables are disconnected. Then unscrew the screws securing the board. Now you can remove the motherboard.
- The main elements are protected by special steel plates. This is necessary to protect components from electromagnetic radiation. Some plates have heat-conducting paste applied on the reverse side. This is done to protect against overheating.
- Some manufacturers glue the plates with glue. This feature greatly complicates repairs. Therefore, if you do not need to replace the processor or RAM, then it is better to simply leave these plates alone .
Disconnecting the matrix and sensor
The tablet screen consists of a touch part, also called a touchscreen, and a matrix, thanks to which you see the image. These parts have to be changed most often. Since falling on the floor or careless handling causes cracks in these parts. The matrix and touch panel are removed as follows.
- Use a soldering hair dryer to heat the edges of the touchscreen to a temperature of approximately 80–90° to soften the glue.
- After this, slide a plastic card under the touch panel and carefully move it over the gluing areas. Now you can move the touchscreen to the side.
- Next, turn the tablet over and warm up the aluminum case where the matrix is attached.
- Use a plastic spatula to pry up the display and carefully remove it.
Attention! If the tablet's touchscreen or matrix is not damaged, then there is no need to disassemble them.
The fact is that when the touchscreen comes off, it will most likely crack. Plus, the glue that has melted from the temperature will spread across the panel, and you will have to clean it.
We hope that our article will help you when disassembling your tablet. We wish you success and may your tablet never break!
What is needed for disassembly
You will need a small Phillips screwdriver and a plastic card.
The plastic card does not leave marks on the plastic case during disassembly of the device if handled properly. It will also reduce the risk of damage to the board and wires.
Step-by-step process for disassembling the tablet
The tablet body is secured with two bolts and clips.
First, open the tablet cover. Remove all SIM cards.
Next, use a screwdriver to unscrew these two bolts on the body.
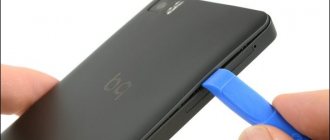
Now all that remains is to open the clips that hold the lid and body. Find the gap between the body and the cover. It is easier to find it near the USB connector. And first try to carefully pry the lid off with your fingernail.
Next, insert a plastic card into the resulting gap between the nail and the lid. Now you need to carefully walk the plastic card around the entire body so that all the clips open.
The tablet is open. Don't forget about the volume buttons. They may fly off the lid when opened.
What not to do after disassembly
Avoid touching the board while the battery is connected. If you need to disconnect any cable, first unsolder the battery wires from the board. Otherwise, due to static electricity, you risk damaging the tablet's chips.
Specifically, this tablet, which was shown in the article, has a problem with the battery. You can read more about this case in this article.
Post Views: 176
Some Important Tips
- Record each stage. This is important so that when assembling the tablet, you assemble everything in the correct sequence. You can photograph each step, make schematic drawings, or even film your actions.
- Sign each item removed. In order not to forget which removed module is responsible for what, put it on a small piece of paper and be sure to sign it. Then you definitely won't forget.
- Install components only for your device model. Many online stores sell components for various tablet models. Install only those that are designed specifically for your tablet, or are fully compatible with it.
- Find the module layout on your device. If you have never repaired a device yourself before, this step is mandatory. It will greatly simplify your task, since you will not have to guess what each of the modules looks like. Search on special forums; usually specialists post photographs of the insides of the tablet, signing the name of the components.
Reasons why the Huawei tablet does not turn on
The most important thing when a Huawei tablet does not charge or turn on is to correctly determine the reasons. Such diagnostics determine whether the problem can be corrected at home so that the gadget works properly again.
The following describes the most common reasons why a working device stops charging and turning on.
Out of charging
The most obvious and popular reason why the device does not turn on and does not respond to pressing is the battery is dead.
If the tablet computer was actively used and then not charged for several days in a row, then even the energy to turn on the device could be used up. Therefore, all you need to do is put the tablet on the charger for the whole day.
After this, you need to turn on the device by holding the power button. Before doing this, you need to disconnect it from the charger.
Sometimes this problem lies in the charger. There may be 2 options: the adapter itself does not work or the wire is damaged. Testing the entire charger is very simple.
To do this, connect the charger to another, already turned on, properly working gadget. If the energy is not replenished, then you should buy a new charger.
The battery has failed
Another fairly common cause is a broken battery. If the battery fails, then it can no longer receive energy from the charger and allocate it to the Huawei tablet.
You can tell that the problem is in the battery by looking at the convex back part. This effect often occurs in lithium-ion batteries on mobile devices running the Android operating system.
If your device has a removable back cover, then I advise you to remove the battery. If the case is solid, you need to disassemble it and remove the battery from below.
Replacing the battery is the only way out in this situation. I recommend buying original components that will last for many years and will not deteriorate over time.
Hardware failure
Hardware failures mean damage to the mechanical elements of a tablet computer. If there are serious mechanical defects, the integrity of the entire structure may be compromised, causing the Huawei tablet to stop turning on.
Hardware failure occurs if the gadget is dropped on a hard surface, or the power button is stuck. For example, when a mobile device is dropped, the screen cable often comes off.
Most problems related to components inside the device are resolved in qualified service centers.
I do not recommend disassembling the tablet yourself if you do not have the relevant experience. Otherwise, you may assemble the tablet incorrectly, completely ruining it.
Incorrectly installed operating system
The most serious system problem that cannot be solved even by resetting to the initial settings is an incorrectly installed operating system. This may be due to an incorrect installation process.
Also, the reason lies in an unsupported version of the operating system, or in the use of custom firmware. The only thing that will help in such a situation is flashing to a supported version of the official operating system.
Important! You should not use unofficial firmware and unsupported versions of operating systems.
Moisture getting inside the device
If moisture gets on some of the internal components of the tablet computer, this may cause them to burn, causing the device to stop turning on or begin to operate with significant malfunctions. Liquid can get in not only if it falls into water, but also if drops occur inside the case.
A similar effect of droplets occurs due to the fact that the device is used in a place with a high level of humidity.
This leads to “fogging” of the metal elements, and after the tablet is in a normal environment, moisture flows onto the boards and cables, causing them to burn out.
Screen problem
The problem with the display is explained by the fact that the tablet computer actually turns on, but this is not visible due to the broken screen.
The screen can fail for a number of reasons, be it a broken display cable or a damaged matrix due to a fall into water.
Unfortunately, this particular problem can only be diagnosed if the tablet makes an activation sound when turned on. Then the sound will come out even with the screen turned off, and then it is clear that it is necessary to solve the problem with the screen, and not with the fact that the device does not turn on.