Solution for Android versions 4.0 6.0
The sequence for solving this issue is different for certain operating systems. So today, a large number of mid-segment smartphones run on Android from version 4, as well as Android 5.1 and 6.0.
Android 4.0, 4.1 and 4.2 allow you to configure saving files to an SD card without having superuser rights. You just need to go to “Settings”, enter the “Memory” submenu and specify there the installed memory card as the default resource for saving data.
To carry out the task, go to “Applications”, select the one you need and indicate the path each time - “Transfer to SD”. But not all applications, especially system ones, will “listen” to you, because to transfer data to Android from 4.4 and higher you will need to obtain Root rights.
The most famous of them are Framaroot and Kingo Android Root. But with full access to your files, you suffer some costs when obtaining Root rights: you lose your rights to warranty service for the device, updates do not come by themselves over the air, and unknowingly you can damage the system by accidentally deleting important files.
What is necessary
Installing a flash drive does not require much time or special knowledge. Even an inexperienced user of mobile gadgets can cope with this task. The proposed installation options can be practiced not only on gadgets from Huawei, but also on others running on Android. Before starting the process, make sure you have the following items on hand:
- 10th grade card and above;
- downloaded and installed Activity Launcher on your smartphone or tablet.
If you buy a card that is of a class lower than 10, then there is a chance that it will not work correctly. Especially if you play heavy games. You can download a special application from the Play Market or trusted third-party sources. To activate the PC transfer method, make sure that:
- I have a PC with pre-installed drivers;
- SD-drive class 10 and higher;
- Activity Launcher is installed.
To check for drivers, use HiSuit. If the smartphone is detected by the program, then there is no need to install drivers.
SMS messages are not sent or received to Huawei and Honor: reasons, what to do?
How to install applications on a memory card for Android 4.4.2 KitKat
Due to the fact that Google, the developer of the Android OS, has changed the application protection algorithms in the new version of its Android 4.4.2 operating system, some device models may experience problems transferring installed applications to a flash card. Some developers of applications for mobile devices with the Android 4.4.2 operating system are concerned about solving this problem by promptly preparing updates to their programs that can bypass this problem. Also, some manufacturers have solved this problem in firmware updates for their devices, as, for example, Sony did for the Xperia T2 Ultra and Xperia T2 Ultra Dual models. For those who want to be able to write programs to an SD card on Android 4.4.2, but this is not provided by standard capabilities, there is the SDFix: KitKat Writable MicroSD application, which can do all this, and is also free
Please note: you will also need root rights for it to work. Working with the program is very simple:
We hope that the instructions we provided for transferring user programs to a flash card will be useful to you, and your applications will find their place on the memory card of your phone or tablet, freeing up valuable space on your device. Be careful when performing operations with a memory card and always back up your data before you start doing anything with your phone. Good luck!
Using Third Party Applications
You can force your smartphone to transfer applications faster through AppMgr Pro III.
Download the application from the Google Market, clear the application cache automatically and perform other manipulations. The program divides applications into three characteristics: those stored on the SD card, those stored on the phone, and those that are moved. The latter can be broadcast to an external card. You can even click “transfer everything” right away - quickly and conveniently.
An alternative is the Link2SD program, which works with OS from 4.4. It creates separate libraries on the card, transferring applications partially. But be careful here too - do not touch system files.
Lack of Visual C and Direct X required version
The next common reason why programs are not installed is the lack of Visual C++ and Direct X components. Visual C++ is necessary for programs written in the popular C++ language, and Direct X is required for most games. As with the NET Framework, there are different versions of these components.
You can find out the version of Visual C++ in the same way as the NET Framework - in the “Programs and Features” section.
And in order to find out the version of Direct X, click “Start” and open “Run” (or ctrl + R). Write down the dxdiag command and click OK.
As a rule, if the program does not install due to the absence of these components or their correct version, a corresponding message appears. The required versions of Visual C++ can be downloaded, and Direct X.
Using system capabilities
When purchasing a phone or tablet, you must immediately purchase a memory card. By default, all information is downloaded directly to the internal drive, but through the settings you can easily arrange for automatic saving of photos, videos and music to an external card, the permissible volume of which largely depends on the resolution of the operating programs of the gadget itself.
Not all devices are designed to accommodate storage larger than 128 GB, so you should carefully read the phone's instructions before making a purchase. In this case, the internal storage will be open for applications, but its volume may not be enough for a large number of desirable games that become “heavier” as manufacturers improve them, and necessary utilities that make work and life easier.
Much depends on the modification of the gadget; sometimes such a simple method is available on highly equipped devices. First of all, you need to check whether you can get by with simple steps:
- indicate the path to save information to removable media when downloading from the Internet;
- download the utilities installed there from the internal card to the sd by logging into it through the “application management” tab;
- download the necessary software onto a USB flash drive via a computer and save it to the gadget’s external storage device via USB.
Actions for Android versions 5.0 inclusive
In older versions of the system, it is quite easy to understand the sequence of actions and free up internal memory, improving the speed of the gadget. To do this, just enter the main settings and go to the application tab, then select the “transfer to SD storage” option. The program itself will transfer the information.
Additional data storage, such as “gallery”, “music” and applications for reading e-books, after saving to external media, will automatically upload information to the SD card without additional settings. Thus, the internal storage will be freer, which will improve the speed of the device as a whole.
It is worth considering that the features of certain games and programs sometimes make it impossible to transfer them to an external drive. That's why the manufacturer's built-in programs are not installed on the SD, and their forced transfer can disrupt the processes inside the gadget. The operating system always warns about this possibility, so you should not be afraid of making a mistake.
Saving applications to an Android memory card from 4.2 to 5 inclusive is quite simple if you follow the following algorithm:
- Go to the “applications” tab and select the “downloads” section, where all previously installed software is located.
- Select the program to transfer from the list and click on it.
- Check data access and required amount of memory.
- Click the “record to SD” section, if provided.
Combining external and internal
Installing an application on an Android memory card from the fifth version and higher will require additional steps, since the system itself is designed differently than in older versions, but there is a new utility - Adoptable Storage, which allows you to combine internal and external drives into a single database.
When this function is activated, the gadget system itself will calculate the total amount of memory based on the storage parameters and display it on the display. In order to use the utility, you need to do the following:
- format the SD card and copy existing data from it, if it has been used previously;
- insert it into the device, and after the signal about the appearance of a new memory device, click on “set up” (installation);
- select from the menu options “use as internal storage” (use as internal storage);
- wait for the process to complete, which may take a long time, but upon completion, new information will by default go to the removable SD, despite merging the storage media.
Sometimes you urgently need to free up RAM and reset all applications, videos, music, photos to a removable disk. This is done in a few simple steps:
- through “settings” go to the storage (“storage”);
- scroll down the page until it says “transfer data to SD card”;
- confirm your desire and allow the system to complete the process.
Using Third Party Applications
A special application, AppMgr Pro III, will help speed up the transfer process. You can download it for free in the official Play Store application store. This program has wide functionality, while allowing you to perform various manipulations with programs, as well as clear the application cache.
In the program itself, you will see three main sections: “roamable”, “on SD card” and “on phone”. If you have applications in the “movable” block, this means that moving these programs is possible.
To carry out the transfer, you must:
The program interface also includes a "transfer all" function. So in a couple of clicks you will transfer all possible programs. After these steps, all shortcuts to the moved applications will appear in the second section “on the SD card”.
An alternative program (in particular for devices with OS version 4.4 or higher) can be Link2SD. Its main feature is that it can move programs not only completely, but also partially. This means that you can install individual libraries on the memory card. However, for it to work fully you will need superuser rights. The program is installed in one file, there are no copies, and there is no need to install anything.
Link2SD has more than ten million downloads, as well as an overall user rating above 4 points.
To use this application, you need to follow the steps of the following instructions sequentially:
Be careful, since with its help you can even transfer some system applications, the memory card becomes an integral part of the memory of your gadget. Saving key data during updating, as well as loading will be carried out from the SD card. Extraction can lead to the most unfavorable consequences, ranging from partial failure of some programs to inoperability of the entire Android system.
Dalvik cache
Dalvik is a virtual machine that is used by Android devices to optimize applications. It also accumulates cache over time, stored in a hidden section of the smartphone’s memory. To remove Dalvik cache you need to follow these steps (not available on all Android gadgets):
Turn off the phone and start it in Recovery Mode. To do this, you need to hold down the power button and volume control at the same time.
In the Recovery menu, select “Wipe cache partition”. Control in this mode is carried out with the volume keys and the power button.
Go to the “Advanced Options” section. Click “Wipe Dalvik Cache”.
Restart your smartphone in normal mode.
Default SD card destination without programs
This method will not work on all devices, so we cannot fully guarantee its relevance for your phone. It is also not recommended for beginners to perform this operation, as it can cause harm to the entire system.
- For our work, we only need a file manager, and it is best to use Root Explorer or any other for this purpose that allows you to see all root directories and files;
- Open Root Explorer and go to the system section, then find the etc directory;
Transfer via Link2SD
This is needed when the phone does not support transfer to an SD card. Apps2SD is a popular app for this purpose, as is FolderMount, but both require root access.
We will look at Link2SD, which can work both with and without root rights. And it can be used not only for mass transfer to a flash drive, but also forcibly (even when it is prohibited by the system).
Launch Link2SD and give it root permission if your phone is rooted. Then select the app you want to transfer and select the Link to SD Card option.
The Link to SD Card (Data and Cache) option transfers application data and their cache, but requires root rights. To transfer more than one application at once, click the menu button in the top right corner and select Multi-select. Now tap on all the apps you want to transfer, go to the menu again and select the option you want: Link to SD card or Move to SD card.
The Move to SD Card option does not require root access, but it will only work if your phone supports the transfer to external storage feature. If you have root rights, you can forcefully transfer applications that did not initially allow this. But some of them may stop working after this.
You can get even more space using .
Using the AppMgr III utility
If you are disappointed with the operating system or you are going to move a large number of applications, we recommend that you try using the AppMgr III utility. In addition to everything, she can:
- Notify when application installation is complete;
- Sort programs by their current location;
- Hide pre-installed applications in the menu;
- Clear cache at the click of a button.
The utility also automatically determines whether a particular application supports transfer to a memory card. Phone only” icon will appear next to it
».
Moving an Android application to a memory card using AppMgr III is not difficult. No instructions are required for these purposes - the utility itself will carefully tell you everything.
The phone does not see the memory card
There are several reasons why the phone does not recognize the card:
- Lost contacts is the first reason. Simply remove and reinsert the SD card.
- Sectors are damaged. What to do in this case? Format the memory card.
- The reason is a block in the phone's security system. The service center can help you remove it.
- The service center will tell you if something inside the phone is not going well, and will help you fix this element, returning the device to a responsive “dialogue” with the memory card.
- Incompatible card. All you have to do is replace the card, carefully reading the instructions about the compatibility of your device.
When the device detects the presence of the card, you can try to transfer programs to it according to the instructions above. And the unloaded system memory will serve you uninterruptedly, save applications, videos and photos to your smartphone and will not bother you with unpleasant notifications when downloading new applications from the Google Store.
I hope we have provided you with real help and are happy to continue talking about the intricacies of modern devices. Also visit us with your friends in the VK group, on Facebook, on Twitter, as well as on the YouTube channel.
UpDron.ru was with you
Bye!
Increase Android memory with a MicroSD memory cardAndroid 5.1 and later
From version Android 5.1 and later, it became possible to increase the system memory on Android using a memory card. There are 2 ways to do this!
Method 1 - Through the menu
- Back up data from SD card to computer
- Go to the Android Settings menu and then “Storage and USB storage” or “Drives”
- Select “SD card” (you may need to go to the “Advanced” subsection)
- Go to the advanced settings menu and select "Settings" or "Storage"
- In the new window, select "Internal memory" or "Connect to internal memory"
- Read the information that after changing the memory, the SD card will be formatted and click the “Clear and format” button.
If after formatting you receive the message “SD card is slow,” then you need to select a faster memory card - When formatting is complete, you must transfer the data by selecting “Transfer now” and click “Next”
- After completing all actions, restart Android to avoid errors in the operating system.
How to return the work of an SD card from internal back to external memory
- Back up data from SD card to computer
- Go to the Android Settings menu and then Storage and USB Drives
- Select "SD card"
- Select "Portable media"
Method 2 - Through the terminal
If your manufacturer has not included a feature to combine Android internal memory with a memory card, then you can use the adb developer utility.
- Download adb
- Enable USB Debugging
- At the command prompt, enter several commands
- adb shell sm list-disks - to find out the memory card ID
- adb shell sm partition disk:NNN,NN private - command to create shared memory (instead of NNN,NN identifier value)
You can also use the ADB RUN program which can combine memory - Other command > SD Card Internal Memory.
Compatibility
Before installing a game with a cache on your tablet, be sure to check the hardware compatibility on the manufacturer’s official website. If there is no such information, do not despair: it is quite possible that everything will work out. But if the manufacturer’s website says that a particular game definitely won’t launch, it’s unlikely that anything can be done.
Please note that pirated games often come with cache, since when you download the application from the official resource, all the required content will be included in the package. So no one can guarantee the functionality of such a program. Please keep this in mind if the game behaves inappropriately after installation.
So how to install a game with cache? Let's figure it out, and we should start with the simplest method.
Stream music and movies
If you have a really large music library, you don't necessarily need to store it on your device. Services like Google Play Music and Amazon Music can store a large amount of music files and stream it to you whenever you want.
Five full-length films in HD quality can take up 15 gigabytes or more of memory. A dozen 1-2 minute videos you shoot will add a couple more gigabytes to this. So it is not practical to store all this on your gadget.
If you purchased a movie using Google Play or Amazon, then they can always be found in the cloud services of these companies. Don’t forget about services where you can watch videos online, without having to download them to your tablet or smartphone.
How to clean your device of unnecessary debris
By following the above steps, you can make significant progress in the process of clearing your memory. Once you have set the correct settings, you most likely will not have to do all the steps again from time to time. But you will have to use information on how to free up internal memory on Android by removing garbage often. So, by installing a special application (for example, Clean Master), you can make the cleaning process quick and easy.
The so-called garbage in the device, which occurs through the accumulation of cached data from the Internet, browser history, and applications, is a very common phenomenon. Periodic cleaning allows you to increase the free space on your device and speed up all actions.
If we look at cleaning a device from debris using the example of the most optimal and convenient Clean Master program, then there will be no difficulties in using it. You just need to select the “garbage” option and click “clean”. The application, conducting an in-depth analysis, makes sure to specify which files should not be deleted.
Transferring files from the device's internal memory to a flash drive
To free up space, transfer data from internal memory to a USB flash drive. To do this, go to the “Files” folder and select the subfolder of interest (photos, videos, documents, etc.). Tap and hold a file for a second until it is highlighted. Select one by one all the photos/videos/audios that you want to transfer to another location or click “Select all” if there is such an option. Click the Move button. In a new window, select “Memory card”, and then select a specific folder. Please wait until the data transfer is completed. Repeat the same procedure with the rest of the information.
Problems with the memory card
First you need to make sure that the memory card itself is working and can accept files. We perform the following algorithm of actions:
- You need to check that there is free space on the external drive. Open the “Memory” menu in the phone settings or connect the device to the computer.
- If there is free space, but nothing can be written to it, check the file system of the memory card. MicroSD for Android should be formatted in FAT32. This can be done on your laptop/computer or directly in the gadget.
- Now you can make sure that the drive’s hardware is working properly. If another card with an identical file system and parameters works without errors, then you need to look for the reason in the media itself.
Increase
MicroSD may be incompatible with the Android device, for example, it exceeds the volume that is allowed for a certain product model. When the flash drive is larger than the memory capacity (32, 64, 128, etc.), it simply will not be recognized, since it is not programmed for such a capacity. In this case, the only solution is to use another microSD media with a smaller capacity.
If no card is detected, then it makes sense to visit a service center. There is a possibility that the gadget has hardware problems that prevent it from working with such an external drive.
How to transfer files directly to your device
To transfer pictures, music and videos directly to the device, it is better to use a file manager. The ES conductor is simple and reliable to use. The main function of the manager is precisely to work with folders and files. This file manager is very lightweight, does not take up the already small amount of memory, and is convenient.
To transfer the necessary data, you need to select it with one long press. When choosing the “move” action, click on “SD-card”. The advantage of this file manager is that the menu allows you to immediately create new folders for transferring files.
Methods for installing programs
By default, Android games and applications are installed on the built-in storage of your smartphone, which may be too small. If you have an SD, you can make sure that some programs are installed there by default, thereby freeing up space for more information. Under certain conditions, you can transfer almost any installed program to a removable flash drive.
How to install an application on an Android SD card? There are several different ways to carry out this operation. The correct method depends on the operating system version and the data you want to move. In the settings of Android 6.0 Marshmallow, you can adapt the SD as built-in memory, automatically installing allowed games and software on the removable drive.
The fact that it is already installed with me is immediately recognized, so double installation is avoided. Of course, for me, as a guide, the advantage of a smartphone is, on the one hand, to receive updated weather reports on a location or train, as well as find accommodation, and secondly, the ability to use such universal genius for navigation as well.
Methods for installing programs
In addition to a route description with photographs from the route, cyclists can also access a profile of the hill and check out literature, points of interest and suitable train stations. Additionally, location cannot be set individually for specific apps, but only across all apps in the store. But who doesn't want to install a game that can take up storage space?
Some smartphones without a new operating system allow you to move an application to the memory card manually, but only if the developer allows it. An alternative way to transfer programs is to use the Link2SD application.
That's why you can only transfer applications to an external flash drive if absolutely necessary. It is recommended, whenever possible, to use this method for programs that do not require high speed for normal operation.
Migrating an application using built-in tools
If you are thinking about how to transfer applications to an Android memory card, then we hasten to provide you with the answer to this question. Follow these steps:
Step 1.
Go to the "
Settings
" section.
Step 2.
Select "
Applications
".
Step 3.
Click on the program or game you want to move to the SD card.
On Samsung smartphones, before this you will have to take an intermediate step in the form of going to the “ Application Manager
”.
Step 4.
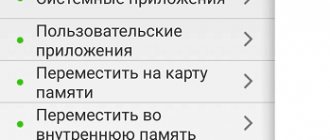
If the “
Move to SD card
” button is active, then click it. If not, then it is impossible to move this application using the built-in Android tools. In some versions of the operating system, the card may be called a USB drive.