Maxim Zhukov 07/14/2021
7652
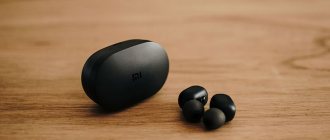
Let's figure out how to synchronize the headphones with each other so that both, left and right, are connected. This instruction answers the question, what to do if one of the TWS headphones stops connecting to the second one or to the phone? The three steps below will help you connect both headphones to your smartphone or computer. Synchronizing two headphones will take 3 minutes.
The instructions are relevant for Airpods, Samsung, Redmi Airpods, Honor and other TWS models.
ℹ️ Synchronizing headphones (how to connect both headphones) – 3 steps:
- We put the headphones in the case.
- Unpair the headphones with all nearby devices.
- Reset the headphones to factory settings.
- If you do not need to restore the pairing of the headphones with each other, but want to learn how to properly connect the headphones to the phone, read our special instructions.
- If you are interested in exactly how to connect a second earphone, first of all make sure that it is charged and works in principle - look at the indication on it.
- And if you just want to connect the left earphone separately, go directly below.
How to connect 2 headphones (sync) - video
Why do headphones work separately on one ear and what should I do?
To begin with, it’s worth saying that many headphone models have a separate operating mode. That is, when you do not use two modules at once, but one at a time. The mono function on the headphones can be forced to enable sound to only one ear. But the loss of communication between them sometimes happens spontaneously.
The moment you take one of the headphones out of the case and it doesn’t find a pair, in some cases automatic desynchronization occurs.
That is, they stop seeing each other, do not pair and connect to the phone only separately - either the “right ear” or the left one does not work. Moreover, if you now take out the second earphone, then in the list of devices available for connection via Bluetooth on the screen of your smartphone you will see two devices with the same name.
Sometimes it happens that after the model name there is also a letter "R" or "L" indicating left or right. Note that this happens on both Android and iPhone smartphones.
Accordingly, you can connect either one earphone or the other, but not both. So what's now?
Disassembling and repairing the plug
A faulty plug is detected by kneading the incoming wire with your fingers. The headphones are connected to a mobile phone or computer, play a music file, and then begin diagnostics.
Typically, copper strands break at the entrance to the rubber or plastic casing of the plug and inside it. If, while kneading the cable, sound appears in the speakers from time to time, it means that the plug needs to be disassembled and repaired.
Recommendations: How to fix headphones yourself if one stops working
, The earphone does not work: fault diagnosis, repair methods
, DIY headphone repair
The plug restoration procedure consists of the following steps:
The plug is cut off with pliers from the headphone cable.
The purpose of the repair is to remove the metal part from the casing. The element is firmly soldered. Trying to save the old casing is unwise. It's easier to cut it lengthwise with a sharp knife.
The metal part of the plug is carefully removed from the casing so that the contacts do not break off. Soldered wires should also be saved. The color of the insulation makes it clearer where to solder the wires of the headphone cable.
In the event of a break in the wires from the contacts on the solder itself, the standard circuit shown in the photo is used for connection. The color of the insulation in the headset cable varies from manufacturer to manufacturer. Most often, the common core is in black or yellow insulation. To be sure, it is better to ring the tester from the speakers to the place where the cable is cut.
The headphones can be equipped with a microphone. In such models, instead of three, four wires are hidden under the cable braid. The connection occurs according to a different scheme, shown in the photo.
The cable cut off from the plug is stripped. First, remove the main braid and free the ends of the cores. The edges of thin wires are cleaned with a sharp knife. It is enough to remove 5 mm of the insulation length so that it is enough to solder the copper core to the plug contact.
The wires are twisted from thin veins, and they are all coated with a protective varnish. This coating prevents soldering. The varnish is removed by scraping with a knife or burned with fire from a lighter. The ends of pure copper wires must be tinned. The common wire will be connected at one contact, so it is immediately soldered together.
A new housing for the plug is made from the bottom cap of a ballpoint pen. The wire is inserted through the hole for the writing rod. The put on cap is moved along the cable further from the soldering point.
Following the cap, a piece of heat-shrinkable tubing is placed on the wire. The sleeve will protect the wire near the new plug casing from breaking.
The cable cores are soldered to the plug contacts. It is important not to forget about matching the wires to the color of the insulation. Functionality is checked by calling a tester. It’s easier to plug the plug into the connector of your mobile phone or computer.
If both headphones work normally, put heat-shrink tubing on the plug contacts. It is heated with the fire of a lighter. The tube will fit tightly around the plug contacts. To be safe, you can press it with your fingers while the plastic is hot.
Finally, the inside of the cap is lubricated with epoxy resin. A little glue is applied to the heat shrink tube. The cap is moved along the cable until the back of the plug is completely inserted into it up to the limiter. After a day, the resin will harden and the headphones can be used.
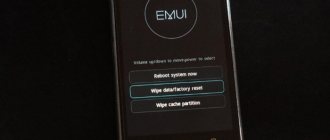
How to reset wireless TWS headphones to factory settings?
That's right, you need to first reset the TWS headphones to factory settings. So that they forget that they once worked in single mode.
By the way, a reset often helps fix the error when the headphones do not turn off in the case.
- To do this, remove the headphones from the phone using the “Forget device” button.
- Then simultaneously press the function buttons on them or hold your finger on the sensor for about 5 seconds. The headphones will first light up, usually with red lights, and then turn off.
- Next, we repeat the action, but press the buttons for 10-15 seconds. First, they will turn on with a characteristic sound from the speakers. We don’t let go and continue to hold our fingers on the sensor or press the buttons until two double beeps sound with a short break.
- Then all the indications will go out and the headphones will turn off again—put them back into the case. This is enough for the settings to be erased and returned to factory settings.
You can also pay attention to the light indication. As a rule, at this moment the lights will blink - red and blue or red + white or only one color depending on the model.
Summarizing the results.
At the beginning of the repair, I didn’t think that I couldn’t fix the headset with my own hands. But it turned out that this is quite possible with little experience in electronics repair, only with basic soldering skills. My daughter was glad that she could listen to music wirelessly again, and I received an additional skill in self-repair and a small plus in my karma.
It is significant that neither the left nor the right earbuds work. That is, the same manufacturing defect is present in both places. Over time, this leads to guaranteed failure of the device, because Shaking during operation will be present in any case.
The manufacturer of the Meizu Pop wireless headset did not bother to secure the battery in the case, which is why almost all breakdowns occur in this model. Over time, a dangling battery simply tears the tracks with contacts from the PCB. It was also possible to make the battery contacts flexible to compensate for vibration.
We also saved money on attaching the holding magnets in the docking station body. They were poorly glued to their seats. Here, too, minimal costs were required in order to avoid this problem in principle.
Sources
- https://sesaga.ru/remont-naushnikov-s-mikrofonom-dopolnenie.html
- https://tehno.guru/ru/kak-pochinit-naushniki/
- https://1bluetooth.ru/blyutuz-naushnik/kak-pochinit-svoimi-rukami
- https://tehnomuza.ru/cifrovaya/naushniki/remont-naushnikov-meizu-pop/
- https://audiogeek.ru/remont-naushnikov-bez-payalnika/
- https://reedr.ru/elektronika/kak-razobrat-naushniki/
How to sync wireless headphones via Bluetooth?
Now, in order for TWS headphones to be paired with a phone via Bluetooth again, not one at a time, but together, they will need to be synchronized again. To do this, take them out of the case and turn them on - again, both LEDs (blue and red or white and red) will blink.
There is one important point to consider here. The fact is that in TWS headphones, most often one is the master and the other is the slave. That is, the main one connects to the smartphone, and the second one connects through it. Therefore, the first thing you need to take out of the case is the headphone that is the main one. If you do the opposite, then the secondary one can connect to the phone before the main one, and then they can no longer be synchronized and they can only work one at a time
In some models, activation occurs automatically. In others, you need to press the button or sensor on each of them once to turn it on. After 5 seconds, the double indication on one of them will go out and will remain only on the main one, which will directly connect to the smartphone.
What is your opinion: is WiFi harmful?
Yes
22.93%
No
77.07%
Voted: 31412
If automatic synchronization via Bluetooth does not occur, then we repeat all the steps to reset the settings again from the very beginning. It happens that this has to be done 2 or 3 times.
That's it - your wireless headphones are now paired again and ready to go. With very rare exceptions, this instruction works the same for all models and types - both in-ear and earbuds “a la AirPods”.
Please note that if the wireless headset does not charge in the case, resetting will not help. We need to look for another reason.
There are also rarer cases when out of the box the headphones work one at a time and do not see each other. This is also due to the fact that when such models are launched for the first time, one of the modules must be designated as the main one. I came across these in CG Pods from CaseGuru. After turning them on, you need to assign a leader to them with a short tap on the sensor, after which they will connect to each other.
If you have any other experience, then share it in the comments.
Reasons for lack of pairing
Sometimes it happens that the headphones do not pair with each other or with a smartphone. There may be several reasons for the problem:
- one or both earbuds are discharged;
- the Bluetooth module can be disabled on one wireless earphone or both elements; some models have buttons to enable it;
- desynchronization of sound reproduction is caused by incorrect synchronization;
- elements are located far from each other;
- interference from a nearby powerful Wi-Fi router;
- obstacle from the settings curves left over from the previous failure.
Step-by-step instructions for resetting and pairing
- Delete wireless headphones from your smartphone's memory
- Press the button or sensor on each of them and hold for 5 seconds until the red indicators light up and go out and the headphones turn off
Press the button again and hold for 10-15 seconds until the LEDs start flashing and go out. At the same time, two beeps will sound from the speaker.
- Place both modules in the case
- Remove and, if necessary, briefly press the function key or touchpad to turn on
- Wait for TWS headphones to sync
Now you can use them in pairs, use them to switch tracks and adjust the music volume.
Repair of in-ear headphones
Wired in-ear headphones are very popular these days. Low price, small size and acceptable sound quality make them indispensable for use in headphones for mobile devices.
Because headphones are used on the go, the wires are constantly bent and then frayed after a while, usually at the phone input, rarely at the jack.
The location of the wire break is usually obvious; the sound in one of the phones begins to disappear from time to time when the wire is moved. In this case, even without instruments, it becomes clear where the wire wear is occurring. Here is an example of self-repairing HTC headphones in a channel.
In this headset, the wire at the input of one of the phones wears out. To fix it, you need to open the case. To do this, insert the blade of a knife into the space between the body halves and twist it slightly to separate the halves.
Typically, the phone halves fit together tightly, thanks to a groove at one end and a raised shoulder at the other, so they pull apart smoothly.
After disassembling the phone, it was clear that one of the pairs of wires was broken, and some of the wires in the second wire were also broken. Considering that the wire at the entrance to the earphone is also worn out, it is necessary to remove all the unusable part.
So the wires were released from the phone, the cable was cut a couple of inches and the wires were stripped of their insulation. The mounting bracket was then removed and crimped onto the cable in its new position. The position was chosen based on the fact that when pulling the cable, the soldered conductors would have poor pull.
What remains is tin and solder, observing polarity, wires to the headphone transmitter. The pliers were used as a third hand. The handles of the pliers were equipped with rubber bands, which provided easy clamping of the phone.
All that remains is to put the halves together and test the headset in action. During the repair, I also resoldered the wires of the second headset, since they will fail in the near future.
Color wiring of wires
The cable coming from the plug contains several wires of different colors. High-quality cables use tinsel, in which thin wires are braided with nylon or linen wire, which increases the mechanical strength when stretching and bending the wire.
There is no international standard for color-coded wires. Therefore, manufacturers solder wires to the connector pins in accordance with their internal documentation.
But from practice we can conclude that ordinary GND wire is not painted by all manufacturers and has the color of copper coated with insulating paint.
HOURHow to fix left or right AirPods stop working: 6 ways.
Clean and charge your AirPods.
The most common problem with AirPods is that particles of dust or debris get caught between the AirPods and the charging contact of the case. When this happens, you may find that your left or right AirPod stops working because they can't charge.
Additionally, neglecting to clean your AirPods and the AirPods case can also cause long-term degradation in the quality of sound output from any of the AirPod speakers.
Why? The thing is, the longer you leave it uncleaned, the harder it will be to remove the debris. Try a three-day cleaning routine for your AirPods.
The best method, which we often recommend to our readers in all of our AirPods and AirPods Pro guides, is to first use a microfiber cloth to clean the AirPods and charging case, then move on to using Q-tips to clean out the crevices.
There are special Q-tips designed just for cleaning AirPods and their speaker grills that you can pick up on Amazon for $9 or so, although almost any clean, unused Q-tips will do. A Q-tip is best used for hard-to-reach areas inside the AirPods speaker grilles. Do the same with the charging case and make sure the charging contacts are clean. Again, be careful and patient when trying to clean your AirPods.
If you still see tiny particles of dirt, you can blow them off. Just make sure the air you blow is dry to avoid short circuiting during charging. Just remember to dry it before starting the charging process.
Once you have successfully charged your AirPods, try testing both AirPods and see if they work as intended.
SUCCESS IN THIS.
One of the most effective methods that helped users in our previous guides when repairing AirPods is to “suck” the largest speaker of a faulty AirPod.
This method has been helpful as it helps remove any debris such as earwax that may be stuck, which prevents sound from emanating and hence why you might find your left or right AirPod stopping working.
Here's a great video on how to do it:
Since you're sucking on a faulty AirPod, we recommend keeping a thin microfiber cloth between them. Also use a microfiber cloth to wipe down your AirPod every time you suck on it.
Check your Bluetooth settings.
In cases where the double tap feature on AirPods is not working, be sure to check the settings on your iPad or iPhone. The Double Tap feature setting is likely not configured correctly and may need to be reassigned to your desired AirPod.
You will need to open your device's Settings app, then go to the Bluetooth option. In the list of Bluetooth devices, find your AirPods and click the icon. On the AirPods settings page, under Double-tap AirPod, you can assign functions to both the left and right AirPods.
After this process, you will be able to use the features using the correct AirPod. This will also restore corrupted settings for your AirPods.
Incorrect stereo settings.
Your AirPods have settings to adjust and separate the audio output to the left or right AirPod.
For some listeners, they may prefer the sound to be louder on the right than on the left, while for others it may be the opposite.
The problem occurs when this setting is configured with unbalanced settings. When this happens, you will hear louder sound from the other speaker compared to the other. Sometimes you may only hear your left AirPod or right AirPod but not the other one as the AirPod will seem to stop working.
Here's how you can ensure the proper level of balance between your left and right AirPods:
- Go ahead and open Settings on your iPhone, iPad or iPod Touch.
- Then tap the General option and then tap on Accessibility.
- Now scroll down and make sure the Mono audio option is disabled.
- Finally, find the Hearing section and make sure the L and speaker indicators are centered to balance the volume of the left and right headphones.
Again, try opening an app like Spotify or Apple Music and try playing the song. Listen and determine if there is any improvement in the volume and sound produced by both AirPods.
Reboot your device.
Most devices such as iPhone or iPad may experience various software glitches and glitches if they have been running for a very long time without a hard reset. This is a common problem with Windows 10 PCs and Apple Mac systems that we've covered previously in our previous articles, and readers have found that simply restarting the device fixes most of the problems they've encountered.
Understanding why this happens is that your device's cache acts as a backup for all the tasks and processes that you perform on your device. When you don't reboot your device for a long time, it never gets a chance to reset its cache and hence turns into this bloated pile of clutter. This explains why even if you changed the settings from Methods 3 and 4 (see above) that you still find that the AirPods are not working.
Here's how to restart your iPhone or iPad:
- First, go to Settings.
- Then find and tap General, then tap Problem.
- Finally, wait a few seconds and then turn your Apple device back on.
Alternatively, you can also try to force restart your iPhone, iPad, or iPod Touch. By completing this process, you have updated your device and downloaded new settings.
Headphone connections i7, i9s, i10, i11, i12 TWS
In the wake of the popularity of Apple's AirPods, one of the Chinese companies has released a range of standard wireless headphones with a similar design. Using the i7 TWS as an example, let's look at how to connect them.
- Take the two headphones out of the case and hold down the control buttons until they light up red and blue.
- Double-click the key on one of the plugs to make it the main one.
- Turn on Bluetooth on your smartphone or other device to connect.
- Find headphones in the list of available devices and click on them once to create a connection.
- After syncing with the new device, the indicators on the headphones will begin to blink. When the flickering stops, the headset is ready to use.
Note! When you place the i9s, i10, i11 and i12 TWS models in the case, you will need to turn them off by pressing the key on the case 2 times.
Possible reasons why the headphones do not turn on or are unstable:
- if you use other TWS headsets, may ignore i7 and other models. Check the paired headset in the Bluetooth connection settings;
- Connection breaks, intermittent music playback and limited range are caused by an incompatible version of Bluetooth. This is true for outdated smartphones, music players and laptops. The version of the wireless interface must be the same or higher for the device to which the plugs are connected;
- Check the charge level of the case and earbuds. When the battery reserve is around 5%, they can automatically turn off;
- Some devices have automatic blocking of new Bluetooth devices. Disable it and try creating a new connection.
Sources
- https://wifika.ru/podklyuchit-naushnik-k-naushniku.html
- https://sdelaicomp.ru/nastrojka-sistemy/kak-sinxronizirovat-besprovodnye-naushniki-mezhdu-soboj.html
- https://andapps.ru/androidsecret/kak-podklyuchit-oba-naushnika-tws-garnitury
- https://www.orgtech.info/sinhronizaciya-naushnikov-tws/