Mobile devices have already become quite an integral part of our lives. Now a person cannot imagine existence without a smartphone or tablet. Devices based on the Android operating system are extremely popular. This OS was developed by Google, and now its market share is incredibly high. Apple's iOS and Windows Phone have a negligible presence in mobile markets compared to Android. However, like all technology, devices on this platform tend to glitch. Various system failures are a hallmark of any operating system. No matter how advanced it may be. Very often devices have to be reflashed. But not everyone knows that it is possible to do without such radical measures. After all, any Android gadget has Android System Recovery 3e. How to use it and what is it even? This is what we will talk about.
What kind of animal is this?
What does Android System Recovery 3e mean? This is a kind of BIOS of a mobile device. Any operating system has its own BIOS - a basic input/output system that can work even if the main OS is damaged. Sometimes the BIOS is different from the standard one (as, for example, in Android devices). It is used to restore the functionality of a smartphone or tablet, apply critical updates or reset to factory settings. The Android System Recovery 3e menu has many items that correspond to one or another action. But the trouble is that the names are written in English. Therefore, many people do not even know how to use recovery correctly.
That is why this article was written. Android System Recovery, the instructions for which are absolutely necessary, is a powerful tool for setting up and resuscitating a smartphone. You need to know everything about how to use this recovery in order not to waste money on specialists. Doing everything yourself is much easier and cheaper. We will analyze each item in the recovery menu and tell you everything we can about it. So let's begin.
Main functions
Through the BIOS menu you can perform many actions with the device. Typically, the Android System Recovery menu consists of 9 sections, including sub-items. Let's consider the main ones with translation into Russian.
Reboot now is one of the main commands that allows you to reboot the device without additional actions. This item is not divided into subsections. By executing the command, the smartphone will reboot without any changes in the operation of the system.
Install from SD-card is one of the large sections of the BIOS menu, which includes 5 commands.
The main task is CWM (Clockwork Mod) - installing the necessary packages with an arbitrary file name. Main functions of CWM:
- installation of custom (official and unofficial) firmware and kernels;
- additions and correction of errors in the OS, installation of factory updates;
- creating a full backup copy of the device’s current firmware;
- restoring the system from a previous backup.
In this section of the Recovery menu of the Android in Russian you can see several commands. Each of them allows you to perform one of the above functions:
- choose zip from SD-card - install the package from the memory card;
- check md5sum of a file — checking the hash sum of a file;
- apply/sdcard/update.zip - installation of the CWM package in the update root folder. zip from the memory card directory;
- toggle sigrature verification - verification of the signature of the Clockwork Mod package to verify the authenticity of its contents, this function is disabled by default;
- toggle sclipt assert - checking whether the script matches the device settings, must be performed before flashing the device firmware.
Toggle usb storage - this mode allows you to connect a memory card to your smartphone to use the device as a USB drive for a PC or laptop.
Wipe (Format) - section intended for Wipe. You can either completely reset the data or delete only some files, for example, the cache, or format a specific partition of the device.
Let's look at the main options of this function:
- Wipe data (may also be called factory reset) - an option that allows you to reset your smartphone to based (basic) factory settings;
- Wipe cashe - function for formatting a cache partition;
- Format system is an option that allows you to completely remove the system, that is, all system files are formatted and the installed firmware is reset.
Backup (restore) - section where you can backup the firmware and restore the system. To create backup copies of the main sections of the software, use the backup function. If you select the restore option, this will allow you to restore the system from previously created backups. The Advanced Restore and Advanced Backup sections are designed for more advanced users, as they allow selective backup and recovery of main software sections.
EXT3 - 4EXT - a section that allows you to convert the system, as well as its individual elements from EXT3 to EXT 4 and back.
Mouts|strage is a function designed to mount and unmount system partitions. Thanks to this option, you can perform operations with the following sections: cache, data, sdcard, and system.
Advanced - a section with advanced settings that includes various unclassified functions. The Advanced option includes the following items:
| Function | Description |
| File System Check | a function that allows you to scan all system files |
| Print Partition Info | system analytics and display of view logs on the screen |
| Copy recovery. log to sdcard | option to copy the recovery log and write it |
| Fix Permission | function that allows you to change permissions on files in the /data partition |
| Partition SD Card | option to create ext and ext2 partitions on a memory card. Here you can either create partitions (to do this you need to go to Remove all partitions and start from scratch), or go back to the main Recovery menu without saving changes (to do this you need to go to the No - save my fat32 partition section). |
Power menu - literally translated as “power menu”. Here you can perform the following operations: completely turn off the device (power off), reboot the smartphone (reboot), reboot in Recovery mode (reboot recovery).
All these functions are present in the Recovery section of almost every device. Depending on the model of smartphone or tablet, the functionality of System Recovery may expand or contract.
How to enter recovery?
This depends on the specific device model. In some devices you need to hold down the power button and the “Volume +” key. But sometimes there are smartphones for which this is not enough. Older models with a mechanical Home button require pressing this button as well. Some devices require simultaneously pressing the power and volume buttons. There are also those who must hold down the power key and both volume buttons. This applies only to original devices from well-known manufacturers.
But there are also frankly “Chinese” gadgets with an incomprehensible operating system and “crooked” translation. Standard methods of logging into recovery may not work in these cases. There are several options here. First: study the smartphone documentation (if available) and find the key combination you are looking for. But this option is not suitable for everyone. Most of these devices either have no documents at all, or the documents do not contain Russian at all. The second option: find the desired combination by pressing all the buttons one by one. Now let's move on to the Android System Recovery 3e menu items.
Installing the recovery function
To flash the firmware, the phone must have a recovery function installed (for example, Android System Recovery 3e). Rooting provides the user with the necessary level of access to perform administrative tasks on their device. .jpg" alt="Android System Recovery 3e" width="300″ height="189″ srcset="" data-srcset="https://androidkak.ru/wp-content/uploads/2017/06/56687731- 300×189..jpg 400w" sizes="(max-width: 300px) 100vw, 300px">Recovery offers the tools needed to actually perform these tasks. Every Android smartphone comes with a built-in recovery feature, but its functionality is usually very limited, so you will need a third-party Recovery to perform additional operations.
The installation process for this feature is usually not very different on different device models. After installing the recovery, you can proceed to the next step.
Now that the recovery feature is installed, you can perform additional operations, including flashing the firmware or installing an application from a ZIP file. The procedure is not much different for most ROMs, although some firmware require a special approach. Since the process may vary for some ROMs, it is recommended to find detailed instructions specifically for your firmware through a search engine.
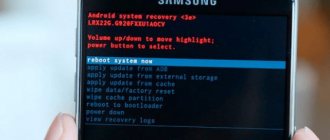
Reboot system now
This menu item performs a complete reboot of the device. After selecting this option, the smartphone will load the standard Android operating system without any changes. Typically, this item is used after completing all manipulations in recovery. Or if you loaded into this mode by accident. Although it is unknown how this can be done accidentally. Be that as it may, Android System Recovery 3e, the instruction manual for which is simply vital for the user, has such a clause. And we have to take this into account.
The Reboot system now menu item should be used as a last resort. That is, when all operations are completed, all components are updated, factory settings are reset and firmware is installed. This is the essence of a reboot: to allow the device to apply all the changes made. True, after some of them the smartphone may not boot at all. But that's a completely different story.
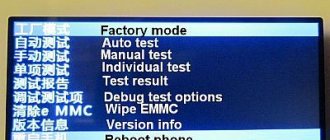
What is Android System Recovery 3e
By switching to this mode, any user can work with the system and its files. Here is a small list of operations that can be performed in it:
- activation or blocking of many system functions;
- return to factory settings;
- complete or partial cleaning of the device;
- system recovery, including flashing.
To avoid problems with the operation of the gadget, you need to know the purpose of this or that item in the menu of this mode.
Apply Update from External Storage
This menu item allows you to apply the update that is located on the memory card. By the way, new firmware is also installed through this point if the main OS does not boot. There are several sub-items in this Android System Recovery 3e menu. How to flash a new OS? To do this, you need to go to this menu and select the Choose ZIP from SD Card item if the firmware is in ZIP format. If this is just an update file, then you should select Apply Update From SD Card. This is how any device is flashed using recovery. Simply copy the firmware file to the root of the memory card, go into recovery and select the desired item.
This paragraph has other subparagraphs that apply in non-standard situations. It is possible to check the MDSUM of the firmware file. This option checks the file for integrity and if something is wrong, it immediately issues a warning. You can also check the firmware file for compatibility with the device. These are the informational options of Android System Recovery 3e. Instructions as such are not required for them. If there are errors, then you do not need to install this firmware. That's the whole story.
Assigning items in mode
The very first and most important point is Reboot. It allows the user to restart the device. To use the device's memory card as an external drive connected via USB, select Toggle USB stage. Here you can also work with the CWM package. It is used to install your own Recovery on the device.
By selecting “Instal from sdcard” (installing CWM from a memory card), you will find yourself in a subsection with the following items:
- Installing CWM Recovery, which is pre-loaded onto the memory card - Choose zip from sdcard;
- Check the amount md5sum – Check md5sum a file;
- Find out the signature of the CWM package – Toggle Signature Verification;
- Check CWM for compatibility with the device - this can be done by clicking on Toggle Sclipt Assert.
How to use Android System Recovery 3e mode for flashing, what to do on Lenovo or other gadgets? Use only proven functions that you understand!
Next comes the reset and Wipe/Format menu. With its help you can do the following:
- Reset all smartphone data – Wipe data/factory reset;
- Wipe Cache allows you to completely clear the cache;
- Wipe dalvik cache is used to clear Dalvik Cache;
- To clear your battery usage history, use Wipe battery stat;
- Format System completely removes all system files;
- Format Date formats the data section;
- Format cache deletes cache data, but the files themselves remain in it;
- Clearing kernel cache data – Format boot;
- To completely format the device, use Wipe all partitions.
All the meanings of the menu items that we are talking about are completely identical for all gadgets running Android.
Backup/Restore is one of the most important sections, which is responsible for backing up and restoring data. It contains the following points:
- Backup – creates a backup copy of data;
- Restore – used to restore factory firmware;
- Advance Restore – used to restore individual data sections;
- Advanced Backup – can be used to copy partitions.
The next item is responsible for converting formats to Android System Recovery 3e. What to do in this menu? Here you can choose different types of conversion to EXT4 and EXT3. Here's what this section allows you to do:
- Convert/change a backup converts the device system;
- Use Convert Data to convert data;
- Change one of you backup is used to transfer backup sections;
- Convert Cache converts cache;
- Wipe data/factory reset is used to convert all partitions;
- Formatting the system – format system, data – format data, cache – format cache.
Wipe Data. Factory Reset
This is a very important point. This option can restore the functionality of the device without any firmware. This tool resets the gadget's operating system to factory settings. Naturally, everything that was on the smartphone will be deleted: applications, photos, music. In general, everything that was in the internal memory of the phone. Android System Recovery 3e, the operating instructions for which are discussed here, was created precisely in order to revive the device without serious intervention in the firmware. And this option allows you to perform this operation.
This function is also used before installing any firmware. It is necessary to reset the phone to factory settings before flashing the firmware. Otherwise, the new operating system will be unstable. But that's not the worst. If you do not return to the factory settings, the firmware may not be installed at all, and then the user will receive a completely “dead” smartphone. There are no instructions in Russian, but the one that is there clearly states that it is imperative to use the Wipe Data & Factory Reset item before each firmware update of the device.
Preparing for firmware
The firmware procedure consists of several stages, which include preliminary steps such as rooting the smartphone and creating backup copies. It should be borne in mind that the terms “installation”, “installation” and “firmware” are interchangeable (they can mean the same thing). Some of the steps listed below may not be necessary for experienced users who have a good understanding of smartphone software.
Official ROM updates from device manufacturers are released in the form of convenient installation files that you can run on your computer after connecting your Android device. But firmware from third-party developers usually looks like compressed ZIP archives, rather than EXE installers or APK files.
Before you start flashing the firmware, you need to make sure that the device's battery is fully charged. Under no circumstances should you proceed with the operation if the charge level is less than 50%. Failure to take this warning seriously may result in irreversible consequences.
There are known cases when a smartphone's battery ran out of charge during the firmware process, resulting in the device being locked and unusable.
The next step only applies to devices equipped with the stock Android operating system. We are talking about devices such as Nexus One and Nexus S. If you are using other smartphone models, you can skip this step. The owner of a stock system must unlock his bootloader before starting the firmware process. This process will be the same for all Nexus models. After activating the bootloader, you can proceed to the next step.
Wipe Cache Partition
Another useful command in Android System Recovery 3e. The recovery instructions say that you need to use this option in tandem with Wipe Data. If the previous item clears the internal memory of the device, then this one clears its cache. Namely, this is where the working application files are stored. Of course, if this is not done before installing the firmware, then nothing bad will happen. It’s just that in the future, when installing new programs, the device’s cache will grow to incredible sizes. As a result, the smartphone will work very slowly. But this is not so scary, since there are many programs for clearing the Android OS cache. And they work great.
It is also recommended to select this function after a factory reset has been done. This will help the smartphone become even “cleaner,” which will have a positive effect on the performance of the operating system. The instructions in Russian for Android System Recovery 3e recommend performing this procedure after the reset. Before rebooting the device. Then everything will be as it should be.
Extra menu
In the Advanced section, you can perform the following actions using the following commands:
- File System Check checks the validation of system files;
- Print Partition Info displays log information on the display;
- Copy recovery.log to sdcard is used to save copies of the recovery log;
- Opening ext and ext2 formats on an SD memory card – Partition SD Card;
- No - save my fat32 partition! stops partitions;
- Use Fix Permission to fix permissions in /data/data.
And finally, the last item is the Power Menu. It is used for power management:
- Reboot Recovery performs a reboot;
- In Bootloader mode, use Reboot into Bootloader;
- A simple reboot is carried out using Reboot;
- Power Off – normal shutdown.
Thus, using this menu you can perform a huge number of functions that are not available in the visual settings. If you have any questions, you can always ask them in the comments!
Wipe Battery Stats
This feature helps you refresh your device's battery. After clicking on this item, the battery cache begins to be cleared, into which the current state of the battery, its nominal capacity and other necessary parameters are recorded. By resetting the battery usage statistics, you can slightly extend its life. And the new firmware will work more adequately with the battery. For some reason, many Android gurus are dismissive of this option. But in fact it is very useful. However, it is not recommended to use it too often. Only before flashing the device.
Mounts. Storage
Here are the controls for the internal and external memory of the smartphone. This item allows you to clear a memory card or built-in memory, format it, or attach it as a drive directly from recovery. This section can be used if you forgot to transfer the firmware file to the memory card, and there is no desire to reboot your smartphone into the operating system. In order to mount the device's memory card as a drive, you need to select Mount USB Storage. As soon as the connection is established, the computer itself will install the necessary drivers for operation.
Once the connection is established, you can do whatever you want with the memory card: format, clear, copy the necessary files, and so on. In order to unmount the flash drive, you should select the Umount USB Storage item on the smartphone screen in recovery. After this, you can move on to other recovery points and carry out further resuscitation of the device on your own.
Methods to enter the Recovery menu on smartphones
Before entering Recovery, be sure to turn off the phone. So what are the ways?
Most Samsung smartphones: Home button + Volume up + Power button Samsung Galaxy S8: Bixby button + Volume up + Power, after the screen saver appears, release the Power button and continue to hold Bixby + Volume up. We continue to hold the two buttons until a blue background appears, then release and after a minute your Galaxy S8 will boot into Recovery mode Most of all smartphones, basic methods: Home button + Power button, as well as Volume up + Power button Most HTC smartphones: Enter Bootloader mode , to do this, press the Power button + Volume down, then in this mode we find the Recovery item and go into it Google Pixel and Nexus smartphones: Volume down and Power button Most Sony smartphones: Turn on in the usual way, when the Sony logo appears or the indicator lights up, try to press Volume down. If it doesn’t work, then we do the same thing, but press Volume up. On some models you need to click on the logo. Some models of Sony smartphones: Press the Power button, two short vibrations should occur, release the Power button, press the Up button and hold until the Recovery menu appears. Some Lenovo and Motorola smartphone models: Volume up + Volume down + Power button
There are also options for launching Recovery using programs, but I’ll write about that in another post. There are also cases when Recovery is missing from the smartphone; I encountered this on the Meizu M3s. What to do in such a situation? Download Recovery from computer to smartphone