Contents of delivery:
- Telephone
- Removable battery 900 mAh
- Charging block
- USB-miniUSB cable
- Wired stereo headset with remote control
- Instructions
Once again I want to start the material by talking about the name of the phone. The fact is that when I come across another device with a stylish, easy to pronounce and instantly memorable name, I want to focus on it. The new budget phone from Fly with support for two SIM cards has just this name - Fly DS105C. Simple and tasteful, it should be pronounced something like this: “fly de es one hundred five si.” BUT let's leave the name and move on to the device.
The Fly DS105C phone is an inexpensive model with a color screen, a simple camera, an audio player and FM radio, as well as support for two SIM cards. Compared to other competitors costing up to 1000 rubles, this phone is distinguished by almost all of the listed functions, because there are very few functional handsets in this segment. In this review, I will try to tell you about the main features of the DS105C and also how well or poorly they are implemented in it, because just having certain features in a phone is not enough, the main thing is that they work.
Design, dimensions, case materials
The phone differs from other budget handsets with its flashy appearance. Four different types of plastic are used here; they differ in texture and color. The body shape of the device is standard and resembles other ordinary phones.
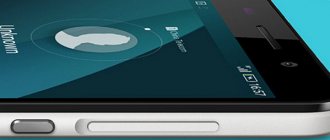
On the front side in the keyboard area there is dark gray plastic with a “cheerful” coating; look at the pictures of the device, you might think it’s dust, but it’s not.
The protective coating of the screen is a transparent layer of plastic. The battery cover is made of matte black plastic; a rim of glossy red plastic runs along the perimeter of the case; closer to the upper and lower ends the rim becomes wider. There is also a red border around the central navigation button. It would probably be correct to say that the Fly DS105C has a youthful design; in my opinion, it is moderately calm, but, as I already said, it stands out from other budget handsets, so that’s a plus.
In terms of dimensions, the Fly DS105C is slightly higher than most budget handsets; the dimensions are generally typical for this segment - 110 x 45 x 14.6 mm, weight 73 grams. The phone fits perfectly in the hand, it is comfortable to hold during a conversation and when you type text messages on it.
The device is non-staining, with the exception of the screen surface, which constantly gets dirty, although this is not too noticeable. Traces and prints on the battery cover are not visible at all, but if you accidentally scratch it, it will already be noticeable.
The build quality is not bad, but there is one feature in the phone that spoils the impression of the build.
Battery Cover Attachment
The battery cover in this phone, or rather, its fastening mechanism, deserves a detailed story. I even specially allocated a separate chapter for this story, as you noticed. The lid is attached to ordinary plastic latches; there are nine of them on the back of the lid. The mount is the most common one, found in every second phone, if not more often.
The problem is that on the Fly DS105C this fastening is somehow incorrect; in the end, to remove it, you need to take an object like scissors and pry off the lid with it. It’s unlikely that you’ll be able to pry it off carefully, and you shouldn’t do it with your nails (you might break it). I removed the cover from the phone three times, during which time I completely picked open the area of the cover that I had pryed off. Otherwise, she simply wouldn’t film.
This spoils the appearance. If you remove the cover twice a week (change SIM cards or install a more capacious memory card), then after a month the back of the device in the area where you need to pry off the cover will look very sad. I note that I had a commercial sample, purchased in a store. So, if you decide on this phone, I sincerely recommend asking the seller on the spot to insert both SIM cards and a memory card into it so that you don’t have to do it yourself.
And yet, the instructions for the phone say the following: “to open the battery compartment cover, you need to lift the upper edge of the battery compartment cover and remove it”
. In reality, you won’t be able to lift the lid by the top edge, because there’s simply nothing to pry it on; you can try to pry it on the notch at the place where the strap or cord is attached to your hand, but there will be no benefit and the lid won’t be removed. Apparently, I’m not the only one who sometimes forgets to edit passages copied from previous reviews in texts (smile).
Control elements, keyboard
There is a flashlight on the top end of the device, and on the top left there is an eyelet for attaching a strap or lanyard to your hand. There is nothing on the bottom end, and on the right there is a miniUSB connector for charging, a headset, or connecting the device to a computer.
To turn on the flashlight, use the central navigation key; it is turned on by holding the “down” direction on it. It can also be turned off by holding this button.
The flashlight is dim, but in some situations it can be useful to illuminate the intercom for entering a code, the door lock, and so on.
The phone has a classic block of hardware keys, most of all the Fly DS105C keyboard reminded me of the Nokia 1280. The buttons are separate, rectangular in shape, combined in pairs of keys to the right and left of the navigation block of five clicks.
The keys have a good and clear press stroke, each time the button is pressed, the button makes a click; I didn’t have any erroneous presses while working with the phone. Illuminating the buttons in a bright blue color, in my opinion, is not the best choice, the eyes get tired from such backlighting, white would be better.
The marking of the characters is done “satisfactorily”: the numbers are printed in a clearly legible large font, the Latin and Cyrillic alphabet are in a more or less legible font.
A navigation button with default actions for side presses; actions for the keys can be changed in the settings. Overall, I really liked the keyboard in this device, with the exception of the backlight being too contrasty. The keys are conveniently shaped and sized, making them easy and pleasant to click. In addition, the DS105C has an interesting find - two call buttons located one below the other, to the left of the navigation key. So, if you enter a number from the keyboard or open it in the address book, you can start dialing it with one touch from both the first SIM card and the second.
Display
The device uses a 1.8” diagonal TFT color screen with a resolution of 128×160 pixels. The physical dimensions of the display are 28x35 mm, the screen displays up to 65 thousand colors. In the screen settings you can set the brightness (up to 1 to 5), select the screen backlight time and background image. The phone only has one background image, but you can download others from your computer or install a memory card image.
In the sun, the display goes blind, and it is almost impossible to read anything from it. The viewing angles of the display are good horizontally, poor vertically. The picture on the screen is grainy, grainy, and the background image and menu icons look as if the device does not have a screen that displays 65 thousand colors, but is capable of displaying a maximum of 4 thousand.
The short summary of the screen is simple – it’s bad. Worse than other budget phones with smaller diagonal and lower resolution screens that I have come across: LG A100, Philips X126 and Samsung E1200.
Battery
The phone has a removable Li-Ion battery with a capacity of 900 mAh. In terms of dimensions, it is one-to-one identical to the Nokia BL-5C battery, as well as any of its new versions. So, if something happens, you can use the battery from your Nokia 1280, which you are tired of, in a new device from Fly.
Under the battery there are slots for two SIM cards and a microSD memory card.
The phone lasts on average 3-4 days on a single charge, depending on the load. I used the device only for calls; the charge immediately after purchase and a full charge lasted for 4 days. I think if you listen to music on it, the device will work for two or three days.
Working with two SIM cards
The device works with two SIM cards. Support for two SIM cards has been implemented, traditionally for inexpensive models - with one radio module. When you make a call from the first SIM card, the second one becomes inaccessible (does not pick up the network). If at this time someone calls to an unavailable SIM card, they will hear the familiar “subscriber unavailable.” Text messages to the second SIM card during a conversation on the first one also do not go through, but are delivered only after the end of the conversation.
You cannot assign names to SIM cards; they are displayed on the screen under the names of operators, that is, MegaFon, Beeline, and so on. During incoming and outgoing calls, the screen shows the SIM card number, SIM1 or SIM2, not a very convenient system.
It is not possible to select separate ringtones for each SIM card; the sound of text messages is also common. I didn't like the functionality of the Fly DS105C for working with two SIM cards. The interesting thing here is that there are only two call buttons, thanks to which you can, without unnecessary navigation through the menu, literally with one touch start dialing the number from exactly the SIM card from which you need it. Otherwise, there are only drawbacks - the inability to assign arbitrary names to SIM cards, the inability to select the main SIM card, and the lack of separate sound profiles for SIM cards.
Voice quality
The interlocutor when talking on the Fly DS105C phone can be heard very well, without extraneous noise, but the person’s voice is greatly distorted and is completely unrecognizable. For example, if a friend calls me on this device from an unknown number, then I am not sure that I will recognize him by his voice, the phone distorts it so much. I don’t know if it’s a drawback or not, because the voice sounds clear, loud and without interference, but it’s noticeable. The interlocutor hears me very well and very loudly, there is some background noise, but it is insignificant.
The volume of the ringing speaker on the phone is very good, it literally “screams, straining itself”, forgive me for this expression. Even if you don’t play the loudest MP3 melodies from a memory card, they will still sound very loud. For incoming SMS you can set either a standard melody or, just like a call, from a memory card. There is only one drawback - the device cannot select the type of ringer that is familiar to all modern phones, when an incoming call occurs simultaneously with vibration. You can choose ring only, vibration only, or vibration first, then ring.
A vibration alert is a small and frequent beat, barely noticeable, even if the phone is in your hand. I have never been able to feel the vibration of the device when it is in my pocket.
Menu
The telephone menu is not very familiar and not very convenient - in the form of such large icons, four of which are displayed on the screen at a time. There are a total of 8 icons in the menu, that is, two screens with icons. The icons are colored, cheerful, in principle, easily distinguishable, and from them it is clear which menu means what.
The disadvantage of the telephone menu, and indeed the system used here, is that the fonts are very thin and unsightly. In general, this is a serious problem for companies such as Fly, Explay and so on, those who mainly sell inexpensive handsets based on Chinese platforms. You can easily distinguish a budget phone from some serious company, LG, Samsung, Nokia, from a budget phone from a manufacturer like Fly by the fonts in the menu and system. In the first phones, the fonts are clear, easy to read, even if small, even and neat, albeit very simple. In the second phones, the fonts are crooked, jagged, jagged, very thin and in some parts of the menu are barely visible. In the Fly DS105C, the fonts are generally neat, but very thin, with large spaces between words in some places. This font does not leave the most pleasant impression of the device.
The address book is simple - you can store up to 150 numbers in the phone's memory, each one is assigned a name and one number. You cannot assign individual melodies, there are no contact images. Calls are presented with separate screens for missed, incoming, outgoing or all calls.
For many BQ Strike smartphone owners, the question of how to remove the back cover of the device has become a real problem. Those who have never manually removed the back panel do not understand how to do it correctly and accurately without damaging the plastic or display, and try to use various improvised means such as scissors, credit cards or knives. But you shouldn’t do this - removing the cover on the BQ 5020 Strike phone is as easy as shelling pears with your own hands. Today we will tell you how to do it correctly. Also watch the instructional video at the end of the article.
Rear Panel Removal Materials
Disassemble the Honor mobile device, of course, at home. With all this, it is not necessary to have any special tools.
To independently open the back cover of your Honor phone, the following devices will be useful:
- a small screwdriver for unscrewing the screws on the device body;
- a special suction cup, where at the end there is a ring, with the use of which you can lift the cover of the phone;
- plastic card, if a special mediator is not available when repairing a mobile device.
When the necessary tools are found, then proceed to the specific disassembly of the Honor mobile device.
Disassembly procedure for Asus K53S
Next, let's look at how to disassemble the Asus k53s laptop. First of all, you need to de-energize the device by disconnecting it from the network and removing the battery. Now you need to unscrew three screws from the frame, which is located on the opposite side of the battery. This procedure will allow you to remove it and gain access to the RAM and hard drive.
The next step is to remove the Wi-Fi card, which is secured with one screw. You have to be very careful here, since there are two wires attached to this module, to remove which you need to unscrew the clasp.
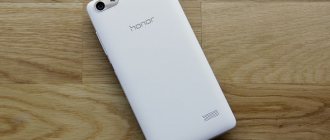
How to open the back cover of an Honor smartphone
Some modern mobile devices in the current situation are created with a unibody body. This is usually done with the intention of maximizing the protection of the device parts from external penetration of water, dust, and dirt. In addition, there is less chance of destroying the body, which, thanks to its own integrity, becomes stronger and more reliable.
However, for some reason the user needs to disassemble the phone by opening the back cover. For the most part, this is carried out with the intention of checking parts, as well as changing devices, for example, a battery. But many users begin to twirl the Honor mobile device in search of some way to open the back cover, but to no avail. However, even on your own you can successfully disassemble your Honor smartphone without causing any trouble.
Preparing to open the lid
Before you begin any mechanical process on your Honor mobile device, you must turn off the power. This is done to prevent accidental button presses, as well as for safer shutdown.
The back panel of the Honor smartphone is fixed with hot-melt adhesive specially designed for this purpose. Therefore, before directly disassembling the phone, it is highly advisable to use a hairdryer, warming up the entire case with it for maximum heating. In this case, the user should monitor the process without being distracted by external stimuli. It is important to prevent overheating, as this can damage the elements of the mobile device.
It is worth considering that hot melt glue will be needed after the preparatory stage. After all the manipulations with the mobile device, you will have to fasten the back cover again; to do this, you will need to generously coat the panel with hot glue, and then press the cover tightly for a few seconds, applying some effort.
Asus x54h - disassembly order
When the question arises of how to disassemble the Asus x54h laptop, you can refer to the instructions written above, since the models have a similar structure, but there are also small features.
The first thing you should pay attention to is that under the first cover, Wi-Fi and RAM are swapped, but the fastening technology has been preserved. Next, the disassembly process follows the same procedure as above, but only before removing the keyboard.
After removing the keyboard and unscrewing the last screws, you can proceed to removing the cover it was on. This procedure must be performed very carefully, since there are many latches around the perimeter of the device. Any plastic card can help in this matter. All that remains is to unscrew a few screws and pull out the motherboard. This will complete the disassembly of the device.
Opening the back cover of a smartphone
The algorithm for disassembling the solid body of an Honor mobile device will look like this:
- Turn off the power of the smartphone by pressing the special key and wait until the device turns off completely.
- Pull out the card slot.
- Warm up the body of the device with a hairdryer.
- Attach the suction cup with the ring to the back cover of the phone, then use a mediator (if you don’t have one, use a thin plastic card) to separate the back panel from the smartphone body.
- Completely remove the cover, which is held on with special glue.
READ How to Connect 4g to Iphone 4s
After carrying out all the necessary procedures, you will need to replace the adhesive on the back cover of the device for maximum secure fastening, and then put the panel in its place, making some effort to secure it.
using a suction cup
The second option requires a special suction cup and a card. The procedure in question is easy and involves a number of steps:
- Use a hairdryer and warm up the back panel.
- Press the suction cup firmly onto the panel.
- Gently pull it towards you.
- Insert a thin plastic object into the gap that appeared during the use of this tool.
- Run it along the entire seam and carefully remove the cover.
If there is a fingerprint, carefully disconnect the cable with an auxiliary tool.
plastic key
The first method involves using a small screwdriver and any card. Take the phone face down and unscrew the two small bolts at the edges near the USB input.
Then remove the SIM card slot.
Carefully insert a card or any plastic tool with a pointed, flat end.
If you have any questions or complaints. let us know
Gently run it along the seam on the body and then remove the panel.
Features of analysis of Asus x53s
The manufacturer Asus has released a huge number of models, but they all need periodic cleaning. Above we have already described several options for how to disassemble a laptop. Asus X53s has a similar structure to other models, so the beginning of its disassembly is similar to them.
You should start by removing the battery, then unscrew the screws on the back of the device. After this, you can remove the cover to gain access to the hard drive and RAM. These modules should be removed, and the wires from the Wi-Fi module must also be disconnected.
The next step is to disconnect the ribbon cable from the keyboard and other sensors. All that remains is to unscrew the three screws located under the keyboard, and you can remove the top cover. A plastic card or any thin object is suitable for this purpose. Now you have access to the motherboard, which can be easily removed.
The company's smartphones with and without a removable cover - list
Smartphones that allow you to remove the cover:
- 7A PRO.
- P20 PRO.
- P30 Lite.
- P8 Lite 2021.
- Y9 2021.
All other modern devices do not provide this function. These include:
- 8 Lite.
- P Smart Z.
- 8 C.
- Y6 Prime 2021.
- 6C Pro.
- 9/9 Lite.
- P30 Pro.
- P Smart.
- Nova 3.
- P9 eva l19.
- 6a.
- 7a.
- View 20.
- Y6 2021.
- 10/10 Lite.
How to open a card slot in a phone
Developers of phones, or rather smartphones, never cease to amaze with meaningless innovations.
However, you have the right to disagree with my opinion, but I, for example, absolutely did not like, for example, the hybrid slot.
This code allows you to insert either a card or a micro SD flash drive into it. Maybe earlier, when there were no two slots at all, such a decision would have been received with a bang by everyone.
Only today no one likes to constantly change cards, but many have to, especially those who call to foreign countries.
The second “misunderstanding” is the key slot. Not only is it hard to find, it also requires a key or something similar.
I don’t know why they didn’t like the traditional slot on a regular latch - I pressed it once, the slot opened, pressed it a second time, the slot closed tightly.
If your smartphone can only install one card, then there is a good way to install two - more details here.
Simple and convenient, but if this happens, I’ll show you how to open the slot on Samsung, xiaomi redmi 3, iPhone, Meizu, ASUS, Huawei, Lenovo, and so on.
How to properly open a card slot with a needle
If you repaired socks or trousers, you will definitely have a needle in the house.
Just use the non-pointed end that you will insert into the hole and press, for example, on the edge of the table.
I wouldn't advise you to try this with your hand. If you use sharp objects, like needles, then use some kind of hard surface to press.
RECOMMENDATION: do not push the needle into the phone tray with your hands - this is dangerous, because you will have to press on the sharp end.
Of course, there are many other alternatives, including toothpicks, pins, or just about any other pointy thing around you.
READ Zte Blade A510 Won't Turn On What To Do
Asus laptop screen analysis
The question of how to disassemble an Asus laptop also arises in a situation where it is necessary to replace the matrix on the screen. The reason for this could be anything. In most cases, this need arises when cracks appear on the screen.
Now you should begin disassembling the device according to the rules described above. It should be disassembled before removing the motherboard. Now we should move on to analyzing the screen. Quite often the mounting screws are hidden under the rubber shock absorber. It is attached to a sticky base, which is removed with a knife.
After unscrewing all the screws, carefully insert a knife or thin screwdriver into the gap between the two halves of the screen. By separating them, you will gain access to the matrix, which is bolted on. Having unscrewed them, disassembly can be considered complete. Study all the intricacies described in the article, and the question of how to disassemble an Asus laptop will become irrelevant.
How to properly open a card slot with a key
For those in the know, this may be obvious, but there are many people who may miss these pinholes as they are not very well integrated into the design.
Locate the small hole on the device body.
Find the card insertion tool inside your phone's box. If you lose it, you can use something like a paperclip.
insert the tool into the hole, press firmly and the slot should pop out.
remove the card from the tray or carefully place the card or flash drive in it.
insert the tray back into the phone and press it to close.
NOTE: You can use a paper clip, but be careful and never use a sharp object like a pin. This will damage the tray. Also, do not use wooden sticks - they may get stuck in the hole.
The card slot does not open - what to do then?
What should you do if the tray gets stubborn and won’t open? First of all, try to press harder - often the issue is resolved.
If this does not help, then first you need to put a key or other object into the hole, which is not subject to discussion.
Next, try to hook the slot with something - you can take a paperclip, bend it a little and try to pull it like a crochet hook.
Some people try to glue something to the tray with superglue, but it is usually not strong enough - it comes off.
Just do everything carefully, otherwise you can pierce some devices right through with a needle (you’ll even see a point of light). Therefore, if you use a pin, it is better to break off the sharp tip (bite off sharper).
It is possible that the card slot does not open because it is broken, for example, the contact is bent and caught - if you pull, it can break off.
Also, the slot may not open due to the fact that the SIM card falls out of the groove and clings to the housing connector.
Then you can try using a strip of foil or a blade and try to pull it out.
Of course, if the slot does not open because the SIM card is crooked, then it is better to give it to a specialist right away than to break it and only then send it for repair.
Some devices will take time to disassemble even for a professional - so be careful, otherwise the consequences of inexperienced intervention may result in expensive repairs.
I also suggest looking at the instructions on how and how to open card slots in phones. Good luck.
Sources:
https://mobi-insider.com/kak-otkryt-zadnyuyu-kryshku-telefona-honor-ili-huawei.html https://vsesam.org/kak-otkryt-slot-dlya-sim-karty-v-telefonax -android/
How and how to disassemble a laptop?
Asus is a famous manufacturer, but its products, like all others, require an inspection, for which the device must be disassembled. Before you begin this procedure, you should prepare the tool.
First of all, you will need a Phillips screwdriver (its size can be selected by looking at the screws located in the back cover). Additionally, you will need tweezers, some paper, hands and eyes. The most important thing in this work is patience, since there are situations when they forget to unscrew the screw and cannot remove the cover or disk, and then there is extra effort, which leads to disastrous consequences.