We all use tablets for different purposes, and usually there are no difficulties when using them. But sometimes there is a need to replace individual components. For example, the battery has deteriorated due to prolonged use, or the display has broken. In this case, contacting a specialist is quite expensive. This is also impractical if you live in a small town. Therefore, it is much easier to find out how the tablet is disassembled in order to make simple repairs yourself. Of course, each model is designed differently. But in this article we will provide you with a generalized tablet disassembly diagram. After familiarization, you will be able to generally understand how this device works.
What you will need during disassembly
Screwdrivers
These are the most necessary things, since without them it is impossible to carefully open the tablet . You can, of course, use a knife. But then there is a high probability of damaging the screws. A set of screwdrivers is inexpensive. It can also be used to disassemble other devices.
Plastic spatula
It is required to detach the back cover and other elements . It is also convenient for disconnecting cables on the board.
If you don’t have such a spatula, it doesn’t matter.
Advice! An unnecessary plastic card can replace the spatula. It is advisable to grind one edge down on a whetstone. This will make it much more convenient to disassemble the tablet.
Soldering gun
This device is used for soldering small board components . It can also be used to separate the touch part of the screen, since in most cases it is glued with glue.
Thin knife
These tools are convenient for working with components that you could not separate with a regular knife. Its main advantage is its thin blade, because it can get to hard-to-reach places.
Wire cutters
When disassembling, you most likely will not need this tool. But in some cases, the manufacturer glues some parts so tightly that it is impossible to do without such a tool. Before using wire cutters, you should definitely think about whether you can later return the bitten off component to working condition.
Tweezers
We recommend picking up almost all small parts with tweezers , since, firstly, it is much more convenient than using your hands. Secondly, if you take the board components with your hands, sebum from your fingers will remain on them. Although this is not dangerous for all components, we still would not advise you to take risks.
Scotch
It will be useful to us already at the assembly stage, since some cables, microcontrollers, and touchscreens are glued with tape.
Galaxy Note 10.1 teardown
The advantage of this model is the use of both standard plastic fasteners and screws - this provides good protection against children and excellent maintainability.
First of all, remove the silver insert - it’s very easy: insert a paddle or pick into the hole between the body and this panel, carefully move the tool around the perimeter and snap off the fastener. We take a screwdriver and unscrew all the existing screws; if this is not done, further disassembly of the tablet will stall.
We put all the screws that have been removed into containers prepared in advance and label them so as not to forget where they came from.
Opening the tablet
Now, using a spatula and a pick, remove the back cover, the actions are the same as with the panel: insert it into the hole and move the tool around the perimeter.
Remove the cover
Disconnecting connectors
As soon as you remove the cover, your eyes will run in different directions, and you will see a huge number of all kinds of cables, however, do not be alarmed, they all disconnect perfectly.
Disabling loops
Now, using light movements, we begin to remove the connected cables. You ask how to disassemble the tablet and not lose anything in the process, the answer is simple: write down, draw diagrams, you can even shoot a video.
Turning off the flash
Please note that the elements may have additional fastenings in the form of screws, so first of all inspect the part that you want to disconnect and only then proceed with it.
Disabling wide cables
Once all the elements around the perimeter have been disconnected: we move on to the battery, but first we disconnect the cables wrapped around it.
Removing the battery
We take the screwdriver in our hands again and unscrew the screws holding the battery and put them in another container, at the same time do not forget to disconnect the cables and connectors holding it.
Disconnecting the battery
The battery takes up the bulk of the internal space, but it is immediately clear that the manufacturers went to extreme measures to somehow reduce its size, so the tablet turned out to be quite thin.
Now you can safely disconnect the motherboard; the manufacturer took pity on the specialists and did not come up with any special fasteners: everything is very easy to remove.
Removing the motherboard
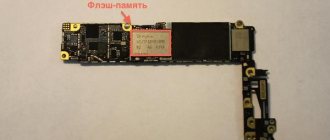
Important elements of the board have special shields, which are very easily removed after unscrewing the screws.
In some models they can simply be glued or soldered - this is the worst option for repair.
Other elements
Now we need to get to the matrix, and to do this we remove the remaining elements.
Dock connector
At the bottom we find barely noticeable screws and unscrew the connector for the docking station, scroll through the case and disconnect the speakers, which are practically not secured. Now you won’t have a question about how to disassemble a Samsung tablet, but let’s still finish the process and then sum up the results.
Removing the speakers
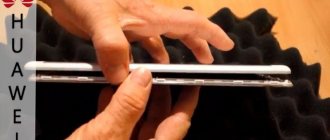
The moment of truth has come, we are trying to disconnect the matrix from the protective glass - this is one of the main stages of the entire disassembly, since it is this indicator that affects the maintainability of the device.
Prying off the display
You can breathe a sigh of relief - this Galaxy Note test passed perfectly. Almost all users know how to work with a tablet, but not many know what is hidden under the case. If the glass is damaged, replacing it will cost much less than, for example, Apple products, which are worth paying attention to.
Removing the display
Finishing with disassembly
You also need to know how to separate the frame from the glass. To do this, you should pay attention to the highlighted fasteners - these are rings that are threaded through the frame and will have to be broken. Fortunately, the frame is additionally held on by adhesive tape.
At this stage you will have to make a little effort, the main thing is not to overdo it, so as not to accidentally break or damage the frame.
Removing the glass
Congratulations - the Samsung Galaxy Note has been successfully disassembled; to reassemble it, follow the same steps in reverse order.
Now you have learned how to disassemble a tablet and understand that, in principle, there is nothing wrong with this, the main thing is to approach everything responsibly and carefully. And so that after assembling the tablet, you do not accidentally discover unnecessary parts.
How to open the tablet
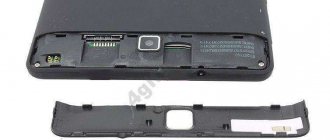
First of all, when disassembling the tablet, the back cover is removed. After this, the main parts will appear in front of you: board, battery, etc. Now we will tell you how to properly dismantle the back cover.
Removing the cover
Many tablets have slots on the side for SIM cards and a flash drive. They are closed with special caps; they should be disconnected first. This is done to make it easier for us to remove the cover.
Next, you should unscrew all the screws located along the edges that secure the cover. Be sure to check the slots for flash drives and SIM cards . Often additional fixing screws are located in these places.
Important! We recommend placing the screws for attaching the lid into a plastic bottle cap. When you unscrew the tablet board, these screws need to be placed in another cover.
This is done so as not to confuse them. Because if you tighten other screws, you can damage the threads.
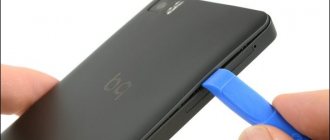
Removing the cover
Next, using a plastic spatula or card, you need to pry off the latches of the rear wall. To do this, place the tablet with the screen facing you. Then carefully insert the spatula into the gap between the body and the cover . You need to insert the scapula until you hear a characteristic click.
Then you need to slowly move the spatula along the body so that all the latches come unfastened . When removing the cover, make sure that there are no wires or cables holding it in place. If there are cables, then you need to use a spatula to pry the latch up . After this, you can remove the cable and put the cover aside.
Disassembly tool
If you want to seriously and permanently engage in tablet repair, then it is best to buy a basic set of elements, which must include:
- Blades of various shapes;
- Positive and negative screwdriver;
- Torx screwdrivers;
- Triangular blades.
In principle, if you just want to try, then all this can be replaced with a couple of unnecessary bank cards and a pick, however, you will still have to purchase screwdrivers. Since manufacturers prefer to use screws with non-standard heads, for example, a polygonal star.
Difficulty removing the cover
Devices that are difficult to open include Apple products. Tablets of this type are very difficult to disassemble, so think carefully before doing this. For some models, for additional fixation and protection from non-service maintenance, the back panel is glued on. This is where a hot air gun comes in handy:
- Turn it on and blow on the joints of the tablet.
- We try to remove the back cover, hooking it with picks.
- If the lid does not come off well, then as the work progresses, every 3-4 cm we leave a pick between the back wall and the screen. The main thing to remember is that you should work slowly and carefully. Then everything will work out.
Video: removing the cover and simple disassembly of the Samsung Galaxy Tab 3
There are often reasons why you need to disassemble your equipment. Most often, this procedure is carried out for internal cleaning. After it, your equipment begins to work more efficiently and faster, and the problems that previously drove you crazy disappear.
The procedure for disassembling the tablet can be carried out at home if you take full responsibility for the consequences. Some service centers will not undertake to repair your tablet even under warranty after you have disassembled it. This is worth taking into account, and if you doubt your abilities, it is better to contact a Samsung tablet repair service center.
Most often, when we need to disassemble a tablet, we are faced with the most ridiculous problems. The very first thing is usually to remove the tablet cover. Yes, you heard right, removing the cover is not always easy either. Difficulties opening the lid also occur on Apple tablets. The cover of the Samsung Galaxy Tab 3 tablet is also quite tightly and firmly attached to the body, and many are wondering how to remove it without damaging it.
Under the cover on the back of the case
Relevant for Digma, Explay tablets, and also the only way to insert a SIM card into an Irbis tablet - even in the 2018 model.
Here, not the entire back cover is removed, as was done in older models of smartphones and phones, but only part of it - a narrow panel along the upper or lower edge of the back of the case.
What do we have to do:
- Turn the tablet with the back side facing you. Let's see where the removable panel is located.
- We hook the panel by the special groove, carefully pull it towards us and remove it from the body.
- Place the card in the slot. You can see how to insert a SIM card into the tablet correctly (which side) in a special drawing - it should be imprinted next to the slot or directly on it.
- We return the panel to its place.
- Turn on the tablet and start using it.
The same instructions are suitable for inserting a SIM card into a Prestigio tablet.
For Lenovo Yoga
To insert a SIM card into the Lenovo Yoga tablet, you also need to remove a special panel. However, it is located on the left (as if we were looking at the spine of a book) and unfastens differently.
Here's what to do:
- Turn the tablet with its back surface facing you. With a convex, rounded edge away from you.
- There is an oval button on the panel (cover) covering the slots. Click on it.
- We open the lid.
- To the right of the button there is another cover - a plastic rectangle. Pick it up with your fingernail and remove it.
- Unfold the SIM card as shown on the plastic above the slot. Insert it into the slot and push it all the way in. You should hear a slight click.
- Replace the second (inner) cover, and then snap the first, outer cover into place.
If you are not used to using a tablet, but most often you use a phone - read our other article about how to insert a SIM card into an iPhone or, for example, into a Samsung!
To remove a SIM card from such a slot, use the instructions below, from the subsection “How to remove...”.
Please note: the cover, which is removed to insert a SIM card into the Digma tablet, covers the entire upper end of the device and the space where the camera eye is located. The panel itself is soft and easily separates from the body.
Lenovo A3300
Opening the cover of this tablet is not too difficult, but extreme care must be taken as it can be damaged.
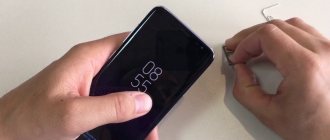
- Take a flat (not figured) screwdriver and insert it into the USB output and gently press towards the cover.
- After a characteristic click, you need to move the screwdriver in the opposite direction from the power button and volume rocker.
- We move the screwdriver to the middle of the side and you can remove the cover.
It is best to find a video guide on the Internet for your tablet model in order to more clearly see the process of opening the device. Below is a video that talks about disassembling the Lenovo S6000 tablet.
A tablet is a device assembled in such a way as to create the impression of being monolithic. There are no screws or latches, no places where the two halves of the case fit together - none of this is practically visible. This is a rather misleading idea, since the equipment can be disassembled if necessary. Specialists cope with this procedure quite quickly, all that remains for the owners to find out is the act of opening the lid of the tablet.
What you can fix yourself
If you are reading this guide, then most likely you are not very knowledgeable about electronics. If this is the case, then do not try to be a hero and try to fix the failure of electronic components yourself. But there are some things you can fix yourself. What exactly?
- Change connectors and individual components. For example, your tablet has stopped charging and you need to replace the power socket. Or the headphones are acting up and you need to replace the audio input. If the battery starts to last very little time, you can try replacing it.
- The most popular reason why ordinary users want to disassemble a tablet is to replace the entire sensor or display. Most often this is caused by careless handling, when the tablet falls on the floor and the sensor cracks, or someone sits on the device lying on the sofa.
So, if you are sure that you really need this, let’s proceed to the guide on how to disassemble the tablet yourself. Reserve a few minutes of time and carefully read all the points.
Tablet disassembly procedure
This process consists of:
- After removing the cover, disconnect the top plate from the device, unscrew the screws. These parts can be from 4 to 8. The number of screws on the plate depends on the manufacturer.
- Disconnect the cables and wires. This can be done using a plastic spatula or knife.
- Remove the battery. In all tablets, the battery can be detached from the case.
- Remove the motherboard, but only remove it if you want to replace the chip. Otherwise, internal components may be damaged.
- Disconnect the display matrix, the easiest way to detach it is by heating the surface with a hairdryer, then the glue will dissolve.
- Separate the case from the protective glass, this can be done with a knife, being careful not to break the screen.
Removing glass from a tablet Sources
- https://protabletpc.ru/advice/kak-razobrat-planshet.html
- https://technosovet.ru/czifrovaya-tehnika/planshety/kak-razobrat-samostoyatelno
- https://plansheta.ru/remont/kak-razobrat-planshet-samsung
- https://ExpertLand.ru/planshet/razobrat