To upload the latest version of the OS, you will have to study in detail the exact algorithm of how to flash your phone. The same rule applies when you need to install a custom version of Android.
Here is a universal instruction, suitable for all Android devices: Alcatel, Asus, Lenovo, Meizu, Philips, Nokia, Oppo, Phillips, Prestigio, Sony Xperia, HTC, Samsung, Xiaomi (Redme), ZTE, BQ, Vertex, Micromax, Digma , Fly, Umidigi, Acer, Blackberry, Oukitel, Texet, Leagoo, Dexp, Doogie, Huawei (Honor), HomTom, Chinese No-Name, sold under the Megafon, Beeline, MTS brands. Relevant for tablets, Android radios and TV set-top boxes.
Firmware may be required if:
- software updates to fix errors in younger versions of the OS;
- improving the software characteristics of the device;
- increasing the protective properties of software.
It is important to understand that incorrect actions can lead to the device becoming “bricked”. Therefore, it is necessary to take into account a bunch of nuances and features. It is about them that we will discuss in our material.
To start
This article will discuss ways to flash devices running the Android operating system. Let's consider the methods from the simplest to the most complex (working in software environments). However, at the very beginning, we will familiarize ourselves with the primary actions that need to be taken before the procedure begins.
Data backup
A backup is a necessary action before starting any significant intervention in Android. Be sure to reserve:
- A complete snapshot of the system (actually a backup). It includes settings for installed applications, basic system parameters, contacts, correspondence, personal user files, alarm settings, notes and much more.
- Personal archive of media and photos. Transfer all photos and video files from your gallery to your SD card. We strongly recommend that you save your access keys and other important documents.
Personal information can be stored on a third-party service. For example, in the cloud. Reset data to Yandex. Drive, Google Drive or DropBox. Just purchase additional space on the service in advance, since the free plan is usually limited to 5 GB of disk space.
To create a backup, use any of the following applications:
- Titanium Backup. A good application with high user ratings. But you will need to issue root rights.
QR Code
Titanium Backup ★ root needed
Developer: Titanium Track
Price: Free
- 7-Data Android Recovery. Helps create a backup, and also finds and restores deleted files. It's better to download from an official source.
- Backup – Backup. Convenient and free application. Helps to restore data or make a backup. The program finds and saves private Wi-Fi passwords.
QR Code
Backup
Developer: Artur Jaszczyk
Price: Free
Attention! Install programs only from trusted sources. Do not use unverified sites with fraudulent APK files.
There is a second way. It involves creating a backup from the Recovery system menu. This method does not require installation of additional software. All you need is a blank SD card.
Algorithm:
- Launch the Recovery system menu. How to get there - read the article below.
- Using the hardware keys, find the line: “backup and restore”. Enter this menu item.
- Now select the “Reserver” line. Confirm your actions.
The compiled backup will be saved on the SD card.
High quality wire
Be sure to buy a good USB cable. It is best to take the original accessory supplied by the manufacturer. Of course, you can update the system via Wi-Fi. But this is a risky method, as radio interference may affect the installation path. The smartphone will simply become bricked. Over-the-air updates are acceptable if you are downloading firmware or an update that came from the manufacturer itself. But not when a custom or older OS is installed on the phone manually!
Wire requirements:
- Only the original wire or a high-quality analogue will do.
- Don't use cheap Chinese USB cables from "noname" brands.
- Do not try to flash a phone through a faulty cable: broken, bitten, broken, melted, etc.
- Discard old accessories. Some of the veins in them may be frayed.
It is best to buy a new branded cable.
Fully charged battery
It’s worth immediately deciding what state the battery is in. If it drains quickly, the power controller is acting up - under no circumstances proceed to flashing the firmware!
The fact is that the gadget may simply freeze for a moment. If the battery dies during this time, you will end up with a brick that will be very difficult to restore.
Modern lithium-ion batteries are recommended to be kept in the charge range from 20% to 80%. This recommendation preserves their performance and extends their life. But for the procedure it is worth making an exception and charging the battery to 100%.
If you are flashing a smartphone from a laptop, you should take care of uninterrupted power supply. Connect the equipment to the network so that the battery in the computer does not play a cruel joke on the firmware process. The same recommendation applies to PCs. To insure yourself 100%, take an uninterruptible power supply.
Possible problems
If something goes wrong during the firmware, the user will probably face problems. Malfunctions can be fatal or simply ruin the functionality of the device:
- Scraping. The smartphone simply stops responding to any clicks and other manipulations, in a word, it does not respond to anything. The screen does not turn on, the indicators do not light up. There are no sounds or vibrations. A dead smartphone can be resurrected. But this will take quite a lot of time to figure out and do it yourself at home. As an option, take the handset to a service center to restore the phone after unsuccessful firmware.
- Cyclic reboot or stuck on screensaver. A less dangerous phenomenon that can be repaired. After installing a new version of the software, the mobile phone begins to constantly reboot at the moment the logo appears. This continues cycle after cycle until the battery runs out. The situation can be fixed, but you will have to sew through a computer. In complex cases, a utility program or flashtool may be required.
- Some functions fall off. For example, it does not see the SIM card, Wi-Fi, Bluetooth or NFC does not work after flashing. This situation often occurs when rolling out a custom version of the operating system. Fixed by flashing to the official working global version of the OS (roll back).
- Warranty withdrawal. If the user decides to flash the gadget manually, the device will automatically be void of warranty. However, the manufacturer himself writes about this. But not everyone reads the manual.
- Disabling some services. This situation is familiar to owners of gadgets such as Xiaomi or Huawei. When a user switches from Chinese firmware to international (global). In this case, branded chips and accounts in the MIUI or EMUI ecosystems may fall off; Access to the bootloader and other issues will be blocked.
Therefore, it is recommended to use only official firmware versions. Or custom assemblies that can be found on trusted sources. For example, on the w3bsit3-dns.com forum in a thread dedicated to a specific device.
How to flash an Android phone using TWRP Recovery
How to disassemble iPhone 5 and 5s at home
TWRP Recovery is also one of the modified versions of Recovery. Before directly installing the firmware, you need to download the TWRP Recovery utility itself. To do this, you will need the Official TWRP App, which can be found in the Play Store.
Official TWRP App
After installing and launching the application, you need to perform the following steps:
- When you first launch it, it will ask you to provide Root rights and agree to the terms of use (check the boxes, click “Ok”).
- Next, you need to select “Twrp Flash” and again allow the use of Root rights;
- In the “Select Device” drop-down list, find and select the model of your device, after which the application will automatically redirect to download the file, you need to click “OK”.
- Then, in the Official TWRP App interface, you need to click “Select a file to flash” and select the previously downloaded file.
- Next, you need to click “Flash To Recovery” and agree (“OK”).
- Upon completion of a successful installation, the message “Flash Comleted Succsessfuly!” appears.
How to reflash Android using TWRP Recovery:
- The firmware image must be downloaded to the SD card.
- You can transfer the prepared device to Recovery mode, this can be done through the Official TWRP App (the “Recovery” item in the menu) or in the standard way - while the device is turned off, hold down the lock and volume keys at the same time.
- Clear the cache and reset to factory settings by clicking “Wipe”.
- In the Recovery interface, select “Install”, specifying the path to the firmware file. If the process completes successfully, a message will appear indicating that the installation is complete.
Important! The device also needs to be rebooted by clicking “Reboot System”.
Basic methods
Now let's look at the main ways to flash Android firmware. They can be divided into two conditional groups. The first methods involve the use of a special software environment, as well as connection to a PC. The second group of methods works through the system recovery menu.
Using a computer
Firmware via a computer or laptop is considered the most reliable. Connecting via cable eliminates interference. In addition, the cable can act as a backup power source. To flash a smartphone via a PC, you need to install a special ADB or Fastboot software environment.
A.D.B.
A special debugger software environment that can work with Android system code via a PC. Essentially, it is a set of commands that operates through the Windows command line. To change the software, you will need a PC or laptop and a high-quality USB cable. In this case, the smartphone is detected by the program as a removable storage device with the OS installed.
Before starting the firmware, you will need the executive file itself or a ZIP archive, which will contain the kernel of the new OS. It can be downloaded from official sources on the Internet or found in specialized threads of specialized forums.
Step-by-step instruction:
- Download the current version of the ADB build on your PC. It is best to download the software environment from the official website of the developer. The site has many files for different versions of operating systems. Choose the one that suits you in terms of bit depth and OS type. Be sure to check Java support, or even better, download and install the latest version from the official website.
- Check the functionality of ADB drivers for your smartphone. Connect the device to the PC, see if it detects it correctly or not. If necessary, download drivers automatically from the Internet. If difficulties arise, download them from the official website of the smartphone manufacturer, and then install them manually through the “device manager” or you can use an alternative platform.
- Now you need to activate root rights and start “USB debugging”. Read our article below for instructions on how to activate these modes. Connect your smartphone to your PC.
- We check the functionality of the utility on the PC. Go to the folder with the ADB program. Simultaneously hold down the right button on the mouse and the “shift” key on the keyboard. A menu will appear, select: “Open a command window” / “Open a PowerShell window here” (for Windows 10). Type “adb” into the command line and press enter. If everything is done correctly, the utility will launch.
- Enter the command “adb devices” here. The system will display an authorization window. Log in using “ok”. If the phone is visible in the system, it will appear in the list of devices.
- Drop the ZIP file with the firmware into the ADB root folder.
- Launch command line (Win+R). In it, enter: “cd”, then grab the icon of the folder with the open program (full path in the address bar), and drag it directly into the command line input field.
- Turn on Recovery mode on your phone. You can access it directly from the command line. Just type: "adb reboot recovery". You can also use the hardware keys of your smartphone.
- Now we are looking for an item in the Recovery menu called “apply update from ADB”. Click on it. The command to enable the sideload loader for ADB will be launched.
- Go back to the command prompt on your PC. Enter "adb sideload". After that, select the ZIP archive and drag it with the mouse directly into the command line input field. The address and file name should appear.
- Press enter. The process of uploading the system core will begin.
Attention. Do not touch your smartphone under any circumstances while the download and installation process is ongoing. At the end of the installation, the Android system (or custom version) will boot into stock state.
Fastboot
This is a special utility that is already included in the ADB software environment. In fact, to install it you will need to complete the first two steps from the manual for flashing firmware via ADB. Fastboot itself is a special mode in which the smartphone is detected by the PC as a working terminal. This mode was made, for the most part, for service center workers, as well as for people who are familiar with program codes.
Attention! Think several times before doing firmware this way. An incorrectly entered command can lead to bricking of the device. Be extremely careful and careful!
Most often, IMG format image files are used for flashing firmware in Fastboot mode. You can flash individual sections of the phone, or flash the entire system through one executive file. Both methods work. However, in this article we will look at the firmware through one IMG file.
Step-by-step instruction:
- Activate fastboot mode on your device.
- Open Command Prompt on your PC. Enter the command into it: “cd /”, press enter; then enter: “cd adb”.
- Now connect your smartphone to your computer using a USB cable.
- Check the functionality of the drivers. If they do not fit correctly, reinstall them. Instructions are above in the article.
- At the command prompt, enter: “adb reboot bootloader.” This will load the bootloader, which is responsible for downloading the firmware. In some cases it may be blocked. Below in the article we tell you how to remove restrictions on the bootloader.
- Now you need to find out whether the PC saw the smartphone in the fastboot. Enter the command: "fastboot devices". It shows the presence of a smartphone in the system. If it doesn't appear, try doing everything from the very beginning.
- To start the process, enter the command: “fastboot update name.img”. Where name is the name of the firmware file.
- Press enter. Wait for the process to complete.
It is important to enter the exact names of commands and names, respecting the case of letters. Otherwise, the system will not understand what is required of it. The firmware is downloaded in advance and copied to the root folder with the unpacked fastboot program. You can use both IMG files and ZIP archives.
Using RECOVERY
The recovery system menu is a set of routines that are compiled into one utility. It works at the “iron” level. Comparable to PC BIOS. Most often, Android devices have a basic version of Recovery installed. It is not always convenient to use. Therefore, users install custom versions of the bootloader: CWM or TWRP. Through these utilities you can flash your smartphone. Within the framework of this article, these methods will be considered. However, you need to understand that the phone must already have a custom program installed.
CWM Recovery
This version of Recovery is very similar to the regular version, with the difference that it has more functions and options.
Step-by-step algorithm for CWM Recovery:
- Connect your device to your PC or laptop via a USB cable.
- Enable Data Transfer (MTP) mode.
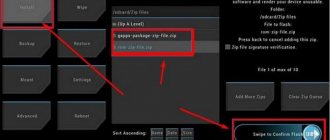
- Download the firmware file (ZIP) to your smartphone. Move it to the root partition of the device or send it to an SD card.
- Turn on Recovery mode.
- As soon as the system menu appears, find and select the “install zip” section using the hardware keys.
- In the new window, select the file with the system and confirm the installation.
To control CWM Recovery, you use hardware keys on the smartphone itself. Use the volume rocker to move through the menu, and use the “on” button to confirm the action.
TWRP Recovery
Custom Recovery, which has one distinctive feature: control is via the display sensor. The program has a more friendly interface, made in the style of tiles. To confirm an action in the system, swipe to the side.
Step-by-step algorithm of actions:
- Connect your phone to your computer using a USB cable.
- Switch the system to Data Transfer (MTP) mode.
- Download the ZIP archive with the firmware and place it in the root folder of the device or on an SD card.
- Put your phone into Recovery mode.
- Among the tiles, find the “Wipe” item. In it, select: “Advanced Wipe”.
- Be sure to highlight the items: “Cache”, “Internal Storage”, “Data”, “System”, “Dalvik Cache”. These are system partitions and will have to be formatted. Confirm the action with a swipe.
- Go back one step and click on “Reboot recovery”.
- After that, return to the start menu tile, click on “Install”.
- Find and select the ZIP archive. To start the process, swipe.
- At the end of the process, be sure to click on “Wipe cache/delvik”, then on “Reboot system”.
When flashing firmware via TWRP Recovery, the installation process of the new OS version is not displayed. You will have to wait until the installation is complete until the smartphone boots in standard mode with stock parameters. In some cases, you may need to unlock the bootloader on your smartphone.
From phone
There is another way to flash the firmware. This is an option to install a special application directly on your smartphone. Today the most popular solution is the ROM Manager program. This is a utility developed by the CWM Recovery team.
To flash the gadget through the application, you will need to issue root rights and install CWM Recovery on your smartphone. Otherwise, the phone cannot be flashed. Free up space on the SD card in advance for the ZIP archive with the system. Download the file from your PC using a USB cable or upload it from the network.
QR Code
ROM Manager
Developer: ClockworkMod
Price: Free
Step-by-step instruction:
- Install the application on your smartphone. Grant any permissions it asks for during the installation process.
- Open ROM Manager. Click on “Install ROM from card”.
- Select the firmware ZIP file on the flash drive and confirm the installation action.
The smartphone will begin the installation process of the new OS version automatically. At the end of the process, the phone will boot with stock Android parameters. In the free version of the application, the user downloads and installs the firmware ZIP file himself. A full license includes a bank of firmware that has been tested by the developer and will probably fit your model. They can be viewed by clicking the button: “Download ROM”.
Possible mistakes
When working with this Recovery mod, various errors often occur. The most common of them are described below.
Error 6
Problems with the updater-script file in the firmware archive (most likely created in the wrong format).
What to do: you need to reinstall this file (change the format to Unix) by opening it in Notepad or NotePad++.
Error 7
It may mean that the firmware version is incorrectly selected (does not correspond to the device on which it is planned to be installed).
What to do: replace the firmware file. You can download it from the official website of the device manufacturer or edit the updater-script file if the first lines contain several device models (leave only the one you need).
Error 7
Error 0
The archive with the firmware does not contain any necessary files.
What to do: reload the archive completely or add the necessary files to it.
FAQ
Let's look at a number of questions that users sometimes have when updating their device's firmware. Basically, these are difficulties when performing any individual actions.
What is firmware
This is the operating system. If we talk about the file component. It can be a ZIP archive or an IMG file (system image). Firmware is usually called the process of installing the system.
There are several types of firmware:
- Stock Android. System without any additional settings.
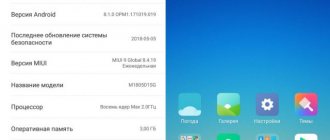
- Operating system shell. For example, MIUI for Xiaomi smartphones or EMUI for Huawei gadgets.
- Custom OS version. Corrected/modified version of Android. It is developed by folk craftsmen and distributed on forums in the appropriate threads. There are risks that some of the functions will not work, plus the possible presence of malicious code.
Reinstalling the Android operating system may be required for various purposes:
- to increase system performance;
- to open some locked functions;
- as a way to get rid of malware;
- for customizing the desktop, icons and other decorative elements of the system.
Firmware may slightly improve the performance of the system, but will not increase the technical characteristics of the device. For example, the new OS version will not add memory capacity or an NFC chip.
How to find firmware on an android device
It is best to look for the firmware on the manufacturer's website. This way you will surely find a high-quality and proven OS. It will not glitch or lag. However, not all companies make their software publicly available. Some brands do not provide access to their developments.
For example, Samsung only allows you to update the system, but not download full firmware. To update the system yourself, you will need to download the additional “FOTA” application (installation without a PC). Or a program for Windows called “Smart Switch”. Both versions of the utilities can be downloaded from the company's official website.
The user can download the official version or use a custom modification from craftsmen. A large number of files on this topic are located in the profile threads of the 4PDA forum. Before installing the firmware, be sure to read reviews from other users. Download only stable and proven versions of the OS. No viruses or bugs.
Will Google account be reset?
Yes, authorization settings will be automatically cleared. You will need to log in again using your username and password when the device boots up for the first time after flashing the firmware.
Is it possible to flash it if it doesn’t turn on?
In this case, you need to focus on the complexity of the situation (breakdown), the smartphone model and the recovery version. Let's consider several options for solving the problem:
- The motherboard is broken, the built-in battery is broken, the device shows no signs of life. There are no options here. Only service center with replacement of internals. Most often, such an operation is comparable in price to buying a new gadget.
- The display is broken, but the main functions are fine. Root access is open and USB Debugging is enabled. Such a device can be restored and re-flashed. You can use regular recovery, controlled via hardware keys. Sew via PC. In some cases, a special programmer may be required to roll the reset bootloader into the volatile memory section.
- Root rights are set, the screen and buttons respond, but there is a cyclic loading or glitches/freezes. You can solve problems by throwing a system error and flashing the gadget in a convenient way.
- The smartphone became bricked after installing a custom firmware version. It contained a virus, rootkit, or other malware. Recovery is possible, sometimes partially, sometimes completely.
Additional video instructions for reviving a dead phone:
How to restore the kernel on Android in emergency MTK USB port mode:
How to install ADB
The current version of the software environment can always be found on the official developer page. Go to it and rewind the slider to the bottom of the screen:
- From the “Command line tools only” section, download a ZIP archive that matches the capacity of your system.
- Unzip it to the system root partition on your computer.
Now you can use ADB tools directly from the Windows command line.
How to enter the Recovery menu
To go to the Recovery system menu, you need to hold down the key combination on the case:
- Simultaneously press the “volume down” and the “power” button. This is the most common combination. Some phone models may use a different sequence.
- Wait until the phone display goes dark and a line-by-line menu appears.
- Release the buttons.
To control this menu, use the “volume down/up” keys as navigation keys. “Power” button – confirmation of the action.
How to open the developer section
The developer section is needed to diagnose the system and to make some changes to the gadget settings. To activate it, do the following:
- Go to “Settings” of your device. Find the “About phone” item and enter it.
- Look for a section in the list called “Build Number”. For Xiaomi or Huawei, this item may be called “EMUI Version” or “MIUI Version”. Tap on it 7 times. The message “You are now a developer” should appear.
- Go back through the menu one step. If everything is done correctly, then the “For Developers” item will appear in it. Enter it and activate the item of the same name by moving the slider to the “on” position.
There are also more detailed system settings, including “USB Debugging”, as well as reports on the operation of some smartphone modules.
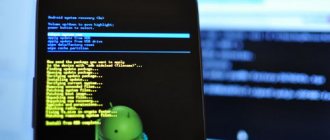
Shows recumbent Android
If at the moment of loading a lying green man with an exclamation mark appears on the screen, then the system has caught a powerful error. But it can be fixed. In this case, you will have to restart the phone from the system recovery menu.
Algorithm of actions:
- Press and hold the “power” button on your smartphone until a little man appears on the display.
- Press the volume down key once.
If everything is done correctly, the system will reset the error and boot into Recovery mode.
How to unlock Bootloader
The bootloader may be locked from the box. Not all manufacturers give the right to download anything on their devices. Enter the command: “fastboot OEM unlock” if you are going to work through fastboot. Open bootloaders “out of the box” are installed in devices from Google.
How to get Root access
Superuser or root rights are a special mode in which the user can manage fine-grained system settings. To enable it, you will need to install additional applications. Some of the most popular are: Frame Root, KingRoot, and iRoot.
Sometimes applications crash and crash. Try starting it again.
An alternative way to get root: entering the command via ADB:
- Turn on Command Prompt (Win+R). The ADB software environment must already be installed on the PC.
- Enter the command: "adb root".
Be careful! Root mode opens the door to various malware on the phone.
List of programs for firmware
Let's leave a list of programs for flashing Android, with an active download link:
- ABD tools,
- Odin,
- SP FlashTool,
- Lenovo Downloader
- KDZ Updater,
- LG Flash Tool,
- Sony PC Companion,
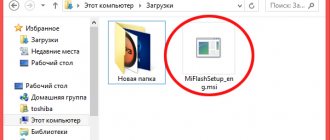
- MiFlashPro,
- ASUS Flash Tool
- Qualcomm Flash Image Loader,
- QPST Flash Tool,
- Wileyfox Flash Tool,
- Qualcomm Smartphone Multi-Port Software Upgrade Tool,
- Smart Phone Upgrade Tool,
- FastbootFlasher
- Firmware Factory Tool
- Infinix Flash Tool.