Mi Mover is a very useful and underrated program from Xiaomi
Imagine the following situation: you replaced your old Xiaomi with a new smartphone from the Chinese tech giant, but the previous device was left with just a mountain of necessary information, settings and personal photos. Do you really have to bother and manually transfer all the necessary files?
Programmers from Apple dealt with this circumstance best - their devices have long had support for automatically transferring all settings when they first turn on and activate a new smartphone or tablet. After looking at the inspiration company, Xiaomi decided that they wanted such a feature and created the Mi Mover application.
Let's look at how to use Mi Mover on Xiaomi.
Mi Mover - what kind of fruit is it?
Xiaomi's Mi Mover application is a special software designed to quickly transfer files and settings from one Android device to another. Previously, this application was installed out of the box as additional software that could be safely removed. Now Mi Mover is firmly integrated into MIUI.
Mi Mover can also be easily found on the Google Play Store, which means it can be used on smartphones from other manufacturers.
In the description of the application in the Play Store you can find out that using Mi Mover you can send: contacts, messages, call history, applications, photos and videos, music, etc.
Install Mi Mover Android in PC Windows 7,810 or MAC
In Tools by Developer Xiaomi Inc. Last Updated: March 05, 2019
Download and install Mi Mover in PC and you can install Mi Mover 115.0.0.9.100 in your Windows PC and Mac OS. Mi Mover is developed by Xiaomi Inc. and listed under Tools.
If you are looking to install Mi Mover in PC then read the rest of the article where you will find 2 ways to install Mi Mover in PC using BlueStacks and Nox app player however you can also use any one of the following alternatives of BlueStacks.
How Mi Mover works
Like the option to transfer one iPhone to another, Mi Mover offers a complete copy of the necessary files and settings to a fresh device using a single Wi-Fi network.
Unlike Apple software, Mi Mover cannot transfer the entire configured system from the old Xiaomi to the new one without resetting applications to their original state. This is due to the fact that the Xiaomi program does not “capture” the cache and residual files. The obvious disadvantage is that you will have to log into all accounts yourself, but the plus is that you will get a clean application and error-free system operation.
The duration of the transfer varies depending on the amount of data being transferred. If you intend to transfer absolutely all available files and settings, you will have to wait more than 15-20 minutes - this depends on the connection speed. Also, before “migrating” files, we recommend that you make sure that your Wi-Fi Network is stable so as not to encounter errors.
Download and Install Mi Mover in PC (Windows and Mac OS)
The following are the 2 steps to install Mi Mover in PC:
- Install Mi Mover in PC using BlueStacks App Player
- Install Mi Mover in PC using Nox App Player
Install Mi Mover in PC using BlueStacks
BlueStacks is an Android App Player that allows you to run Android apps on PC. The following are the steps on how to install any app on PC with Bluestacks:
- To begin, install BlueStacks in PC
- Launch BlueStacks on PC
- Once BlueStacks is launched, click My Apps button in the emulator
- Search for: Mi Mover
- You will see search result for Mi Mover app just install it
- Login to your Google account to download apps from Google Play on Bluestacks
- After login, installation process will start for Mi Mover depending on your internet connection.
Hints:
If you are having LOADING issue with BlueStacks software simply install the Microsoft .net Framework software in your PC. Or comment below your problem.
With Mi Mover application user can clone all data from Xiaomi mobile phone, including the most sensitive files on the system. And from that, personal data can also be recovered. In addition, the app provides a detailed number of other potentially supports. Mi Mover allows the users to delete applications with administrator privileges with requiring any authentication. In this way, let's imagine that the person has installed an anti-theft application, such as Cerberus, Easy Finder & Anti-Thief or AndroidLost. With authentication, the user can access to the smartphone to delete applications with prior authorization, and help the owner to handle the mobile data.
Features
- Mi Mover helps in transferring multiple data
- Easy to pair in two devices
- Mi Mover is a faster connection and holding data in cloud backups
- Works as Wifi hotspot during data sharing
The ability of Mi Mover applications is to prevent data from anyone from tracking them. Another vulnerability reported for Mi Mover app, which allows easy transfer of files, apps, and settings to another Android phone. Mi Mover replaces the Android sandbox, something that is extremely good. The Mi Mover app has two layers of protection and, in any case, requires the hacker to have physical access to the device, a scenario in which no application offers absolute security.
Other Apps by Xiaomi Inc. developer:
- Mi Home APK Download
- Mi Remote controller – for TV, STB, AC and more APK Download
- File Manager by Xiaomi: Explore your files easily APK Download
- Mi Drop APK Download
Hint: You can also Download Mi Mover APK file and install it on Bluestacks Android emulator if you want to.
You can download Mi Mover APK downloadable file in your PC to install it on your PC Android emulator later.
Mi Mover APK file details:
| Best Android Emulators | Bluestacks & Nox App Player |
| Operating Systems | Windows 7.8/10 or Mac |
| App Developer | Xiaomi Inc. |
| App Updated | March 05, 2019 |
| APK Version | 3 |
| Category | Tools |
| Android Version Required for emulator | |
| APK File Size | 9.1 MB |
| File Name | com-miui-backup-transfer-3_SOFTSTRIBE.apk |
Download APK
Install Mi Mover in PC with Nox
Follow the steps below:
- Install nox app player in PC
- It is Android emulator, after installing run Nox in PC, and login to Google account
- Tab searcher and search for: Mi Mover
- Install Mi Mover on your Nox emulator
- Once installation completed, you will be able to play Mi Mover on your PC
How to use Mi Mover?
As we said earlier, the new Xiaomi smartphones already have Mi Mover on board right out of the box. For older smartphones from a Chinese brand, as well as in case of using a device from another manufacturer, you will first have to install Mi Mover manually through the Google Play Store.
So, we downloaded and installed the application we needed. First we launch Mi Mover on the second smartphone. After that, open it and see a large button with the words “I am the sender” - click on it. An animation appears on the screen, signaling that the smartphone is looking for a “pair” that is also running the program.
If the connection did not occur automatically, then on the second smartphone during the search, click on the “I am the recipient” button. A QR code will appear on the screen, which must be scanned by the sending smartphone.
After “connecting”, a menu will appear for selecting the data required for transfer. There are five categories in total: images; SMS, contacts and calls; audio, video and other files; system data and applications from third-party developers.
We select the items we need and simply click on the “Send” button. An animation of the process of transferring the selected files to the new device will appear on the screen, at the end of which we agree with the work done and observe the presence of the necessary data in the internal memory of the new Xiaomi smartphone.
A little advice - be sure to keep two smartphones next to each other, as there are reviews on the Internet about possible gaps when “transferring” files from one device to another.
Now you know how to easily and effortlessly change your old Xiaomi to a new model.
Methods for transferring applications
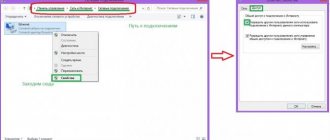
On Xiaomi, almost all models do not have a standard transfer function. That is, if you go to the settings and select one of the programs in the “Applications” item, then in most cases the “Transfer to SD” button will be inactive. Therefore, you have to use additional software. We will show you several software solutions that can help you transfer all applications to a memory card.
Clean master
The most banal way. Open the program and select “Application Manager”. Check the boxes for the applications to be transferred and click the “Move” button.
In some cases, this button may not be available. Therefore, if you were unable to do anything using Clean Master, then move on.
Price: Free
AppMgr III (App 2 SD)
The advantage of this program is that it does not require root rights. Once launched, you will be presented with a list of all applications. Bring up the menu on the left by swiping to the right side of the screen and tap on “Move app”. A list of roaming applications appears. Choose one and follow the program's instructions.
Price: Free
Link2SD
This solution requires root rights. The principle of operation is the same: open the program, select the one you need in the list, scroll down a little, press the “move to sd” button. Click OK and you're done. The program itself is free, but not long ago a paid version was released, with additional features and without advertising.
Price: Free
Let's look at the transfer using WhatsApp as an example.
Folder Mount
A fairly common program that can be used to transfer an application.
ROOT rights are required for the program to work. You can learn how to install root rights from this article.
Open the program. The message “List of pairs is empty” appears in the main window. Call up the side menu by swiping to the right, click “Application Analyzer”. Select the desired program. We see two subsections: data and obb. One of these partitions must be active. Click “Create a pair”. The message “Do you want to automatically select the destination folder?” appears. - click “Yes”.
A new window will appear indicating the name, source (the folder where the application is currently located) and destination (the folder on the SD card into which information about the application will be moved). To confirm the actions taken, click on the checkmark at the top of the screen.
By opening the curtain, you can see how many percent have moved.
After completing the movement, we return to the main Folder Mount window, where we see the created pair. Turn it on by clicking on the slider next to the name. With this slider we enable the connection between the application and the transferred folder, which is located on the SD card after all the manipulations done.
Price: Free
This program was tested using the Whatsapp application. The task was completely completed. We invite you to watch the video instructions from one of the users. Now the application interface has changed a little, but all the functions and buttons remain in place.
How to move game cache?
The most important question from mobile gamers is how to transfer game cache?
The situation with games is a little different. If you download a game from the Play Market (meaning a heavy game), then after installation you can also transfer the cache to a memory card using Folder Mount.
In some games, the game itself is downloaded first, and the cache begins to load after the first launch, asking permission to download additional files. But it happens that there is not enough phone memory, then the toy asks permission to download everything to the SD card at once, and you don’t have to transfer anything.
But it also happens differently, when a window appears with the message about the lack of phone memory, and the game refuses to download the cache to the flash drive. Then you just need to find the game on the Internet or on a third-party site, where you can download the apk installation file and the archive with the game system files separately, unpack the data from the archive manually into the sdcard/Andoid/data or sdcard/Android/obb folder.
Which folder to unpack the archive into is usually written in the game description.
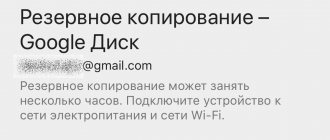
Backup via recovery
Backup through recovery is the most radical way. You can say “cheap and cheerful” about him. Why? It's simple: it copies all data from the smartphone to a memory card or internal storage, including the system, applications, settings. It's very easy to do:
- Turn off the phone;
- We wait 30-40 seconds, for safety;
- Enter Recovery mode;
- Select the item backup and restore;
- Next, select Backup;
- We wait 5-10 minutes;
- Reboot the device;
- Profit!
It is worth noting that the backup function is only available in modified recovery, such as CWM or TWRP.
In addition to all of the above methods for backing up data, you can save it using special cloud services such as Dropbox. They, of course, cannot save system information without root rights, however, they do a good job of saving various documents, images, music and other user content. Among other saved cloud files, there may be created backups.
As a conclusion, we can say that it will be most effective to save a local backup file on the network in order to always have access to it. We hope that the article was useful and now you know how to make a backup on Xiaomi Redmi and Mi models in several ways.
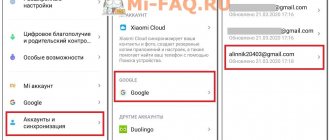
Mi Cloud
A current application created not only for data exchange, but also for storing it, is Mi Cloud. When logging in for the first time, the service will require the user to create an account, come up with a login and password, and also link their phone number, which will help, if the information is forgotten, to restore access to the profile.
The service contains a huge range of different functions - both for communication and for other needs, among which there is a very useful one. Its essence is to create a backup copy of data that will be stored not just on the phone, but also virtually.
This will allow you to download the archived data to another gadget without the need to connect to another device. All that is required is to log into Mi Cloud using your username and password and download the necessary information. And if a backup was created, then the program functionality itself will unzip and install it.
Possible errors and solutions
These are bugs related either to the flash drive itself or to the phone. There is no third option, as you understand.
You can save data on an SD card if it does not have bad sectors, it was purchased from a normal seller and there is a guarantee for its quality. A million cases of files “disappearing”, errors during playback and launching applications are associated with damage to the memory card. We pull it out mercilessly.
The following errors: the smartphone says that this application cannot be installed.
It helps in each specific case differently.
If the reason is a malfunctioning firmware, then to be completely sure, you should install the developer version in order to exclude the option associated with the lack of root rights. Many people are experimenting with custom recovery and firmware, where the procedure for patching and acquiring super user rights is much easier. It is included in the phone settings.
It is also important how the flash drive was prepared for use, formatted and partitioned. Those who are restless with custom can reap the fruits of their work: marking a flash drive is possible not on a computer, but directly on the phone from under TWRP or CWM recovery
These functions are all written there; just insert a memory card into your smartphone.
Transferring data to a Xiaomi card has become much easier today, ways have appeared in the settings of the smartphone itself, new applications have learned to solve problems with transfer. I think that it won’t be difficult for you to understand simple issues related to changing the amount of memory in your phone.