After the device manufacturer stops supporting it, you can only get an update by flashing it. If the pleasure is overshadowed by incessant glitches and slowdowns of the gadget, when some of its system files are lost, if viruses are not removed even by the best programs, you want to get rid of some of the annoying applications and “make life easier” for a weak processor - this procedure will help out. There are a lot of methods, but among them there are those that are used more often and are suitable for most devices: we’ll tell you how to flash Android through recovery.
What does Android firmware mean?
Firmware is the name given to replacing an operating system or even software. There are many options and tools for carrying out such an operation.
It is impossible to point out one universal and best device for all devices without exception. Compatibility with hardware plays a role.
Of course, it is possible to flash Android without recovery using:
- FOTA updates (“over the air” via Wi-Fi);
- computer with special software.
But one of the most effective and simplest options is using recovery.
Stock firmware
This term refers to original software released by developers. This is the code that is maximally optimized for working with a specific device.
Smartphones that are on sale are initially offered with the optimal version of the OS, which the manufacturer does not recommend changing. This may only be necessary in extreme cases when you need to roll back to earlier points.
The advantages of stock firmware are:
- availability of a guarantee of system stability;
- providing protection from the influence of potentially dangerous software;
- saving automatic updates from or new OS version;
- the possibility of obtaining warranty repairs at an official service center if the device breaks down.
The disadvantages of stock firmware are:
- a large amount of pre-installed software that the user may not need;
- lack of full access to system files;
- inability to install certain types of programs.
Recovery concept
Recovery is a special mode, which means “recovery” in English, and is available on almost every mobile device running Android OS. The developers specifically provided for the possibility of restoring the functionality of gadgets with its help.
In this mode, the user himself has the opportunity to:
- reset the system to factory settings;
- reboot the device;
- make a system backup;
- clear the device memory from the cache;
- format individual partitions.
It is also possible to install firmware on Android via Recovery (in this case, “firmware” means the operating system)
Setting up the device after flashing the firmware
The initial startup of the device may take a long time, which is due to automatic system optimization. After a few minutes, the updated Android will launch and offer the first setup. After starting the OS, you need to select a language, set the time and connect to the access point.
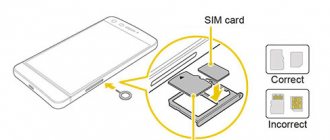
Despite the fact that the Android system is distinguished by its stable operation, there are often cases when it is necessary to flash the smartphone. This is necessary in case of unstable system operation, frequent freezes or other system lags. The main reason for such troubles is the firmware installed on the phone. The situation can be corrected by reinstalling the software. This can be done using a computer. But what to do if you don’t have a PC at hand and how to install firmware on Android from an SD card?
Login to recovery
A special feature of this mode is entry and navigation, which are carried out using mechanical control buttons on the previously turned on device. Two or three keys are pressed simultaneously and held until the mode is entered.
Which keys exactly depend on the manufacturer, and sometimes the model, which can be found in the instructions supplied with it. Typically, the following variations are used:
- volume button (to decrease, increase or both at once);
- power button;
- Home button.
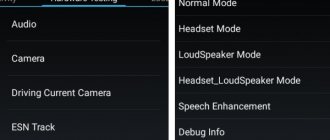
The device responds with vibration, and the “green man” characteristic of Android appears on the screen. You can navigate through the menu using the volume keys and confirm your selection with the power button. The list of mode capabilities depends on its type.
Custom Recovery – CWM and TWRP
The “native” mode, or, as it is also called, stock mode, does not have a large list of features provided. Some Chinese gadgets are not equipped with it. Therefore, enthusiasts created versions with an increased set of functionality: first CWM, and then TWRP.
What is custom recovery
They were called custom by analogy with the English word custom, which in one of the translations means “convenient”. That is, at the software level adapted to the needs of the user.
While both do their jobs equally well, TWRP has a few more features, including navigating menus using the touch screen, choosing a location to save a copy of the system, batch installing patches, a built-in file manager, keyboard and terminal emulator, allowing you to work without having to force a reboot.
The sixth version of CWM also received a touch option, but is still inferior in ease of use due to the interface being too simple.
Why use custom recovery
Stock mode allows you to install only stock firmware into the device, that is, provided by the gadget manufacturer. Custom makes it possible to install any “homemade” firmware with different capabilities, which can vary greatly, and of which a huge number have been created. Flashing the kernel on Android via Recovery or getting root access is not very difficult.
Installation
Both types of custom Recovery are installed into internal memory instead of factory memory using:
- a special utility on the device itself;
- connected computer and special software.
Typically, different types show better compatibility with different utilities.
Installing CWM using ROM Manager
The easiest way to install CWM is using the ROM Manager utility, available for free in the official Google Play store. The program for flashing recovery on Android requires root. It is also recommended to visit the official page of the program developer and make sure that the mobile device is in the list of supported ones.
If everything is in order, you need to download the program to the gadget, open it, find the Recovery Setup item in the menu, then Install or Update Recovery and select ClockworkMod Recovery.
The program will detect the device, after which all that remains is to confirm the installation, and after completion, provide ROM Manager with root rights, if necessary.
Installing TWRP using GooManager
The GooManager utility is well suited for TWRP. It is also available for free on Google Play, and also requires root access to operate.
After installing the program, you need to open it and select Install OpenRecovery Script from the menu. After installation, you can switch the gadget to mode directly from the menu of this program.
Flashing custom recovery using Fastboot
The methods described above are simple, but do not always cope with the task due to possible incompatibility. In this case, there is nothing left to do but flash the recovery on Android via a computer.
A computer with the Fastboot program allows you to get rid of them and install any Custom Recovery on your gadget. Fastboot is part of the Android SDK used for OS development.
The work requires some extensive computer knowledge, a computer with Windows OS, a distribution kit and drivers for a mobile device, and a USB cable.
Fastboot can be installed separately or download the entire SDK from the official website of the developer. A suitable recovery can be obtained from the project website or specialized forums.
Before you start, you need to enable USB debugging mode on your gadget. The device must be well charged. Drivers should be found on the manufacturer's official website. It is also recommended to make a backup.
Step by step instructions
When everything is ready, you need to do the following:
- Rename the downloaded file from Recovery to update.img (can be anything else, but without Cyrillic and spaces and always with the same extension), move it to the platform-tool folder in the Android SDK directory.
- Connect the gadget to the computer via a USB cable.
- Open the computer command line: select the Win+R key combination, enter the cmd command in the field and confirm with the Enter key.
- Specify the path to the recovery folder.
- When the computer detects the device, enter adb devices into the command line, and then adb reboot devices.
- Wait until Android reboots and enters bootloader mode. When the robot appears on the screen, enter the fastboot devices command to check if there is a connection.
- If everything goes well, enter fastboot flash recovery update.img.
If everything is done correctly, the message “finished. total time..."
You can flash other memory sections in the same way.
Updating or flashing Android using ADB sideload
This option should be used when the stock recovery does not have an option to flash the OS and the over-the-air update does not work. This is done as follows:
- Before you start working with adb, you need to download basic drivers.
- Then the Android SDK Platform is downloaded and unpacked into the root directory of the system drive.
- Then the device is switched to recovery mode (to do this, when the phone is turned off, press Power and Vol+ or Power and Vol- ). Before connecting, you need to install ADB drivers.
- In the custom recovery menu, select “Apply update from ADB”. When the message “Now send the package adb” appears, you need to connect the phone to the computer via USB.
- The next step is to launch the Windows terminal (cmd), after which you need to go to the directory with unpacked adb.
- Then the command “ adb sideload filename.zip ” is launched - instead of filename you must specify the name of the firmware file!
Then press the Enter key - the installation process of the new version of the operating system from the Flash card will begin. This way you can install both updates and full stock firmware on your phone.
Firmware via standard recovery
Standard or “factory” recovery allows you to install only stock firmware, but you can do this without additional software and a computer.
To flash Android via System Recovery 3e, you will have to download the official firmware or copy it to an external memory card, and after entering the mode, erase the old one and specify the path to the new one. This operation is not fraught with any pitfalls, since all the tools used are official.
How to download firmware
The firmware must be downloaded from the official website of the gadget manufacturer. There is no need to unpack it, but it is worth changing the name to update.zip. For devices based on the MTK processor, there is a convenient program called MobileuncleTools, with which you can easily and simply install the distribution kit on a memory card and update the operating system from it. Only to work with it you will need root.
Installation of MobileuncleTools
You can download the utility on the developer’s official website or specialized resources. The program is distributed free of charge and has a Russian-language interface. Installation is performed in the usual way - downloading and unpacking the ARK file.
Launching the utility and flashing the firmware
The program is launched in the same way as any other - by tapping on the icon. After logging in, you need to find the “Firmware Update” button in the menu, after activating which the utility itself will detect and install the firmware.
Where can I find the firmware and why should I reinstall it?
Installing firmware via TWRP may be necessary if:
- Errors constantly appear in the Android operating system.
- Applications do not open.
- Many programs from the Play Market do not work.
- The phone itself reboots or turns off.
- It gets stuck on the OS loading screen.
- It works slowly or lags a lot when flipping through desktops.
- You decided to try a different version of Android.
- You are not satisfied with the functionality of the stock (official) firmware.
- The OS does not meet the system requirements of the smartphone.
Don't just download Firmware or run TWRP Recovery for no reason. If done incorrectly, the phone will simply break. If you don't like the interface or want to change the button design, it's better to install a new launcher.
To update the operating system through Recovery, you need to download it from somewhere. It can be done:
- On the official website of the manufacturer. Find your device model there. There should be a "Support" or "Drivers and Utilities" section.
- On the resource of Android application developers.
- On specialized services where users post custom or official OSes. For example, on the 4pda forum.
- Online. Type “download firmware for [smartphone model]” into any search engine.
Firmware must be accompanied by a description and instructions. If it indicates that the archive is being downloaded through Recovery mode, you can download it.
Do not use software that is not designed for your phone. If you try to load it with an incompatible OS, it will stop working.
Android firmware via CWM Recovery and TWRP
These operations have approximately the same algorithm. A PC can be used, or you can do without it. In the first case, you can flash the phone through the recovery menu from a flash drive to which the distribution package has been previously copied in .zip format.
In the second, the archive is transferred to an external memory card and installed directly from it. It is recommended to search for the archive with the firmware on trusted sites.
Detailed instructions
Procedure:
- Put your mobile device into Recovery mode.
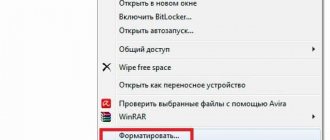
- Clear the internal memory and cache - do a so-called wipe. To do this, in the mode menu you need to select the Wipe data/Factory reset and Wipe cache partition items.
- Select the Install section and specify the path to the file.
- After flashing the firmware, reboot your mobile device by clicking on Reboot system now.
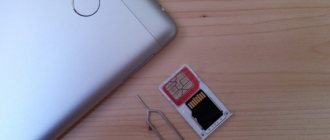
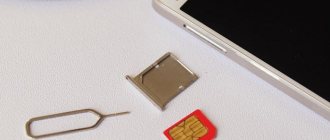
How to install firmware on Android from an SD card
1. Go to the recovery system. To do this, with your phone/tablet turned off, simultaneously hold down the volume up key and the power button. All control in this system is carried out using the volume buttons and the back button.
2. Sequentially select the items: “Wipe data” > “Wipe partition” > “Wipe cache” > “Wipe dalvik cache” > “Install zip.”.
3. The installation of the firmware will begin. Lasts from 20 to 45 minutes.
4. After its completion, you will need to restart the device, which starts in the same recovery system. To do this, select “Reboot system now”.
If the firmware installation fails, try installing it again, but first return to the initial state. That's why you made a backup copy.
Run the recovery system again, select “Backup and restore”. After returning to the original state, repeat the steps to install the firmware.
Once you start, you will realize that everything is not as difficult as it seems. Arm yourself with our instructions and go ahead!
Sometimes your favorite device running Android OS ceases to please you with its speed and stability. Often, malfunctions are caused by some problems in the software environment of a smartphone, tablet or other Android device. As a rule, they arise due to the fact that the device’s firmware crashed or began to work with errors due to improper use. There are several ways to reinstall the smartphone operating system. Let's look at how to flash Android via an SD card.
Content
How to make an Android backup
Before flashing the firmware, it is recommended to create a backup copy of the system. If the result is not satisfactory, you can always quickly roll back. There are a huge number of tools for this. You can use special software on a connected computer, or you can get by with the same custom recovery. This requires root.
If you choose the latter option, you must:
- Enter the mode.
- In the Backup and Restore section, check the boxes for the data to be backed up.
- Confirm the archiving task, and then reboot the gadget by selecting the appropriate item (reboot).
It is recommended to store the created archive on removable media or another device or in the cloud.
The same can be done using third-party programs that are freely available. For example, Nandroid Backup, available on Google Play, allows you to make a backup in a couple of clicks. Titanium and many others work the same way. You need root everywhere.
Recommendations
It seems that understanding how to flash Android via Recovery is not so difficult. But if some points are unclear, or you are not confident in your knowledge, it is better not to get involved with such processes. But even if something doesn’t work out, you can always restore the device’s firmware through the corresponding menu item. The main thing is to make a backup copy before flashing Android via Recovery. To do this, you will need a custom “Recovery” and a little patience, because the process of backing up the firmware takes a lot of time.
If something goes wrong, you can always turn to knowledgeable people. At least an authorized service center will definitely help you. The main thing is not to lose heart and move forward confidently. This is the only way to achieve any results. Good luck with the flashing!
But it’s worth it, that is, the factory versions have rather limited functionality, and usually allow you to update the installed OS, the update packages of which can be downloaded from the manufacturer’s official file, or reset all settings to factory settings. The custom version, in contrast, has a huge range of functions, but installing it requires certain computer skills.
How to restore factory firmware
To reset the firmware to Android via Recovery, you need a full reset, which is done as follows:
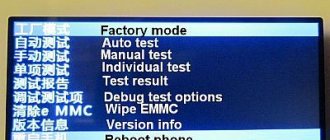
- You need to get into mode.
- Select and confirm “Wwipe data/Factory reset” (full reset to factory settings) and “Wwipe cache partition” (erase cache partition).
- Restore a previously saved copy of the OS by selecting Sinstall zip from sdcard and specifying the path to the archive on the memory card.
To return to factory settings, you need to:
- Enter "Settings".
- Go to the "Restore and reset" section.
- Select "Reset settings" and follow the instructions.
As a rule, this is enough.
CWM
Recently, this recovery has lost ground relative to TWRP, but its use is still possible. The key advantages are the ability to control if the touchscreen is damaged and compatibility with older models. As in the previous case, you will need to place the image in the root of the device. You can also name it "update.zip" for easier access. Then, after entering recovery mode, do the following:
- Reset your device to factory settings by going to the Wipe Menu and then selecting “Wipe Data – Factory Reset”. Don't know how to do this? Check out the article - how to reset Android to factory settings;
- Return to the main menu, select "Install zip";
- If you gave the archive the name “update.zip”, click on “Apply /sdcard/update.zip”, otherwise click “Choose zip from SD card” and select the file - most likely it will be located at the very bottom;
- A console will appear showing the progress of the actions. The end of the procedure becomes clear thanks to the “Install from sdcard complete” message that appears;
- Reboot your device using the “reboot phone” button at the very top of the main panel.
The process is just as fast as using the method above.