What to do if there is not enough space on your gadget? Or maybe you purchased a new smartphone, but transferring data, contacts and other settings will be time-consuming?
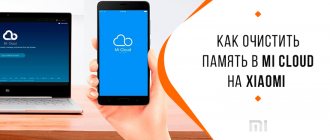
In order to solve these issues, Xiaomi specialists have developed their own personal cloud storage - Mi Cloud. Here you can store data while saving memory on your phone, tablet or computer.
The Mi Cloud cloud service is an online cloud storage in which data is stored on numerous network-distributed servers provided for use by clients under the Xiaomi flag. The only difference from ordinary cloud storage are several interesting options, which you will learn about after reading the article to the end.
Setting up Mi Cloud from a Xiaomi phone
First, I’ll tell you where Mi Cloud is located in Xiaomi and how to turn it on.
How to enable Xiaomi Mi Cloud:
- Go to “Settings”;
- Find the item “Synchronization”;
- Select Mi Cloud and click the “Activate” button.
You can get into the cloud settings in MIUI in another way:
- Go to “Settings”;
- Find the Mi Account item;
- Select Mi Cloud.
A menu opens in front of us with a list of functions (Device search, backup, recycle bin and amount of memory), and below are synchronization objects. Let's look at the capabilities of the cloud in more detail.
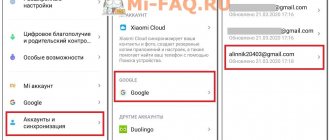
Login from smartphone
Let's figure out how to log into Mi Cloud on a Xiaomi smartphone. First, you need to go to the Accounts section in the settings and add a Mi account there.
The account menu will display the tariff plan and available space.
When you first switch to Mi Cloud, you will need to specify the available permissions. They are necessary to synchronize the corresponding objects.
Attention! When granting permission for calls and SMS, the application can send an international message as confirmation.
After permissions are issued, you can specify the necessary items for synchronization. After that, they will become available on the PC via the web interface.
Sync Mi Cloud Xiaomi
Mi Cloud synchronization and backup allows you to automatically create a copy of data from your device to Mi Cloud cloud storage. You can synchronize contacts, gallery, messages, call log, calendar, etc.
Thanks to this option, you don’t have to worry about the safety of your data, because even if the device is lost or stops working, all the information will be in the “cloud” and you can easily transfer it to a new device or view it through a browser.
How to enable synchronization with your phone:
- Go to “Settings”;
- Find the item “Synchronization”;
- Select Mi Cloud , in the “ Synchronization Objects ” tab set the position to “On.” for everything or select those objects that are needed.
Overview of the capabilities of the Mi Cloud service in Russian
When you register on the Mi Cloud website, the main window with folder icons will open. They allow you to sort all the files you upload to the cloud. In the top right corner is your profile icon. Here you can specify your device, change the user’s personal data (password, email), go to the service forum or log out of your account. Initially, all Xiaomi users have 5 GB of free space. If necessary, more can be purchased for a fee.
At the bottom of the screen there is a line where you can send a message to your Xiaomi device if it is linked to an account.
Let's look at the purpose of folders on the main page of the site:
- The Contacts folder allows you to contain your phone's contact files. When setting up an account, they can be restored to your Xiaomi phone.
- Messages is an archive of your messages, including those in Russian. Here you can view them and resend them if necessary.
- The Notes folder exists to create and store your notes.
- Gallery is your device's gallery. This is where users store all their photos and videos.
- The Recordings folder is designed to store voice recorder files and voice messages.
- Find device is a special function that allows you to determine the location of your device using GPS technology.
To use the service, you need to link your mobile phone to your Mi account. All service functions are presented in English. But even without knowing it, you can easily find your way around. Therefore, Russian is not needed to work with the cloud.
Main functions of Mi Cloud
The Xiaomi cloud menu is designed in an intuitive style, all icons are labeled:
- Contacts - data from the phone book;
- Messages - incoming/outgoing SMS messages. In addition to viewing, we can also write an SMS and send it to the recipient;
- Gallery - photos and videos from the gallery;
- Notes - entries from the built-in Notes ;
- Dictaphone recordings - Dictaphone recordings and recorded conversations;
- Find device—allows you to locate your smartphone on the map. In addition, here you see several more items: “Sound” - turns on the ringer on the phone. At the same time, the smartphone rings at maximum volume. It is very convenient to use if your phone is lost somewhere nearby; “Lost mode” - enter 4 digits to lock the phone. It can only be unlocked using this PIN code; “Erase data” - allows you to erase ALL data from the phone
- Settings - here we see how much space is left. In addition, you can view connected devices;
- Recycle Bin - used to completely delete files.
How to clear Mi Cloud on Xiaomi
To clean the Mi Cloud, do the following:
- Follow the link i.mi.com;
- Enter your Mi Account details;
- For example, select “Gallery”, select unnecessary files and delete them. In this case, the data is moved to the trash, which we subsequently need to empty;
- Go to the trash can and empty it.
Mi Cloud how to increase space
If you do not want to delete files from storage, but there is no longer enough space, there is an option to increase space in the cloud. For this:
- Follow the link i.mi.com and enter your Mi Account details;
- Click “Settings” - here you can see how much space is occupied and the total amount of cloud memory.
- Click “Buy” and select a tariff. There are three of them: Premium, Mega and Ultra.
By highlighting one of them, you see the amount of space provided, the storage period for deleted files and the number of automatic backups per day. Accordingly, the more space, the more expensive the tariff.
When purchasing a package, please note that it is not given forever: for a maximum of 12 months.
Mi account guide: how to create, configure and delete
Surely, if you have been familiar with Android for a long time, you are aware that a lot of things about setting up the system and using applications require a Google account. But now the moment has come, and you bought yourself a device from Xiaomi: a smartphone , a bracelet , or even a smart scale - for all this to work and be useful, if you please, create a Mi account.
Mi Account does a lot of things that should make your life easier. Using an account with cloud storage and other devices connected to one account, a variety of data is synchronized: call history, messages, photos, system settings and much more! Moreover, Mi Account will help ensure security on your smartphone. So, for example, if you have lost your gadget, then by logging into your Mi Account from another phone or computer you can not only see the current location of the lost gadget, but also, if necessary, delete all data from it in one click.. Moreover, if you If you don’t have a Mi account, you won’t be able to set up your new Mi Band .
HOW TO CREATE A MI ACCOUNT?
And it's very simple. First, you need to understand that you can create and use a Mi Account even if you do not have a single Xiaomi device.
From here there are two ways to create an account: • on a Xiaomi smartphone in the settings • on a computer or smartphone from another company through the website
In the first case, this is done as follows: • go to the settings of your Xiaomi smartphone • find the “Accounts” item and select “Mi account” or “Other accounts” and then “Mi account”, depending on the installed firmware • you can register an account either on mobile phone number, or by email (in the second case, you must additionally select “Other methods”). In both cases, this is done simply: click the “Registration” button and fill in the required fields with data. If you register an account on a mobile phone, you will receive an SMS message with the code necessary to complete the registration; if by email, then the message will be sent to your inbox. • after confirmation, return to the account registration window in the settings and click on “Account has already been confirmed” • to log into a new account, click on “Other methods” and enter the credentials • if the account asks for any permission to collect information from you, then we allow and use