Basic setup
Despite the fact that Android is the common OS for a million different smartphones, many manufacturers tweak and decorate the operating system in accordance with their vision of beauty. Therefore, the sequence of initial setup steps may differ slightly in different smartphones. There is no need to worry about this, just follow the instructions on the screen and you won’t miss. Now let's turn on and let's go. 1. If the device was purchased in a store, then after installing the SIM card and when you turn it on for the first time, you will be greeted by a welcome screen, where you will need to select the main interface language. Everything is simple here: in the list that appears, look for the one you need and click “Next”.
2. Following this, the system usually offers to connect to the desired Wi-Fi network so that the smartphone can communicate with the outside world and can quickly update the necessary updates. Everything is simple here - select your home network, enter a password and you're done. If something happens, you can skip this step and connect to the network later.
3. Full use of a smartphone is possible only if you have a Google account. If you already had an Android smartphone or previously created an account with Gmail or YouTube, simply enter your information and then agree to the terms of the license agreement.
4. If there is no account, then click “Create a new account” and go to the registration menu. Here you need to come up with an email address, a password and, if desired, enter your personal data. You should not skip this step, since without a Google account many services on your smartphone will not work.
Popular pure Android smartphones Google Pixel 4a from 11,100 UAH. Google Pixel 4a 5G from 14,444 UAH. Google Pixel 5 from 21,600 UAH. Nokia G20 64GB from 4,199 UAH. Google Pixel 3a from 6,378 UAH. Nokia 3.4 64GB/3GB from 3,389 UAH. Google Pixel 3 64GB from 8,825 UAH. Nokia 5.4 64GB/4GB from 4,076 UAH. Google Pixel 3a XL 64GB from 6,928 UAH. Nokia G10 32GB/3GB from 3,299 UAH. Google Pixel 4 64GB from 12,699 UAH. Google Pixel 3 XL 64GB from 9,500 UAH. Motorola Edge 128GB/6GB from 11,999 UAH. Google Pixel 4 XL 128GB from 20,595 UAH. Google Pixel 2 XL 64GB from 5,828 UAH. Google Pixel 4 128GB from 14,299 UAH. Nokia 2.4 32GB from 2,799 UAH. Google Pixel 4 XL 64GB from 17,580 UAH. Meizu M10 32GB/3GB from 3,115 UAH. Nokia C20 32GB/2GB from 2,499 UAH.
5. Next, most modern smartphones will offer you to transfer data from your previous handset to it or restore it from the cloud. The data transfer manager differs from smartphone to smartphone and is endowed with different functions from simply transferring previously installed applications to completely copying the system. Therefore, decide what exactly you want to return and what to leave in the past, and follow the instructions on the screen.
6. Almost there. Android will now prompt you to activate the necessary Google services. Usually, all items are checked, but you can uncheck unnecessary ones (for example, enhanced geolocation or sending anonymous system data to Google) and, if necessary, enable them later in the settings.
7. The last point is smartphone protection. In this menu, you will need to create a password/PIN code and add a fingerprint (if your smartphone has a fingerprint sensor). This will not take much time: you will need to touch the sensor in different places several times with the right finger and the impression will be ready. This will take a maximum of a minute, but in the future it will save a lot of time and nerves when unlocking the screen, contactless payments and authorization in banking applications.
Additional setup
After completing all the manipulations, Android will greet the new owner and offer a short introductory tour of the system. Essentially, the setup of the smartphone is complete, and now you can use it. However, we recommend devoting another 5 to 10 minutes of your time to in-depth customization of the system for yourself.
Updating the system
Even if you have a brand new smartphone, it's still worth doing. During the time that the smartphone was lying on the counter, the manufacturer could have time to roll out a whole pack of important and not so important system updates. As a rule, system updates are placed in a separate item in the smartphone settings (“About the system” or “System”), which is located at the very bottom of the list. Click on it and look for the “Software Update” item.
Checking IMEI and originality
Each gadget has an identifier, which is denoted by the abbreviation IMEI. It is unique for all smartphones; it can be used to check the originality of the gadget, and sometimes even find it if lost. However, there are cases when, under the guise of a new smartphone, they try to sell a stolen or restored device with a broken IMEI.
The easiest way to check the authenticity of a smartphone is to immediately open the dialer and enter the combination *#06#. A unique sequence of numbers will appear, which must be compared with those on the box. Some manufacturers (for example, Xiaomi) allow you to use a code to check the smartphone for originality through the website.
If the numbers do not match, it is recommended to refuse the purchase. If you ordered a gadget from a foreign online store like AliExpress, we recommend filming the unboxing so that if something happens you can open a dispute and get your money back.
Install the necessary applications
Most smartphones come with basic apps like Gmail, Skype or Facebook Messenger installed out of the box. However, such “starter packages” vary noticeably from manufacturer to manufacturer, and it often turns out that instead of the programs you need, the desktop is filled with some incomprehensible rubbish. Many people immediately after purchase pay extra to the store’s specialists for installing additional software, but this does not seem entirely reasonable to us. Since they install mostly free applications on their smartphones like Instagram, TikTok, FBReader, Pocket, VLC directly from Google Play.
Popular smartphones on Android 10 Q
Xiaomi Redmi Note 9 Pro 64GB from 6,295 UAH. Xiaomi Redmi 9 64GB from 3,963 UAH. Xiaomi Mi 10T 128GB/6GB from 9,999 UAH. Xiaomi Redmi 9T 64GB/4GB from 4,846 UAH. OnePlus 8 128GB from 14,781 UAH. Samsung Galaxy S20 FE 128GB/6GB from 14,001 UAH. Google Pixel 4a from 11,100 UAH. Xiaomi Poco X3 NFC 64GB from 6,499 UAH. Xiaomi Redmi 9A 64GB from 3,349 UAH. Xiaomi Poco M3 64GB from 4,499 UAH. Xiaomi Redmi 9 32GB from 4,199 UAH. Samsung Galaxy A51 128GB/6GB from 6,999 UAH. Xiaomi Redmi 9 NFC 64GB from 3,963 UAH. Xiaomi Mi 10T Lite 128GB from 8,399 UAH. Xiaomi Redmi Note 9 Pro 128GB from 6,299 UAH. Xiaomi Redmi 9T 64GB/4GB NFC from 4,850 UAH. Xiaomi Redmi Note 9 128GB/4GB from 5,509 UAH. Samsung Galaxy S20 FE 256GB from 15,899 UAH. Samsung Galaxy S20 Ultra 128GB from 28,999 UAH. Samsung Galaxy Note20 Ultra 5G 256GB from 26,733 UAH.
Then why not do it yourself? We look for the Google Play icon in the menu or on the desktop, click on it and enter the name of the desired application in the search bar. Then we go to it, select “Install” and give it the necessary permissions to use the smartphone. And so we repeat the process for each application. Everyone has their own list of “needs,” so it’s difficult to give any recommendations. If you don’t know what you need, then be sure to look at thematic recommendations on Google Play itself or Google “the best apps for Android.” The main thing is not to rush to fill your smartphone to capacity, then you will forget what you installed and why, and the smartphone may slow down.
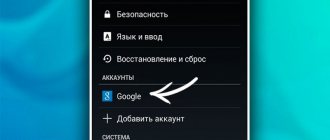
Creation or authorization into accounts
To create or log into accounts, go to the appropriate menu item - “Accounts” or “Accounts and synchronization” , select the application in which you need to log in. Authorization takes place using an existing account, or a new one is created.
Let's look at creating a new account using Google as an example. After selecting the “Add account” and the application type, we proceed to filling out personal data: Full name, date of birth, gender. At the next stage, we come up with a strong password.
For security, it is recommended to link your Google account to your phone. This will avoid losing data such as passwords and personal files.
Once the account has been created, the user has access to Google applications (Mail, Drive, YouTube, Google Play and many others), as well as use the account to make payment transactions.
Upgrade your home screen
Getting to the desktop after the first launch, the user sees only those utilities that the manufacturer decided to draw your attention to. Naturally, you can customize it for yourself and display only those applications that you really need on the main screen. In addition, you can add special widgets to Android (weather, clock, exchange rates, player, etc.) that allow you to interact with the application directly from the desktop. Applications are added to the desktop by simply dragging the icon to the desired location. To add a widget, you need to click on an empty area of the screen for a few seconds, then in the menu that appears, click on the “Widgets” section and select the one you need from the general list.
Changing the wallpaper
The desktop of a smartphone should please its owner. Especially at first. Wallpaper is an integral part of it and this is what the eye catches first. Instead of scouring the web and manually selecting them, install an app that will update your backgrounds automatically. For example, Wallz or WallHub. It is likely that you already have a similar wallpaper application on your system. Search for "Wall" or "Wallpaper" in the title.
The perfect start to your new Android smartphone
Set up screen lock
To prevent anyone from using your smartphone, protect it with a PIN code, password or pattern. Most modern smartphones now come with a fingerprint sensor, making secure unlocking a convenient process. Face unlock has also become another common option. This is important to know: if you choose the so-called biometric unlocking process, you must also set a PIN, password or pattern as a backup solution. This way, you won't be able to unlock your phone just because your fingers are wet or the smartphone doesn't recognize your face in the dark.
Fingerprint sensors are now even integrated into the display / © NextPit
Locking the screen has other advantages, which we discussed in a separate article. Warning: In case you forget your password, you should have alternative methods ready. We have also explained how to do this separately:
Install updates
Your smartphone will likely be constantly connected to the Internet. In theory, this means that it is always vulnerable to external attacks. You can do your part to protect yourself by regularly checking and installing operating system updates. Many manufacturers provide these updates on a monthly basis. Hence, you will likely be asked if you want to download these updates soon after setting up your new smartphone. It is highly recommended to install them to the latest version to minimize any possible security loopholes. This is especially important for smartphones that have been on the market for a while, and although it can be quite a lengthy process, it is worth your time and effort.
Start by installing the apps that matter to you. We've compiled a selection of good apps from the Play Store for you over the years. You can also choose from a wide range of games on the Play Store to keep yourself entertained. Your new smartphone would come with a lot of apps pre-installed. On the one hand, there are various applications from the manufacturer that are often impossible to remove, they consume system resources and are rarely optimal application solutions. You can deactivate them and thus free up a little more space and enjoy a smoother user experience.
Personalize your phone
Personalize your phone. A new wallpaper, a different ringtone, or even a different launcher will give your smartphone a completely new look. In a separate article we will tell you where to find wallpapers, ringtones and launchers, and which ones we recommend:
Back up your photos with Google Photos
One of Google's favorite pre-installed apps and services would be Google Photos. This app allows you to store your photos on Google. This has two benefits: first, you can no longer lose your precious photos on your smartphone. Secondly, you can delete images after downloading them from your smartphone and free up additional space on your device for new photos. For a long time, Google Photos offered unlimited storage space—but now Google counts the number of images you upload against your storage quota. Despite this development, Google Photos is still a good way to manage photos on your smartphone. Because even without a backup, the basic idea is this: Photos are automatically tagged and can be easily found.
Google Photos is a good way to manage your photos despite storage limitations / © NextPit
Google Photos
How to search for new applications?
Smartphones are your personal companions and what you make of them. With the right apps, you can use your smartphone effectively by providing it with many practical features. You can compose music on your phone, edit videos, or even learn new languages. Here we would like to direct you to our best app lists, where you can find featured apps on specific topics or application areas.
Additionally, you should take care of your smartphone and clean it regularly so that it doesn't slow down over time due to memory full or too many apps running in the background. To learn how to clean your smartphone of malware and junk data, check out the linked article.
Customizing the notification shade
The curtain for notifications and quick settings is the best invention of mankind since penicillin and the internal combustion engine. It allows you to quickly turn on/off geolocation, NFC, Wi-Fi, flashlight, auto-rotate screen, and basically anything in one click. Therefore, it would be logical to configure it immediately after the working screen. To do this, drag your finger from top to bottom across the screen until the curtain comes out. An icon resembling a pencil will appear in the upper right corner next to the gear icon. Click on it and go to the curtain settings menu: here you can change the order of the quick access icons, add the ones you need or, on the contrary, remove the unnecessary ones.
Get ready for active work
Immediately put your phone on charge. You'll probably be using your new smartphone a lot over the next few hours. It would be a shame if your smartphone suddenly dies in the middle of an important process.
Immediately connect to your home Wi-Fi network if available. Not all mobile operators provide unlimited Internet. And you're almost certainly going to download a lot on your first day, installing apps and games.
Setting up display settings
Basic display settings often suit only a small number of users. Instead of being disappointed in the phone because of the “wrong” colors or large font, go to the smartphone settings and look for the “Screen/Display” section. First of all, we advise you to play with the color mode and temperature; these parameters can radically change the impression of your smartphone. Also in the settings you can set the desired brightness (or enable automatic brightness change) and font size. In the same section, you can configure the inclusion of a special night mode, which prevents exposure to blue light, which is especially negative when using the phone before bed.
Protect your device
Your phone contains sensitive information, especially if you use it for banking, online shopping and home delivery. It is important to implement measures to protect your data.
Setting a PIN to unlock is a security option available on all Android phones. Many of them have fingerprint scanners, a faster and more secure option. There are already devices that offer face unlock, although in many devices this feature is not as secure as a PIN code or fingerprint scanner.
You can check if your device supports Smart Lock. This is a rather useful feature that allows the smartphone to bypass the lock in certain situations. For example, the phone will not be blocked if it is near a certain Bluetooth device, such as a smart bracelet.
Adjusting battery consumption
How often you charge your new smartphone will greatly affect how you use it. Therefore, we strongly recommend that you go to the settings menu, find the “Battery” item and do a little magic there.
Popular Android smartphones with good battery
Xiaomi Redmi Note 9 Pro 64GB from 6,295 UAH. Xiaomi Poco X3 NFC 64GB from 6,499 UAH. Xiaomi Redmi Note 9 Pro 128GB from 6,299 UAH. Xiaomi Redmi 8A 64GB from 3,485 UAH. Motorola Moto G9 Play 64GB from 3,799 UAH. Samsung Galaxy A21s 32GB from 3,980 UAH. Samsung Galaxy A31 64GB from 5,224 UAH. Motorola Moto G9 Plus from 5,999 UAH. Xiaomi Redmi Note 9S 64GB from 5,249 UAH. Samsung Galaxy M11 32GB from 3,550 UAH. Asus Zenfone 8 128GB/8GB from 17,099 UAH. Samsung Galaxy A21s 64GB/4GB from 4,948 UAH. Samsung Galaxy A02s 32GB/3GB from 3,725 UAH. ZTE Blade A7 2021 32GB from 2,399 UAH. ZTE Blade A7 2021 64GB from 2,649 UAH. Vivo Y30 64GB from 4,499 UAH. Doogee S88 Plus from 6,799 UAH. Blackview BV9100 from 5,599 UAH. ZTE Blade A7 from 2,149 UAH. Xiaomi Redmi Note 9S 128GB from 6,159 UAH.
In the parameters, the first thing you need to do is set the lower charge threshold, when reached, the energy saving mode will turn on. In some shells you can set this value with an accuracy of one percent, but most often it is a fixed value like 10%. You also need to decide whether to use the Battery Manager or Adaptive Battery features. The first will identify programs that consume excessive power and offer to limit their operation. In the second case, the system itself will monitor which applications you use least often and limit such background processes to extend the life of the smartphone on a single charge. The names and principles of operation of these features may differ slightly depending on the shell and version of Android, but the principles of their operation are general.
We additionally save energy consumption
In addition, battery consumption is greatly affected by screen brightness, conversations and the use of wireless networks and additional services. The general recommendations here are: turn off Wi-Fi, mobile Internet, Bluetooth, NFC and geolocation when you don’t need them. And in the screen settings, check the box next to “Auto”. Then the smartphone will adjust the brightness depending on the lighting around it, and not constantly shine at 100%.
Sending data about device operation
This feature offers to send diagnostic data and reports on the operation of the smartphone to improve the Android mobile system. Sometimes users are asked to join a testing program. It allows you to install new versions of the operating system before the official release. In theory, customer reviews help developers quickly fix problems found during the operation of a smartphone. In fact, there will be no noticeable effect from this.
We use mobile traffic wisely
Although mobile operators are handing out increasingly generous monthly packages with mobile traffic, it would be a good idea to monitor it. Step one - go to the system settings, look for the “Network and Internet” item, then “Data transfer”. There we will find the “Set traffic limit” menu, in which you can specify how many megabytes the smartphone can download before you are shown a notification. After reaching this limit, mobile Internet will be disabled.
It would also be a good idea to limit application updates via the mobile network. To do this, open Google Play and click on the icon with three vertical stripes in the upper left corner. An additional window will open in which you need to select the “Settings” menu. In it we look for the item “Auto-update applications” and select “Only via Wi-Fi”.
Summary
The prospect of setting up a smartphone yourself scares many buyers, but in reality there is nothing difficult about it. Android has come a long way from a clumsy “bucketroid” to an extremely convenient and well-thought-out operating system, so reading these instructions will most likely take you even more time than the setup itself. The main thing is don’t be afraid to “do something wrong” (it will be difficult) and don’t panic if you can’t find the right item in some menu. As we have already said, each smartphone manufacturer tweaks Android in accordance with its own ideals of beauty, so some menu items may be called a little differently than in the text, or hidden in another section.
Calibrating the screen and top curtain
If the device does not respond correctly or takes too long to respond to touch, the screen may need to be calibrated. This can be done in several ways - through settings, using special utilities, or through the engineering menu. Before starting calibration, you should check that nothing interferes with the correct operation of the sensor (the screen is clean, the protective film is glued evenly and the system is not overloaded).
Today, some phone manufacturers build screen calibration utilities into the operating system. To use it, you will need to select the “Display” or “Screen” .
If there is a “Screen calibration” , select it. Next, follow the instructions on the screen, as a rule, click several times in different places on the screen.
To calibrate through the engineering menu, you will need to dial a certain combination corresponding to the brand of the phone manufacturer.
In the menu that opens, select the “Sensor calibration” , and before starting calibration, reset the touchscreen settings (for correct settings in the future).
If the previous methods are not suitable, special utilities (for example, Touchscreen Calibration) are installed, including for automatic calibration.
The status bar of the smartphone usually displays the current time, notification icons of installed applications, network signal level and battery charge, etc. When you open the curtain, an expanded list of the most frequently used functions appears: network connection, flashlight, auto mode, etc.
To change the list of functions, you need to open the curtain, click the edit button and move the function buttons in the required order.