What is a proximity sensor
You've probably noticed that during a call the screen turns off completely and does not respond to accidental presses and touches. This way, the user won't mute the current call with his ear, open the keyboard, or switch to speakerphone. It is very comfortable. In addition, when the display is turned off, battery power is significantly saved.
This simple function is called proximity sensor . The sensor detects the physical proximity of the device to any object, and the screen automatically dims.
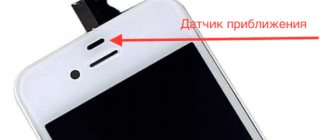
But where is the proximity sensor located, and what exactly is it? You can notice the detail on the front panel of the device near the front camera. It looks like a small round element .
Method 2: Special software
If the engineering menu options do not allow you to configure the proximity sensor, try using third-party software that can be found on specialized forums or in the Google Play Store. In the application store at the moment, the Proximity Sensor Reset Tool is considered the most popular. It works on any device, but you can fix the calibration result at the system level only in “rooted” devices, otherwise the settings will be reset every time you reboot Android.
- Let's launch the application. To check the functionality of the sensor, open the “Menu” and tap “Test Sensor”
and bring your hand or object to the sensor. It works if the indicator turns green.
- Go to the main screen and click “Fix It Calibrate Sensor”. Before calibration, it is better to remove the protective glass and clean the surface above the sensor.
- We touch the area where the proximity sensor is located several times with our finger and click “Next”.
- Cover the sensor with your hand to determine the maximum proximity value and move on to the next step.
- We remove our hand from the sensor so that the software calculates the minimum value.
- Tap “OK” to save the settings. Reboot the system. If the device is rooted, the application will edit the corresponding system file. If there are no root rights, Proximity Sensor Reset Tool will remember the parameters, but after each reboot of the phone it will automatically recalibrate, i.e. In this case, the application cannot be deleted.
- If the proximity sensor does not respond, use the Overrider function. It is proposed to replace the standard sensor with a proximity service for the application program, which will turn off the screen when you bring the phone to your head, and enhance the effect using a light sensor. The developers do not guarantee 100% results, but you can try. Tap the “Overrider” icon on the main screen and launch “Proximity Service”.
Additionally, we enable the “ProxLight” option.
It's easy to check how the function works. You don't even need to make a call to do this. Simply cover the proximity sensor with your hand to lock the screen.
Preliminary check of the sensor
If you notice that the sensor is not working correctly, you should not calibrate it right away . It might just be disabled. Below you will find some tips that will help you determine the activity of the option and configure it correctly.
Enabling the proximity sensor
- First, go to “Challenges” . There will be “three stripes” in the lower left corner, click on them.
- We are redirected to a standard page with all the items for detailed settings. Click on the section “Incoming calls” .
- Now look at the inscription “Proximity sensor” . Blue slider? This means that the function is activated and the sensor does not work for other reasons. If the slider is gray, simply move it to “On” .
Disabling the pocket lock feature
The proximity sensor is also used to prevent unwanted clicks in your pocket or bag. This feature is certainly very useful, but sometimes it does not work correctly.
If you notice that the sensor is not functioning properly, try disabling Pocket Lock . For this:
- Find the “Settings” icon on the main screen and launch the menu;
- We go down to the “System and device” section, where we click “Lock and protection”;
- Next, go to “Advanced settings” . And here we move the slider to the “Off” opposite the inscription “In Pocket” . Ready.
Disabling the accidental click prevention feature (MIUI 9)
This item will work on older versions of MIUI. In MIUI 10, the function was moved to the “In Pocket” mode.
Here the situation is almost similar. The screen goes blank when the sensor does not detect light . For example, the display will not function in the same pocket.
But sometimes, even when in the owner’s hand, the phone does not respond to touches, and Face ID does not work. In such situations, it is necessary to disable the function. To perform this operation, you need:
- Go to Settings and visit the “Lock screen and password” item;
- Go down to the “Advanced” tab;
- And uncheck the box next to the “Prevent accidental clicks” section.
Note! The sequence of items may vary slightly depending on the MIUI version and phone model.
Disconnection methods
If the sensor interferes with you during calls, opens other applications, dials other numbers, or stops working, then it can be disabled at the request of the owner. How can you disable the proximity sensor on Android smartphones:
- Through the settings of your smartphone.
- Through the installation of special programs. 2 programs will be considered - Smart Screen on/off and Sensor Disabler.
We will analyze all the methods so that you can use the most suitable one. Options will be considered on the Android version from 9.0 Pie. You can check the installed firmware by going to the “System” section in the settings and then “About phone”. The line “Android Version” will indicate the current one.
Through your smartphone settings
To turn off the option through your smartphone settings, follow these steps:
- Go to the settings section of your smartphone and scroll down to the “System Applications” section.
- Among the available applications, find “Calls” and go to the section to view detailed information.
- Among the listed options, find “Incoming calls” and click on the line to go.
- Find the "Proximity Sensor" item and click on it so that the slider turns gray. This means it will be disabled.
Through the installation of special programs
First, let's look at turning it off using the Smart Screen on/off program. To do this, follow these steps:
- Find the program in the Play Store and install it.
- After successful installation, open the application and click on the “OK” button to allow access to the device.
- You will be redirected to the next page where you need to click the “Activate” button.
- You will be redirected to the main page of the application, where you need to move the largest slider to the left to disable the proximity sensor. It should turn red.
The last way to disable it is through the Sensor Disabler app. To use this shutdown method, follow these steps:
- Install the application of the same name in the Play Store.
- After installation, click on the “Open” button to start working with the application.
- Check the box indicated and click the “OK” button.
- Swipe right to go to settings or click on the three horizontal lines in the upper left corner.
- Scroll down the settings menu to the “Proximity” section and click on it.
- From the available options, select “Remove sensor”.
- Click on the save button, which is located in the lower right corner.
After saving the data, the parameter settings will be saved.
Instructions for calibrating the proximity sensor on Xiaomi
If the above actions did not have any effect, there is only one way out - calibrating the proximity (light) sensor. On Xiaomi smartphones this is a fairly quick and simple procedure, but still be careful.
Enter the engineering menu
First you need to get to the menu that allows you to perform calibration. Therefore, we take the phone, open “Calls” and type the following key combination without quotes and periods: *#*#6484#*#*.
We do not press the call button , since the menu opens automatically. After a second, a page called hardware test should appear on the screen.
We test the light and distance sensor
In the window that appears, pay attention to two items: “Light sensor” and “Distance sensor” . We go to each tab in turn, following the instructions indicated on the screen. Namely:
- Cover the front panel of the phone with your hand, moving your palm closer and further several times.
- Just below the text on a gray background is the value 0.0 . Let's look exactly there. If everything is in order with the sensor, the zeros will change to some other number . If no changes occur, then the sensor is faulty and calibration is necessary.
- Now let’s move on to the distance sensor: click on the “Calibration” .
This method has been tested on Redmi 5 Plus and Redmi 4X phones . Everything works great.
How to calibrate the proximity sensor
If the settings do not bring the desired results, you need to calibrate the proximity sensor of your Xiaomi. But before that you need to make sure that it works.
To conduct a verification test, you must first open the engineering menu:
- go to “Phone” and dial the combination *#*#6484#*#*;
- You should not use calls, the menu will open on its own;
- In some phones this combination may not work - then you should press *#*#4636#*#*;
- in the menu that appears, select Single item Test;
- in the next window that opens, look for and select Proximity Sensor.
The Xiaomi Redmi Note 7 smartphone takes a slightly different path. You need to go to “Settings”, select the “About phone” item, in the engineering menu that opens, click on the “Kernel Versions” item several times
A test will appear on the smartphone screen, on which you will see a number or the inscription “Far”, depending on the version of the phone.
Place your palm on the phone's sensor and cover it completely. The illumination numbers on the display should change to 0, and the word should become “Close”. Repeat this several times. If the numbers or words change, then the sensor is working and you can proceed to calibration.
To calibrate the sensor, you need to completely turn off your smartphone. Then press and hold the side power and volume keys at the same time until you hear a vibrating buzzing sound. After this, you need to release the power key while continuing to hold “Volume”.
A menu should appear on the display. If it is in Chinese (most likely), translate it into English by selecting 中文. After that, select PCBA test, and then Proximity Sensor.
The adjustment must be carried out on a flat surface, placing the smartphone in a horizontal position.
Bright light sources should be removed and the sensor should be clean and free of protective film or glass.
To begin calibration, click the Calibration button. When finished, click on Successfully and exit the program. Next, turn on the phone and check the operation of the proximity sensor during calls and conversations.
What to do if calibration does not help
Proximity sensor not working even after calibration? This is already an alarming signal indicating serious problems . Below you will find some tips that may be relevant in such a situation.
Reset
The first thing to do if calibration does not help is to reset to factory settings. Unfortunately, this option does not always help , but for prevention purposes it’s worth a try.
To avoid losing important data, be sure to make a backup before starting the operation. Also transfer the necessary materials to a safe place (computer or external storage).
Authentication
Are you sure that you own a real Xiaomi smartphone? Recently, the release of absolutely low-quality fakes has become more frequent, so users need to be careful.
Make sure your phone is genuine by going through a special check. This is especially true for recently purchased mobile devices , in which some functions suddenly stop working.
To avoid such problems in the future, always purchase electronics from trusted sellers. The best way is to purchase in company stores.
Changing MIUI version
If you are an experienced user with good technical skills, then you should try reflashing . Low-quality software, such as “Vietnamese” firmware or crooked custom ones, often causes bugs and glitches in certain options.
The best option is to install Global Stable ROM. Yes, such shells have some drawbacks, but stable and well-coordinated operation of the phone is ensured.
Going to the service center
And the last option to solve the problem is to visit a service center . Specialists will diagnose and possibly disconnect the sensor, after which a new sensor can be installed. If the smartphone is under warranty, the repair will be completely free.
What can interfere with the sensor?
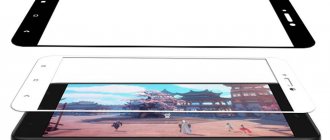
One of the reasons for a proximity sensor not working correctly is physical interference in its operation, namely protective film or glass. For example, our employee’s xiaomi redmi note 3 pro does not have this proximity sensor working for this exact reason. If you do not have holes for the light sensor, then you need to either change the film/glass or make this hole yourself. This sensor is usually located above the screen, next to the front camera and earpiece. Low-quality or universal films usually suffer from this problem. Therefore, before purchasing a protective coating, be sure to check the presence of all holes.
How to disable the proximity sensor via Sensor Disabler
If the required option is not available in the system settings, then on an Android phone you can try disabling the sensor using a third-party application. In this tutorial we will use Sensor Disabler. Procedure:
Step 1 . Launch Play Store and download Sensor Disabler to your phone. Wait for the installation to complete and click on the “Open” button to start working with the application.
Step 2 . Call the "Settings" menu. To do this, swipe right or click on the icon in the form of three lines (in the upper left corner). In the menu that opens, click on the “Proximity” item.
Step 3 . Select “Remove sensor” to disable the proximity sensor (“Do nothing” - leave the default values, “Mock sensor values” - calibrate the values manually) and click on the “Save” icon in the lower right corner.
The changes will take effect immediately. With Sensor Disabler you can also revert to default values at any time. To do this, select “Do nothing” in the “Proximity” settings.
Other causes of the problem
The reason that automatic brightness is glitchy is due to incorrectly selected protection for the screen. Some glasses and films do not provide special holes for the sensor, which is located near the front camera. Check the protective film. Even if it is correct in size, it can cause interference in operation precisely due to the lack of the necessary holes. This problem especially often occurs among users with universal films and glasses.
The sensor often does not work after replacing the original Xiaomi screen. To solve this problem you need to contact a service center.
Another cause of problems is incorrect or old device firmware. This can be corrected by upgrading to new firmware versions. However, do not forget that after the update, all data and applications will be deleted. As well as unnecessary or harmful information.
Please note that all the given methods for solving the problem with the Xiaomi proximity sensor are advisory in nature. If the problem cannot be resolved, contact an authorized service center.
Using third party software
If all the previous methods to normalize the sensor’s operation did not help, then you can use the “Proximity Sensor Reset” application (for rooted devices).
Download and install the program from the Play Store . After launch, activate the large “ Calibrate Sensor ” button. Now cover the proximity sensor with your hand and click “ Next ”:
Next again , and then “ Calibrate ” and “ Confirm ”. We grant superuser (ROOT) rights to the system request. After completing the steps, wait for the smartphone to reboot.
Now you know how to turn on/off/configure the proximity sensor on Xiaomi. However, if in your case the problem has not been solved, then it is possible that you will need to calibrate the display or reflash the smartphone. In addition, sometimes the sensor may not work correctly due to a hardware failure, then you cannot avoid contacting a service center for help.
Through the Xiaomi engineering menu
Using the engineering menu, you can check the correct operation of the sensor and, if necessary, calibrate it.
To do this, enter the following set of characters in the dialing field: *#*#3646633#*#* Now open the “ Hardware Testing” and press the “ Sensor ” button, select “ Proximity Sensor” ):
Next, for testing:
- Select “ PS Data Collection ” (proximity sensor data collection);
- In the next window, select “ Get One Data ”;
- 0 appears, place your palm on the proximity sensor on your smartphone and press “ Get One Data ” again;
If as a result we see the number 255 , then our sensor is functioning normally.
For settings:
Select “ PS Calibration ”, then “ Calibration ”. After that, without covering the sensor, click on “Calculate min value”. Calculate succeed appears at the bottom of the display, we bring a sheet of paper to the sensor at a distance of 2-3 centimeters and click on “ Calculate Max value ”, after which we just have to click “ Do Calibration ” and restart the smartphone:
Causes of problems
Speaking about the occurrence of a sensor problem, we can identify some cases that may lead to problems. The main part relates to the settings inside the phone.
Causes of problems:
- The sensor function is disabled;
- Activating unnecessary options;
- Incorrect film or protective glass. Operation may be disrupted if the glass or film does not have a special hole for the speaker or front camera. In such a situation, you just need to change the protective material.
- Incorrect operation of the device itself. Only in this case will it be necessary to calibrate the sensor
Now let's look at each case separately.
Another way to prevent unwanted clicks on Xiaomi:
- Open “Settings” and scroll the page a little;
- Open the “Lock screen” section and activate the “Prevent accidental clicks” function;
Ready.
If none of the above methods for setting up the sensor helped you, move on to more labor-intensive operations.
Disabling the lock in your pocket:
- You'll need to get to the call menu again through the Phone app;
- There, in the “Incoming Calls” tab, there is the “Block in Pocket” option, which should be disabled;
Ready.
Please note that the Pocket Lock feature is not present on all Xiaomi models or is located in a different location. As a rule, these are old versions of smartphones. For example, on the Xiaomi Redmi 3, Xiaomi Redmi 4 and Xiaomi Redmi 5 models, the path to this option will be different.