Perhaps the most pleasant and useful advantage of phones, besides games, calls and applications, is the excellent quality of the photographs they create. Even mid-priced phones have already been able to replace the camera, allowing users to capture vivid impressions and share with others. However, in some cases, the owner of the gadget encounters problems with saving the photos or other content he creates. Why does the phone give errors when saving photos to the gadget and how to solve this problem?
Software glitches
Many software glitches can be resolved by rebooting the phone. Because when using a smartphone, several errors could accumulate. In order to reboot, you must:
- Hold down the power button and select “Restart”.
- When the phone reloads all the data and turns on, try taking some picture or screenshot.
- If it is preserved in the gallery, then there are no more problems.
If this doesn't help, try the following:
- If your phone has a built-in memory card, move all data and applications to it.
- Then take it out of your phone.
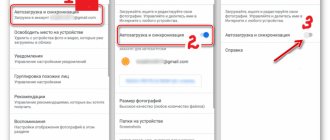
- Find Settings and select Backup & Reset. This is usually at the very bottom.
- Then reset everything. Just before doing this, read the information about resetting the data, confirm the action and wait for completion.
What to do if photos are not saved on your phone
Often the pictures do not remain on the device. This can happen on a new smartphone you know nothing about, or on one you've had for many years. If the photos are not saved in the “Gallery”, you must adhere to the following steps.
- Go to the settings and set the “Save to flash card” mode. This feature is not present in all gadgets.
- On your phone, find the “Erase data” function in the camera.
Then format and reboot the gadget. Do not forget to periodically transmit information on other media.
Full application cache
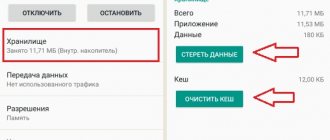
It happens that photos are saved on the phone, but the gallery refuses to show them. In such cases, proceed as follows:
- Go to your phone settings.
- Find "Application Manager".
- Find "Gallery" in the list.
- Click Clear Cache. Do not confuse this with the “Clear data” button, otherwise all photos and videos will be deleted. These are different teams.
- Go to the gallery and check for photos and videos.
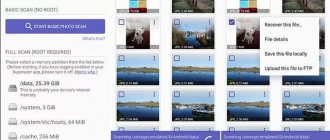
If after this the problem still bothers you, download the free program for your smartphone QuickPic. It will help you view photos and videos without the gallery.
Causes
First, let's figure out why Honor doesn't save photos in the gallery or on a memory card. The main reasons include:
- The cache in the Gallery is full.
- Lack of memory on the phone or memory card.
- There are problems with access rights.
- Problems with the camera or mobile device.
These are the main reasons why photos and other data are not saved on Honor’s phone. To solve the problem, you can do without the help of the support service and resolve the issue on your own.
Lack of free memory space
If the notification about lack of memory pops up frequently, then it’s time to clean it. Here's how to do it:
- In settings, click on “Memory”.
- If memory is low, delete unnecessary music, books, documents, or photos and videos.
- Clear the cache of all applications, this will free up your smartphone memory, at least a little.
- You can also get rid of apps you don't use if you installed them yourself.
- Using CCleaner, you can delete all unnecessary files on your smartphone.
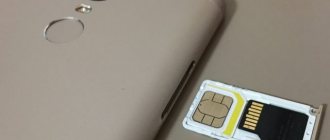
If your phone does not see the flash drive, which is why it does not save the photo, take it out and insert it again after a while.
Transfer files to SD card
To free up space, transfer data from internal memory to a USB flash drive. For this
- go to the " Files "
- select the subfolder of interest (photos, videos, documents, etc.).
- Tap and hold a file for a second until it is highlighted.
- Select one by one all the photos/videos/audios that you want to transfer to another location or click “ Select all ” if there is such an option.
- Click the " Move " button.
- In a new window, select “ Memory card ”, and then select a specific folder.
- Please wait until the data transfer is completed.
- Repeat the same procedure with the rest of the information.
Insufficient access rights
One of the most common reasons is insufficient access rights. You may not have access to the folders that contain your photos. The solution is simple:
- You need to rename the folder called DCIM.
- Then restart your phone.
The smartphone itself will create a new folder with the same name as the deleted one. All subsequent photos will be saved there.
If there is a recent photo left in this folder, you can transfer all the old photos there using a PC and a USB cable. Then all the pictures will be available for viewing and will remain in the new folder.
Rules for saving photos
If you do not know how to correctly save sent pictures from various applications or MMS, you can use the following brief instructions.
When using the Instagram app, you can't just save photos. The platform does not provide a direct option. You can save your processed photos in the application via drafts. Additional manipulations will be required with other people's photos:
- We repost the photo through a third-party application. It will be saved automatically to a folder on your gadget after viewing it on Instagram.
- We take a screenshot of the screen, and then crop off the excess.
- Install a third-party program for saving images (Insta Download, InstaSave and analogues).
Read How to post photos on Instagram from a computer
WhatsApp also has certain subtleties in saving photos. Only in correspondence, pictures are saved automatically, but if you delete the conversation history or application, they will disappear. To transfer them from the application you must:
- Allow application access to multimedia files during installation.
- Check the boxes in the settings for downloading multimedia files.
- Now the photos will be saved automatically in a folder with the name of the application itself.
If you do not check the box for loading data, the pictures will only be available in the chat.
Telegram
The Telegram application allows you to save images directly. We follow the following instructions:
- Open the sent image.
- Click on the icon with 3 dots in the right corner of the screen.
- Select the line “Save to gallery”.
Photos will be saved in a folder with the name of the program. You need to look for them not through the Android device’s gallery, but directly along the “Files”, “Images” path.
In contact with
You can save pictures from the VKontakte mobile application in the same way as the telegram application:
- Open the image.
- Click on the icon with 3 dots.
- Select the line “Save”.
The picture can be found in the “Downloads” folder (another folder may be called “Downloads”).
Viber
In the Viber messenger, photos can be saved using the following algorithm:
- In the settings, set the automatic saving of pictures to a folder that has the name of the messenger.
- When displaying pictures on the screen, we select to save manually when we click on the “Save to Gallery” button.
- New versions of Viber already have a separate “Save” button.
As with WhatsApp, there is no need to set automatic saving. This is relevant in cases when you only need one photo, and not all that you exchange in chats.
Skype
If the photo was sent via Skype messenger, then to save it you should:
- Open the photo.
- Tap on it and hold it.
- Select “Save” in the menu that opens.
Saving pictures from MMS messages
In the Android system, saving attachments is performed according to the following algorithm:
- Open the picture sent in MMS.
- Click on it and hold it.
- In the menu that opens, select the line “Copy to SD card”.
There are third party applications to save attachments from MMS messages. They can be installed from the Play Market.
Problems with camera
Photos may not be saved due to problems with the camera. What to do in this case:
- Open your phone settings.
- Find your camera and reset it.
- Then confirm the action several times.
- After rebooting your device, take new photos. Check their availability in the gallery.
We looked at 5 reasons and 5 solutions why photos are not saved on a smartphone. The choice of a convenient way to solve the problem is yours. If none of the options help, your phone needs a flashing. Then you should contact a specialist so as not to injure your smartphone.
- Author: Elena
Rate this article:
- 5
- 4
- 3
- 2
- 1
(4 votes, average: 4 out of 5)
Share with your friends!
Photos are not saved to the memory card
Often images are not saved to additional storage because it is not displayed on the device.
In this case, do the following:
- Remove the external drive, restart the device, and reinsert it.
- Monitor the flash drive for errors, format it.
- Unlock the device.
- If no card format is visible, then there is a problem in the internal system of the device. So you need to contact the service src=”https://mobi-insider.com/wp-content/uploads/2019/11/ne-sohranjajutsja-foto-na-telefone.jpg” class=”aligncenter” width=”520″ height=”516″[/img]
- Not all gadgets support cards. After all, today the micro standard is mainly used.
This way you increase the storage of your device.
If you have any questions or complaints, please let us know
Ask a Question
Option 2: Transferring Pictures
If you need to move captured images to microSD, you need to use a file manager. In “pure” Android 11 it is present by default, as in most current shells, but if it doesn’t suit you for some reason, you can install an alternative one.
Read more: Best file managers for Android
- In the version of the “green robot” used in our example, the desired application is called “Files”, tap on it to open.
- Click on the three bars in the top left, then select Main Memory from the menu.
- Navigate to the folders “DCIM” – “Camera”, then call up the context menu by clicking on the three dots and use the “Select all” item.
- Open the menu again and tap “Copy to...”.
Note. It is recommended to choose copying, because if an error occurs during the transfer (for example, due to a low-quality microSD), the files may become inaccessible.
Exit to the main menu (see step 1) and go to the memory card.
- The contents of the DCIM folder can be copied to the same directory on a removable drive or you can select any suitable location. Regardless of the location you select, click Copy.
As you can see, this operation is also not complicated.