How to turn on the proximity sensor
Before you enable the proximity sensor on your Android device, it is important to find this option in the settings of your mobile device. On equipment of different brands it is placed in different places.
Usually you need to open "System Applications" and go to the "Phone" .
Here you should select the “Incoming calls” and move the slider opposite the line with the module name to the working position (or set the checkbox).
On smartphones from some companies, the required section can be found by dialing the number and opening call settings. In other cases, for example, on Samsung smartphones, you should open call logs, go to settings and activate the desired function there.
Features of setting up the proximity sensor on Android 9
With minimal knowledge and skills, setting up a proximity sensor on smartphones is not a difficult task. There are some differences depending on the OS. They mainly concern the names and order of buttons. On Android 9, the module activation process goes like this:
- Enter "Challenges".
- Click on “Settings”.
- Tap on “Incoming calls”.
- Activate the “Proximity sensor” item (check the box or slide the switch).
The sensor works differently on older versions
The sensor setup goes like this:
- Find in the Play Store (using the search bar) the item “Proximity sensor Reset repair”.
- Activate the “Install” button and wait until the installation is complete.
- Click the “Open” button to start working with a third-party application.
- Click on “Fix It”.
- Follow the instructions that appear.
- Use the “Ok” button to save the settings.
- Reboot the device.
Modern gadgets are replete with various sensors. All of them are designed to make them easier to use. Manufacturers are racing to launch new updates. But even the most proven programs sometimes fail. What helps is that there are ways to fix almost any problem.
How to configure (calibrate) the proximity sensor
In cases where the module does not work correctly (the display does not turn off when approaching a person’s head or goes out when moving away from it), it will need to be adjusted. To do this, it is important to know how to calibrate the proximity sensor on Android. This problem can be solved using built-in system tools, through the engineering menu, or through third-party utilities.
We recommend: How to set music to alarm clock on iPhone
Before you begin calibration, you need to find the module on the smartphone body. Most often it is located at the top of the display, near the front camera. To find it, when making a call, move the mobile device away from your ear so that the screen lights up, and then move your finger to the selfie camera and swipe left or right from it. If the display turns off, it means that the required node is located in this location.
In some cases, the functionality of the module is impaired due to dust. To fix such a breakdown, just turn off the gadget and thoroughly blow and wipe the area around the element. Next, you should restart the device and check its functionality. If the problem persists, you should proceed with calibration.
System capabilities
Built-in services are the easiest way to perform calibration. To do this, you need to go to the settings of your smartphone and select this option “Display” or “Accessibility” Next, you will need to follow the system prompts during the operation.
First you need to remove all objects located in front of the sensor, and then activate the setting. After this, you need to place a sheet of paper a few centimeters opposite the element, and then successively move it closer to the module and away from it. If the screen goes out and lights up again during these steps, it means the calibration was done correctly.
Engineering menu
The module can be diagnosed and, if necessary, adjusted through the engineering menu. To do this you need:
Select number entry and enter *#*#3646633#*#* or *#*#6484#*#* .
- Go to testing components ( “Hardware Testing” ), open the “Sensor” , then “Light/Proximity Sensor” (light and proximity sensor).
- To perform testing, collect module information ( “PS Data Collection” ).
- Click “Get One Data” when “0” lights up on the screen, bring your palm closer to the element and click “Get One Data” .
- “255” appears on the screen , the module is working.
- To configure, you need to select “PS Calibration” , then “Calibration” .
- Click “Calculate min value” , and the module should be open.
- “Calculate succeed” on the screen , move the paper sheet a couple of centimeters closer to the screen and click “Calculate Max Value” , and then “Do Calibration” .
After these steps, you need to restart your mobile device.
We recommend: How to install Tor browser via APK?
Main problem
Owners of mobile gadgets and specialists often note that the accumulation of dirt is one of the standard causes of problems with the proximity module. It is localized in the upper area of the body, and you can additionally detect a number of other sensors that are built into the smartphone. Visually, the elements resemble small slits located near the speakers and covered with glass. If debris penetrates, the functionality of the components may be impaired, so before completely deactivating the sensor, it is recommended to thoroughly clean the device.
To remove foreign particles from the speaker for normal operation, there are several simple steps:
- Turn off your smartphone and use compressed air on the speaker grille;
- Make sure that you have removed all the dirt, and if necessary, you can use a toothpick or other improvised means that will be effective for removing fine dirt or dust;
- Restart the device and try to use the functionality normally.
Troubleshooting
I found many messages on the forums that after updating the software, custom firmware and other similar actions, the proximity sensor began to function incorrectly.
Among the negative factors, it is worth highlighting physical damage as a result of impacts and falls. In this case, the only solution is to go to the service center.
Ideally, use only stable versions of software and only official ones. Or carefully read reviews before any experiments.
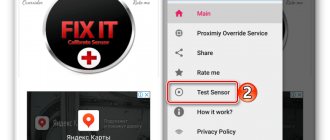
Also, calibrating the sensor using third-party software often helps. This application is in first place on Google Play. It allows you to test and repair the module:
The utility is partially translated into Russian, but when you click on the large “Fix it” icon, you will see four steps with explanations in understandable language. Just follow the instructions and then restart your device. The only drawback of the program is the periodically appearing advertisements, but they can be easily closed.
So we figured it out - the proximity sensor in the phone, what kind of component it is and how to activate and configure it.
10.26.201810:0024903 Victor Felk Information portal IT Technician
Sources used:
- https://appsetter.ru/kak-vklyuchit-nastroit-i-otklyuchit-datchik-priblizheniya-na-telefona-android.html
- https://itpen.ru/datchik-priblizheniya-v-telefone-kak-vklyuchit-otklyuchit-kalibrovka-datchika/
- https://upgrade-android.ru/stati/stati/4020-kak-vklyuchit-datchik-priblizheniya-na-android.html
- https://viarum.ru/datchik-priblizheniya-android/
- https://it-tehnik.ru/gadgets/proximity-sensor.html
SHARE Facebook
- tweet
Previous articleDialer for Android - top 7 applications
Next articleHow to enable recording of phone calls on Android
↑ Accelerometer calibration (Gsensor)
We need an accelerometer to perform a number of important functions: it is responsible for the orientation of the device in space, it is used by many applications, etc. Thanks to this, we (gamers) can enjoy those games that use this feature. Most often it is, of course, racing. And if Gsensor is “dull”, then this will certainly upset us. However, let's leave this lyrical digression aside and get down to business.
↑ Method one
In this case, we will use the engineering menu of the Android device.
- Go to the engineering menu of the smartphone/tablet, “Launch MTK Engineering Menu”.
Launching the MTK Engineering MenuTools
- Go to the “Hardware Testing” tab.
- At the very bottom we find the “Sensor” item and click on it.
- Select “Sensor calibration”.
- Next, click the “Calibrate Gsensor” button.
- The device must lie on a flat, horizontal surface. The current data should be equal to zero (I have irregularities on the back cover, so the readings in the screenshot are a little inaccurate). Press the “Calibrate (40% accuracy)” button and after a couple of seconds you will see the “Operation Succeed” message.
That's all, exit the engineering menu. The accelerometer is now calibrated.
↑ Method two
Now we will do the calibration using a third party program called Accelerometer Calibration Free
Accelerometer Calibration Free
Optimization and acceleration
- Download, install and launch this application.
- On the screen we will see a large crosshair with a green center, as well as a red ball. We turn our smartphone/tablet so that the ball rolls into the green zone, and then press the “Calibrate” button (a whole mini-game is created).
- We are waiting for the process to complete.
All is ready. Note that the advantage of this program is the automatic calibration of the accelerometer. It is very comfortable. In the future, you will not have to monitor the operation of Gsensora; if there is the slightest inaccuracy, the application will calibrate it itself.
↑ Method three
There is another good application called Spirit Level, which, in addition to calibration, performs a number of additional useful functions.
Spirit Level
Tools
- Download, install and launch Spirit Level.
- Press the “CAL” button.
- In the menu that appears, press the same button again in all five items.
- A message like this will appear.
That's it, the device has been calibrated. Note that this program has three different skins, which visually makes it very interesting.
What is a proximity sensor and why is it needed?
The main purpose of this function is to block the display during a telephone conversation - the sensor will detect the presence of a certain surface (user's ear) in front of the display near the speaker and generate a signal to block the sensor. This allows you not only to avoid unwanted clicks on the touch screen, but also to save battery power, since the main hardware consumer is the lit screen. The sensor also prevents unwanted clicks on the sensor when the phone is in the owner’s pocket/bag or is on the table with the screen facing down.
Also, the proximity sensor, like other hardware modules of smartphones, can be used to program other actions - for example, automatically increasing the volume or, conversely, turning on the vibration alert mode when the phone is placed in a pocket.
If the motion sensor fails, begins to detect the presence of a surface incorrectly, or is triggered when there is no need for it, it is possible to disable this hardware module in several ways, discussed in the article.