Huawei is gaining increasing popularity as a manufacturer of tablets and smartphones. Despite this, wireless routers have begun to appear in the product line. One such device is the Huawei WS329 router model, which operates at a speed of 100 Mbps with the 802.11n standard at 2.4 GHz. Wireless connection speed is up to 300 Mbps.
The new router is gaining popularity among users
Setting up the Internet depending on the type of connection
It's important to think beyond the configuration of your wireless network.
Without access to the Internet, it will not make sense. That is why, in the “Internet” or “WAN” tab, a connection to the provider is created, taking into account the data specified in the contract with him. It also depends on the type of connection.
PPPoE protocol
If the Internet is provided via PPPoE, then you will need a login and password, which are issued by the provider when concluding the contract. The steps are as follows:
- Select PPPoE type;
- Enter your login and password;
- Disable the secondary connection option;
- ABOUT.
Connection via dynamic IP
To establish this type of connection, you do not need to enter your provider login and password. It is enough to do the following:
- Mark the lines to enable connection and Internet;
- Define type as IP;
- Select NAPT connection type;
- Addressing type - DHCP.
L2TP or PPTP connection
L2TP is practically no different from the previous type, except that you will additionally need to specify the name of the operator’s server. Instructions:
- Select L2TP type;
- Enter your login and password;
- Check the box next to “Dynamic IP”;
- Enter the server address;
- Set the MTU size to 1460, which will be optimal.
But PPTP can be both dynamic and static. Often providers provide communications in this protocol, so you need to be able to configure it. To do this, you need to know the login information for the server and the address of the server itself. If everything is known, then you can start configuring the PPTP dynamic option:
- Select the appropriate type;
- Enter your username and password to log in;
- Activate dynamic IP and enter the server address;
- The MTU value is set to the optimal value of 1420;
- The automatic connection function is activated.
Important! If a static IP was obtained using the same protocol, then the parameters will be slightly different and will include: login information, your IP, server IP and subnet mask, gateway, and DNS server address. It is important to change the IP from dynamic to static at the configuration stage
Dynamic IP address
You can also choose a router configuration method such as Dynamic IP or Dynamic IP address.
For this purpose, you need:
- open the “Internet settings” tab in the router settings;
- check the “Enable connection” checkbox;
- select “INTERNET” type, “IP Routing” service type, “DHCP” addressing type.
- do not forget to save the changed settings.
Working with the terminal
How to set up and flash a Huawei hg8245h router
This method also requires root, as it works directly with the Linux kernel in Android OS. You need to install the Terminal Emulator program. We connect the smartphone with a cable and enable modem mode in the phone settings. Then you need to enable network sharing (as is the case with Reverse Tethering). In the terminal emulator you need to enter the command:
In the window that appears, you need to find and write down the IP address of the USB0 connection. Then, in the network connection of the smartphone on the PC, you need to open the properties of this connection, select “Protocol” and click “Properties” at the bottom right. Instead of automatically obtaining an IP, you need to check the “Use the following IP” checkbox. In the IP line, you must enter the address corresponding to USB0 on the smartphone, but replace the last number with one.
In the terminal on your smartphone you need to enter the following commands:
ifconfig usb0 up
route add default gw dev usb0 (where
– IP address previously set on the computer.
setprop net.dns1 8.8.8.8
(You can use another DNS server)
Internet is connected. You can automate the action by writing a script (for example, in the GScript program) with the commands:
ifconfig rmnet0 down
ifconfig usb0 up
route add default gw "your IP address" dev usb0 setprop net.dns1 " DNS server address"
How to access 192.168.8.1
How to set up a tenda router yourself and connect wifi
Review and configuration of the D-Link Dir-320 modem
Instructions on how to enter the settings of a Huawei router include steps from physically connecting two gadgets to changing the standard conditions in 192.168.8.1 admin: password, login, Wi-Fi, network name.
Step 1. Connect to a desktop computer, laptop or phone
In a Huawei modem, the 4G setting depends on the equipment selected as the “base”: PC, laptop or smartphone, each of them has its own circuit.
For a computer or laptop you need:
- connect the LAN wire to the input connector of the Huawei modem;
- connect a computer or laptop with a LAN cable to the router;
- or insert the modem directly into the USB port.
Connection via phone or tablet is carried out via Wi-Fi, for this you need:
- Make sure that mobile Wi-Fi is turned on in the “Settings” menu, or open the curtain and click on the corresponding icon.
- Find the one you need in the list of networks and log in.
- Most models will not require a password, but if the device asks for one, the information is listed on the back of the modem.
- After logging into the Huawei network, access to the router through admin. The panel will open.
Step 2. Connect to your personal account at 192.168.8.1
Open a browser: Safari, Internet Explore, Opera or any other.
Error when logging into the web interface
A common mistake that occurs when entering this address is the writing of characters. Letters may be printed instead of numbers, there may be an extra space or an erroneous number. Enter admin as username and password. This is the factory password; you can change it later. To avoid hacking and after resetting the settings with the Reset button for some reason, you will need to come up with a new password. The number of characters must be no shorter than six, and the use of Latin letters is mandatory.
Step 3. Authorization in the router’s personal account
The appearance of the personal account page depends on the type, model or mobile operator. However, most routers have a single shell, including using mobile WiFi, logging into the system is carried out like on a PC. The WiFi modem has an additional security function with the obligatory entry of a login and password when trying to enter any point.
Step 4: Change Settings
After logging into the Huawei router, the type of connection is configured in more detail depending on the state of the IP address, dynamic or static.
For WAN the procedure is as follows:
- Check the “WAN connection” box.
- Enter the VPI/VCI values that are assigned to the service in the region by the provider. As a rule, for the Internet VPI is 0, for cable television - 2. Information is indicated in the contract or on the official website or forum.
- Specify the connection type as “PPPoE”.
- Enter your login and password.
- Click the Submit button to save the profile.
Dynamic IP on some types of modems is configured in the same way and differs in only three variables:
- In the Connection type line, select IPoE.
- Select “DHCP” from the list in the Address Type line.
- Activate NAT, if given a choice, then register NAPT.
The next step is setting up a WiFi network through the WLAN tab:
Select the first Network with index “1”. She will be the main network
Additional Information! The router has several WiFi profiles available. The number depends on the firmware, and the last ones on the list of networks will be considered guest.
- Fill in the SSID field with the name of the new network. The name is then displayed on all devices.
- Check the "WMM" box.
- The value “40 MHz” is placed in the Width line (channel frequency).
- Security type select WPA2-PSK with AES encryption.
- A mandatory condition is to enter the network access password in the “WPA pre-shared key” line to prevent unauthorized access.
Setting up digital television
In order to set up IPTV on WS329, you need to go to the “IPTV Service” subsection:
Check the “Enable IPTV” checkbox to enable the function. In the list of ports - “LAN Interface” - you need to tick the port to which the TV set-top box will be connected. Connection type - “Connection type” - in 90% of cases we set “Bridge Mode”, i.e. transparent bridge mode.
If suddenly the provider uses tagged multicast traffic, that is, you need to explicitly specify the Vlan ID, then you need to check the “Enable VLAN” checkbox:
In the “VLAN ID” field you must enter an identifier, which you must first find out from the technical support of your telecom operator. In the “802.1P” field we enter priority 4. Click the “Save” button and check the operation of the television.
Login to settings, settings IP address, default login and password
How to reboot a wifi router
In order to enter the system menu of the Huawei HG8245 router, you must perform the following steps:
- Launch any web browser.
- In the address bar field, enter the IP address https://192.168.100.1 and click on the “Go” icon.
- On the start page of the system menu of the Huawei HG8245 router that opens, fill in the Account fields, where you enter your login and Password, where you enter your password.
- By default, the Huawei HG8245 router uses the root login and admin password.
- After entering your username and password, click on the Login button.
- In some versions of router firmware, the Rostelecom provider sets the login telecomadmin and password admintelecom.
After completing the above steps, the main window of the router system settings will open.
In the main window, carry out the initial settings of the router
Changing the password to enter settings
Since the factory password for entering the system menu is the same for all routers of this type, this affects the security of the Internet connection. Knowing the password, you can monitor the user’s work on the network, have access to confidential information and block access to the Internet.
In the system menu it is possible to change the factory password to your own. This must be done if the router is not connected to the Rostelecom provider network. With the latter, access to the system menu is controlled by technical support, so there is no need to change the password.
To change the password you must do the following:
- After entering the system menu, go to the System Tools section.
- On the left side of the window, click on the Modify Login Password tab.
- Enter the old password in the Old Password field.
- Enter a new password in the New Password field.
- Reenter the new password in the Confirm Password field.
- Confirm the password change by clicking the Apply button.
For a higher level of security, the password must contain from 9 to 30 characters, including Latin letters and numbers.
Setting up the PPPoE protocol
To configure the PPPoE
you need to perform the following actions:
go to the main device settings menu;
select “Internet Settings”;
in the window that appears, check the boxes “Enable connection”, “Service type - Internet”;
select “IP routing PPP” from the list of connection types.
Leave the rest of the values as standard.
After you have set all the settings according to the specified instructions, all you have to do is enter the values in the “login” and “password” fields, which were provided by the operator when drawing up the agreement. In the remaining PPP Service Name field, enter the value “internet.”
We configure the Internet itself depending on the type of connection of your provider
The first setup step is the most important: you need to correctly specify the protocol - the one your operator uses. Otherwise, you will not connect to the Internet. Therefore, we take the contract or memo that the specialist left after installing the cable, and read it carefully. There you will find all the connection information, including the protocol and network login information.
Even if you don’t find anything in the contract in the end, don’t panic. Call the operator's technical support - they will explain everything to you and help you set up the Internet. We will look at setting up the three protocols below. Select the instructions you need and follow them.
PPPoE protocol
Such large operators as Dom.ru, Rostelecom, TTK, NetByNet and others work with this high-speed connection. How the protocol is configured on Huawei:
- Go to the second section “Internet” - you will go straight to the first tab with its settings. That's what we need.
- In the “Basic Information” block, check the box next to the item about enabling the connection.
- Set INTERNET as a service. In the panel with a list of protocol types, select “PPP Routing”.
- In IP mode, specify a dynamic value. If you bought a unique address on the Internet from your operator, set it to “Static” and enter all the data from the contract.
- The next thing to change is the trigger mode. Set it to "Always online".
- Fill in the “Internet account” and “Internet password” fields with the data that is in your agreement with the provider. After that, save the changes using the button below.
Connection via dynamic IP
Unlike the previous type of connection, dynamic IP does not require you to write authorization data. You only need to do the following:
- Open the Internet settings tab. Activate the connection and select IP rooting (IP) in the protocol drop-down menu.
- Leave the NAT type as default.
- In the IPv4 menu, set DHCP. Click on “Save”.
L2TP or PPTP connection
For example, Beeline has a network with the L2TP protocol. Both types are configured in the same way on a Huawei router:
- Follow the steps above to set the connection type to "Dynamic IP".
- Now in the same “Internet” section, open the VPN tab. Select one of two menus - L2TP or PPTP (depending on what your provider uses).
- Check the box next to “Enable” to activate the protocol.
- In the WAN connection, specify the previously created connection with a dynamic IP.
- In the LNS address field, enter the address of your operator's VPN server.
- For PPP username and PPP password, enter the information from your ISP agreement.
Beeline L2TP connections
As a rule, upon completion of work, the configuration wizard sets all the settings independently, but often it may be necessary to configure it manually. Therefore, you need to know how you can configure the Huawei WS329 router.
Connecting via Beeline L2TP is not an easy procedure and will require strength and patience. When setting up a router, you will need to create two connections - DynamicIP and a VPN connection.
The first connection is standard and is necessary for the operator’s internal network.
To configure the second one you need:
go to the VPN menu tab;
check the box next to “Enable L2TP LAC”;
in the “LNS address” field you need to enter the Beeline server name – tp.internet.beeline.ru.
In the lines below with the value “PPP Username” and “PPP Password”, enter your chosen values for authorization. Make sure Connection Mode is set to Auto. Don't forget to save the specified configurations.
How to connect to a Huawei E8372 3G-4G modem via the 192.168.8.1 web interface via wifi?
In theory, if you bought a Huawei E8372h modem from one of the operators, the Internet should work immediately. But if you purchased it separately and inserted the SIM card yourself, then you may actually need to get into his personal account.
In addition to the classic method via USB, there is another option to connect to a Huawei modem via WiFi for detailed configuration. The fact is that the Huawei E8372h, unlike the E3372h, is also a router, that is, it can distribute a wireless signal to any other computers, laptops and smartphones.
If you use this modem to relay 3G-4G Internet via WiFi as a router, then to connect to it there is no need to insert the device into the USB port of the computer. You can use any extension cord or external battery.
The network name and password for connecting to its default signal are indicated on a sticker under the modem cover. Most often, IP addresses 192.168.8.1 or 192.168.3.1 are used to log into your Huawei personal account via the web interface. For example, this is what the information looks like on the Huawei E8372H label
If you purchased a modem from a cellular operator, then the web interface page of your personal account may look like “status.megafon.ru” or “home.beeline”. To log in, you need to log in - the default login or password is “admin/admin” or in some modifications “admin-password”.
They will immediately offer us to change them immediately for greater safety.
And after the replacement we get to the main page of the control panel. Here you can already make detailed modem settings.
How to enter the settings of a router from the manufacturer Huawei.
In order to connect a Huawei router,
Let's perform the following step-by-step actions. With the back of the router facing you, you need to:
- Connect the Internet cable coming into the apartment to the blue socket of the router, called WAN;
- Next, you need to connect the wire from the computer to the router into any of the four sockets, they are named LAN1, LAN2, LAN3, LAN4. Can be used both for a computer and for a TV and other equipment that can be connected;
- In the Power connector, you need to insert the power cord and plug the device into the outlet;
- We also see here the WPS or Reset key, which helps if you have forgotten or don’t want to enter the password, but you need to be near the router, or you need to reboot it. All you need to do is press this key;
We are done with the router connectors and its connection to the computer and network.
Let's go to the settings:
- Go to the browser and enter the code: “192.168.1.1” - this is the provider firmware;
- Since the computer is connected via a wired connection, in the window that opens, in the fields that appear (user name and password), enter, for example, the same word “Kievstar”
- Next, a menu appears with three blocks:
— WI FI setup;
— checking the network status;
- You can immediately use the setup wizard by clicking on this block. Your next steps will be described step by step in the setup instructions on the screen. You can press the automatic connection button or the manual mode button;
- We will start with the wi-fi settings block, since the default is DHSP, which is used in our network;
- A window opens where the SSID is written - this is the name of the network and its password, which consists of at least 8 characters and can be viewed by checking the required box. There are also buttons to enable, disable the network and save, which we need to click on to save our data.
- Next is the Internet tab, where we can see all the addresses, DNS service, and so on, and you can set up parental controls right there.
7.1. Network security (we do not recommend setting it to a high level; low or medium is enough), because in addition to this, there is also a security system on the computer itself.
7.2.View all devices that have ever been connected.
7.3.View the interface, where it will be written which input (LAN..) is occupied, mac-address, ip-address and their settings.
7.4. Wi-Fi settings, where you can configure everything at your own discretion, turn the wireless network on and off, change its name and some other functions. Here you can put the hide network icon, then no one will see it and to connect to it you will need to enter not only the password, but also the name that you specified.
7.5. It is better not to change anything in the additional settings, since everything is set to “auto” mode and connects independently, adapting to your Internet provider.
.
7.6. Access to the wi-fi network, here you can put an icon on the VPN connection by pressing a button. This means that you do not need to enter a password to log into the network; you just need to press the button on the back of the router, as mentioned earlier. Allow all devices to connect to the router.
7.7. Guest networks, you can configure a guest network that will not have security or will have it, but minimally;
- Maintenance tab. All settings that were specified by you or automatically by the network are shown here. For example, you can quickly and easily see which input (LAN..) your computer is working on and what other devices are connected to this router and which input. Information about network activity is shown, how much is entering and leaving the router.
- You can also check the network status. By clicking on the “check network status” section, a window appears showing which devices or appliances are connected to the wireless network. In this case, we see that two devices are connected to this wireless network. Laptop and Android. The Earth icon indicates the Internet gateway, the next one is the router, when you click on it you can get complete information about: IP address, mac address, device ID, AO version, software version.
There is a sticker on the bottom of the router. It indicates all the data on the router, name, modification, energy consumption, country of origin, and so on. Share link:
Source
Huawei WS329 wireless router
Huawei today is widely known as a manufacturer of smartphones, tablets and cellular modems. Having unique experience in the development and production of large solutions in the telecommunications field, the manufacturer recently decided to bring home wireless routers to the open market.
One of the first models was the budget Huawei WS329 with wired ports of 100 Mbit/s and 802.11n in the 2.4 GHz band with connection speeds of up to 300 Mbit/s.
Delivery set and appearance
A sample was provided for testing, so we do not have exact information about the package. Judging by the product descriptions in online stores, in the box the user will find a router, a 12 V 0.5 A power supply, one network cable, brief documentation and CDs.
In appearance, the WS329 differs little from other devices in this segment. It has a black plastic case with dimensions of about 18x12x3 cm excluding connectors and antennas. The top cover has a glossy finish. The manufacturer’s logo is placed in the center, and eight blue LED indicators are installed along the bottom edge: power, Internet, WLAN, WPS, LAN1-LAN4.
The bottom of the case and the antenna are matte. For installation, four legs are used that do not have rubber inserts, or two holes for placing antennas on the wall with the antennas down or up. Passive ventilation slots are located at the bottom and at the ends of the top cover.
On the rear panel you can see two non-removable antennas, a power supply input and a switch, a button, five network ports without indicators. A single button can be used to initiate WPS pairing, to disable WLAN, and to perform a hard reset.
Apart from the impractical gloss on the top panel, the device has a good design, which, however, does not stand out as anything unusual. Another small quibble is the small “cloak” over the connectors on the back, which makes it difficult to unplug network cables by blocking the latch on the plug.
Hardware configuration
The printed circuit board occupies only part of the housing. The router is based on the Ralink RT63365E processor. The volume of the RAM module is 32 MB, 4 MB flash is installed for the firmware.
A network switch (all ports are 10/100 Mbit/s) is built into the processor, and to implement Wi-Fi, an external Ralink RT5392L chip (802.11n, 2.4 GHz, 2T2R, up to 300 Mbit/s) was added. The antenna cables are soldered to the board, but there are also micro connectors.
Note that there are no radiators on the chips, but they are located on the bottom side of the board. However, during testing we did not notice any problems with overheating. On the board you can see a group of pads for a console connection, but access is blocked by an unknown password.
Testing was carried out with firmware version V100R001C199B011 provided by the manufacturer.
Settings and features
Considering the positioning of the model in the budget segment, it is unlikely that we will encounter any functions that go beyond the standard scope here. The web interface is available at 192.168.3.1. In the firmware version under review, it is only in English. Access to it can be limited by client IP addresses. To configure the device via the Internet, the HTTPS protocol is used.
There is built-in help for some pages. Without entering a password, information about the status of the device is available - hardware platform and firmware versions, Internet connection, wireless network name and some other data. It’s convenient that the link “forgot your password?” shows how to reset the settings.
On the main page there are three large icons that allow you to launch the Internet connection setup wizard, change basic Wi-Fi options and view the current network connection diagram. In the scheme, you can quickly set restrictions for clients - on download speed and on the time of access to the Internet.
For more detailed system settings, three menu sections are provided: Internet, home network and maintenance.
The WAN port supports bridge mode, IPoE, PPPoE, PPTP and L2TP. Note that the last two options are configured on a separate page, and not through a single list of capabilities.
To support IPTV, you can use the allocation of wired ports to bridge mode with WAN, a separate IPoE or PPPoE connection, VLAN technology and multicast (IGMP snooping, IGMP proxy). The user can add his own entries to the routing table and also use RIP.
The device supports ALG for some protocols: PPTP, H.323, RTSP and SIP.
The router can limit the Internet access time for clients. In each rule, you can specify the time by day of the week and the MAC addresses of the systems. There is also a URL filter by keywords. It does not support scheduling, but can only be used for selected clients. For the schedule to work, there is support for a built-in clock with synchronization via the Internet.
Implementation of remote access to local systems is carried out using DMZ and port translation rules. They can use port ranges and have different external and internal numbers. Port switching technology has also been implemented
In addition to the usual firewall with protection against several types of attacks, the router provides programming of rules that block access of specified clients to specified Internet services (the latter are indicated by the port number of the remote system).
The manufacturer has provided a bandwidth management function. After specifying the characteristics of your Internet channel, you can create rules with restrictions on download and upload speeds based on IP, MAC, physical port or application.
Given the router's relatively fast processor, this service may be interesting in some configurations. However, we note that its use can lead to a decrease in the maximum speed performance of the router in routing tasks.
A separate page provides information about all connected clients on the local network segment. You can also view the connection status of wired ports.
By default, internal addresses are issued to clients by the DHCP server from the network 192.168.3.*, while the router address is 192.168.3.1. These parameters can be changed if necessary. It is possible to specify MAC-IP pairs to assign permanent addresses to clients.
Basic settings for a wireless access point include the network name and security mode (open network, WEP, WPA/WPA2-PSK).
Additionally, you can select the transmitter power, enable client isolation, set the network type (b, g, b/g, b/g/n), channel number and width, and guard interval.
Note that in our copy there was a “region” item, but it was set to read-only mode (Great Britain was selected).
To simplify client connection, WPS technology is supported, both with a button and with a PIN code. You can restrict client access to Wi-Fi using a white or black list of MAC addresses. Let us mention the presence of WDS mode.
In addition to the main network, you can also organize a guest network, which has a different name and protection mode. Its clients will not be able to access the LAN segment and will only work with the Internet (they are even given addresses from a different subnet).
The factory settings of the wireless network already use protected mode with an individual password. The network name and router key are indicated on the sticker.
The last section contains familiar items for changing the administrator password, updating firmware, working with configuration, rebooting, as well as system information and an event log (not very detailed, but with the ability to send to the syslog server). The device keeps statistics of data reception and transmission across interfaces (LAN1..LAN4, Wi-Fi, guest network). There is an option for “one-button” diagnostics of the router, as well as ping and traceroute utilities.
Performance
We were unable to test the device with Beeline Internet - the L2TP connection was apparently established, but access to the Internet did not work. The lack of detailed logs and diagnostic tools made it impossible to understand the situation.
So only synthetic tests were used to test performance. Since the router only has 100 Mbit/s ports, we tested it on the version of the stand used in most previous materials.
All options for connecting to the Internet were checked.
When using IPoE, PPPoE and PPTP modes, the user can count on almost full channel speed of 100 Mbit/s. Higher load in the L2TP client reduces the maximum speed to 60-70 Mbit/s. In addition, it should be noted that the latter option turned out to be not very stable in tests - prolonged operation under high load led to loss of connection.
The router is capable of providing access to the provider’s local network simultaneously with VPN connections to the Internet. There are no comments regarding the speed of operation in this mode; the indicators are shown in the following graph.
When loaded by a p2p client, the router in all modes except L2TP showed a real operating speed of 8.5 MB/s, while the number of connections was 500 or more (no restrictions were set in the client). With L2TP, work in this scenario was unstable, which once again confirms the poor implementation of this function in the firmware version under review.
The router has a wireless module with a maximum connection speed of 300 Mbit/s. However, in practice, in the presence of neighboring networks, it cannot use a wide channel, so you can only count on 144.4 Mbit/s. However, given the use of 100 Mbit/s wired ports, this should not be considered a significant limitation on the Internet access speed of wireless devices.
Wi-Fi speed testing was carried out with a TP-Link TL-WDN4800 adapter. The distance between the devices was about 4 meters. The router was configured to operate in the 802.11n standard with a 20/40 MHz band and WPA2-PSK AES protection. The numbers represent the speed of operation of a wireless client with a PC in the LAN segment and with a server on the Internet for various connection options.
The results of the wireless controller performance test can be considered good for the hardware configuration used. In all modes except L2TP, the client can count on 85-95 Mbit/s when working over Wi-Fi.
In general, the device performed quite well for the segment and hardware configuration under consideration. Apart from L2TP, the implementation of which clearly requires improvement, the router can be effectively used with connections with speeds up to 100 Mbit/s inclusive.
conclusions
The Huawei WS329 wireless router is a typical representative of the modern mass segment of home devices. Its technical characteristics, hardware and software platforms are well balanced, which suggests the absence of redundant functions and speed restrictions in the main use cases.
The use of a sufficiently fast processor provides routing speeds sufficient to service channels up to 100 Mbit/s. There are also no comments regarding the operation of the wireless module.
The current version of the firmware does not cope well with working in L2TP mode, which is found in domestic operators. We were also unable to test the functioning of IPTV multicast broadcasts.
I would like to hope that the company has enough resources to correct the detected deficiencies.
It is difficult to expect a wide range of functions from products in this price category, so we will only note support for scheduling Internet access for individual clients and a guest wireless network.
It will not be easy for the company to find its niche, since with a price of about 1,000 rubles, there are devices on the market with similar characteristics from more well-known manufacturers.
The device is already available on the local market. Cost information is provided below.
Source: https://www.ixbt.com/comm/huawei-ws329.shtml
What to do if you forgot your Wifi password?
This is not a rare case because we see that many people have difficulty remembering their password. It's even easier to forget your Wi-Fi password since we have Wi-Fi everywhere. School, home, restaurants, cafes, gyms, or even the garage often have different Wi-Fi networks.
You need to reset all settings to factory settings. Each router or modem has a button that helps you erase all previous settings. After rebooting, the modem will become completely new.
Now the settings will return to the default modem username and password and all you have to do is configure everything again.
How to set up Wi-Fi on Huawei using a computer?
We provide you with another method to set up your 3G/4G Wifi modem. To do this, you need to use a laptop or a regular desktop PC.
Step 1: Connect to Wi-Fi
Same thing with using a phone, you need to connect your laptop to Wi-Fi by default. The default username and password are located on the back of the router. They must include the SSID and key (password) to enter the Wi-Fi setup.
Step 2: Login to IP 192.168.8.1
On a laptop, you cannot configure the application, but you can log in with the default IP address 192.168.8.1. Any internet browser from Firefox or Chrome can access this site, so simply enter this IP in the address bar (as if you were visiting a site) and press Enter.
192.168.ll - login to the admin panel
The site will require you to select a language and then a username and password before logging in. This site by default requires admin/admin details according to ID and password. Now we move on to the main task. It's set up.
Step 3: Set up your Wi-Fi
Find the path to the configuration function. Next, we need you to select a WLAN to create basic settings for that network. You are allowed to change all information as follows Select a name for the new Wi-Fi and enter it in the SSID field
In the WPA Pre-Shared Key, you must create a password for the newly created Wi-Fi name. The requirements are the same as on a mobile phone. Finally, don't forget to click the Apply button to save your settings. Without saving, your settings will be deleted when you log out.
Wireless access point
Setting up the WS329 router's wireless network begins by specifying the connection name and data encryption mode (open network, WEP, WPA or WPA2-PSK). You can also select the transmitter power, set the network type, as well as the channel number and width. To simplify client connection, you can use WPS technology. If you want to restrict a specific client's access to Wi-Fi, you will need to configure a white and black list of MAC addresses. The standard firmware of Huawei WS329 makes it possible to organize a guest network. It may have a different name and protection mode. Thanks to this, all clients who connect to it will be denied access to the LAN segment. They will be able to work exclusively with the Internet. Factory settings assume the use of protected mode with a unique name and preset password. This data is on a sticker located on the router case.
Setting up a WiFi network on the Huawei E8372H-153 modem
Unlike the E3372, the Huawei E8372h-153 modem has a separate block of configurations related to setting up a wireless network for distributing the Internet via wifi to other computers, laptops or smartphones.
- In “Basic WiFi settings” you can change the network name (SSID), assign a new password and make the network invisible to other users.
- In “Advanced” you can also change the region and select the optimal WiFi channel.
- “MAC Address Filter” allows you to cut off unwanted clients from the Internet using a unique device identifier.
- In the “WPS” section, the function of automatically connecting to a signal or using a PIN code from other devices is activated.
- Finally, in DHCP, the IP address of the modem is specified, the range of available values for distribution to other computers and the lease time for these addresses.
Control of the “wifi repeater” mode has been placed in a separate section of the menu. If you turn it on, the Huawei modem will be able to choose where to get the Internet from - from another router or from a SIM card. This is convenient if you have connected a modem to your laptop. In order not to waste mobile traffic, if you are in the area of a known Wi-Fi signal, preference will be given to it.
SD card access
And another interesting feature of the Huawei E8372h modem is its support for working with micro SD cards. It, like the SIM card, is installed inside the case. Based on it, you can create a network FTP server and open access to it for all gadgets connected to its WiFi network. This setting is located in the “Sharing” section.
By default, the “USB Only” mode is activated, that is, it is used as a regular flash drive connected to a computer. But if you move the checkbox to “FTP access”, the options described above open up.
You can give permissions only to read files or also to write. Plus select the directory to which you will open access - to the entire memory card or to a separate folder.
These are the basic modem settings, which can be found at https://192.168.8.1 or 192.168.3.1 in your Huawei account. Now you know how to enter and change them.
Firmware
The popular Huawei WS329 router model has a wide range of functionality. As standard, the device has English-language firmware version V100R001C199B01, which has IPTV support.
Additional device firmware can help eliminate some malfunctions and operational errors, as well as expand the capabilities of the device itself.
In order to change the standard firmware of the router, you need:
- download the updated firmware version for the device on the manufacturer’s website;
connect the device to power and to the computer;
enter the router settings panel;
open the system settings tab “Maintenance”;
select “Software Update”;
select the downloaded software version as the firmware file;
click the “Update” button and wait for the update to complete;
check the settings, connect the provider cable.
Wi-fi router Huawei WS329 is a convenient and functional router that allows you to connect the Internet at home or in the office. This device is the most popular router for installing a high-quality and high-speed home network at home.
As a rule, installing a device of this type does not require much effort and is a fairly quick process, subject to certain rules.
If you wish, you can not waste time calling a specialist, but configure the Huawei WS329 Beeline router yourself, using the user manual and expert advice.
You can set standard device configuration settings, you can set an additional security password or change your login information, ensuring a greater degree of device security from hacking, and also install additional auxiliary accessories and antennas to increase Wi-fi coverage.
Connect to PC
The first thing you need to do when setting up the Huawei WS329 Beeline router is:
connect the device’s Ethernet cable to your PC;
check the correct connection;
make sure that the cable is connected correctly and was recognized by the computer;
diagnose the device.
In addition, it would be a good idea to check your device for viruses by scanning the antivirus program installed on your computer.
How to open a personal account for a Huawei modem at 192.168.100.1?
- Your device (PC, laptop, smartphone) from which we will log into the web interface must be connected to a modem/terminal. You can connect either via a Wi-Fi network or using a network cable. Something like this:
- You need to disable the browser on your device, enter (or copy) the address https://192.168.100.1 in the address bar and follow it (by pressing the Enter key). If the address is correct and you are connected to the terminal, an authorization window will open.
- In this window you need to enter your username (Username, or Account field) and password (Password). Perhaps on your Huawei router this information is indicated on a sticker (shown in the photo above). By default, this is usually the following data: Username (Account) is root, and Password is admin. Only these are factory data; they could have been changed in the router settings. For example, a wizard when installing and configuring an optical terminal. If the modem is from the Rostelecom provider, then the login is most likely telecomadmin, and the password is admintelecom. Be sure to try it. If everything is fine, then the personal account of the Huawei modem or terminal should open. You can set up Wi-Fi (WLAN), etc.
- If your login/password doesn’t work, or you don’t know it or have forgotten it, then see my instructions below.
Huawei login and password (root, admin, telecomadmin, admintelecom)
For many people, an authorization window opens at 192.168.100.1, but they don’t go into the settings because the standard login and password don’t work.
Login/password for authorization in modems and terminals Huawei HG8245H and other similar models:
- Login – root
- Password – admin
But if the device was issued to you by the provider Rostelecom, Beltelecom, etc., then a different login/password is set there. Often:
- Login – telecomadmin
- Password – admintelecom
If this data does not suit, then I recommend calling the support of your Internet provider and asking what data to use to enter the router settings.
Or another option is to reset the settings of the Huawei router/terminal.
After resetting, you will have to configure your router again. If this was done by specialists during installation, and you are not sure that you can configure it, then I recommend first discussing the problem with the support of your Internet provider.
To do this, you need to find the Reset button on the device body (usually it is recessed into the body), press the button and hold it pressed for at least 10 seconds. The router settings will be reset to factory settings. After rebooting the router, try logging in to 192.168.100.1 and entering the factory login/password.
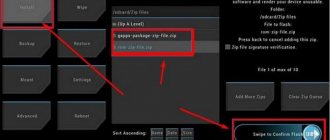
How to configure and flash Huawei WS329 router
Huawei is gaining increasing popularity as a manufacturer of tablets and smartphones. Despite this, wireless routers have begun to appear in the product line. One such device is the Huawei WS329 router model, which operates at a speed of 100 Mbps with the 802.11n standard at 2.4 GHz. Wireless connection speed is up to 300 Mbps.
The new router is gaining popularity among users
Appearance of the device. Equipment
The Huawei WS329 package includes:
- router;
- power unit;
- patch cord;
- operating instructions;
- disk.
The appearance does not differ significantly from other models in this segment. The body is made of black plastic. Its size is 18x12x3 cm, not including connectors and antennas. Top cover with glossy finish.
In its very center is the logo of the manufacturer, and on the bottom edge you will find 8 LED indicators with a blue glow (power, internet, 4 LAN ports, WLAN and WPS). The antennas and the bottom of the case have a matte finish.
Installation of the router is possible both on a horizontal surface (there are 4 legs without rubber inserts) and on a vertical surface (2 mounting holes are used). For passive ventilation, holes are used at the bottom of the device and at the ends of the lid.
On the rear panel there are 2 non-removable antennas, a socket for connecting a power supply, an on/off button, as well as 5 network ports. In addition, there is another button on the rear panel, which is necessary to communicate with WPS and disable WLAN. It performs a factory reset function.
Technical part
The router is powered by a Ralink RT63365E processor, 32 MB of RAM and 4 MB of Flash memory. There is no separate network switch - it is built into the processor. To implement a wireless Wi-Fi network, the manufacturer installed a Ralink RT5392L chip on a printed circuit board.
Despite the fact that the antennas were soldered to the board, there are also micro connectors on it. The chips do not have heatsinks, but there should be no problems with the device overheating.
By the way, the router has a special group of contacts for console connection, but, unfortunately, access is protected by a password that the manufacturer does not disclose.
Setting up the router
To configure the device, use the web interface. You can access it using any browser by going to 192.168.3.1. Standard login and password are admin. To make the necessary configurations via the Internet, the HTTPS protocol is used.
The firmware has a small reference book. If you do not enter a password and login, you can obtain information about the status of the device. Immediately after you go to 192.168.3.1, you will see 3 large icons on the main page.
They will allow you to launch the Internet Setup Wizard, change wireless connection options, and also see how the current network is connected. In the scheme, you can set restrictions for clients not only on the time spent on the network, but also on the connection speed.
To be able to configure the system in detail, there are 3 menu sections:
- Internet;
- home network;
- service.
The WAN port can be used in bridge, IPoE, PPPoE, PPTP and L2TP mode. The last 2 options need to be configured on a special page.
To view IPTV, you must use wired ports in WAN bridge mode or a separate IPoE (PPPoE) connection. Huawei WS329 can be configured to limit Internet access time for certain clients.
Each rule specifies the time by day of the week, as well as the MAC address of the system. There is a URL filter by keywords.
To implement remote access to local systems, you must use a DMZ. In the WS329 router, you can program a rule that will block access of certain clients to the Internet.
Setting up a router involves a bandwidth management function.
By specifying the characteristics of your channel, you can create a rule that limits the speed of downloading and transferring data based on an IP or MAC address, a physical port, or an unwanted application.
By default, Huawei WS329 issues IP addresses to clients from the 192.168.3.* network using a DHCP server, while the router’s IP is 192.168.3.1. If necessary, you can configure these parameters at your discretion.
Wireless access point
Setting up the WS329 router's wireless network begins by specifying the connection name and data encryption mode (open network, WEP, WPA or WPA2-PSK). You can also select the transmitter power, set the network type, as well as the channel number and width.
To simplify client connection, you can use WPS technology. If you want to restrict a specific client's access to Wi-Fi, you will need to configure a white and black list of MAC addresses. The standard firmware of Huawei WS329 makes it possible to organize a guest network.
It may have a different name and protection mode. Thanks to this, all clients who connect to it will be denied access to the LAN segment. They will be able to work exclusively with the Internet. Factory settings assume the use of protected mode with a unique name and preset password.
This data is on a sticker located on the router case.
Firmware for router WS329
The pre-installed firmware of the WS329 router may be outdated, which means that if a new version is available, it needs to be updated. No additional router configuration is required. First, download the latest version from the company’s official website or from third-party developers.
Remember, flashing is carried out only using a patch cord. It is prohibited to perform this action over Wi-Fi. This may damage the device. To go to a special menu, go to https://192.168.1.1/html/userRpm/SoftwareUpgradeRpm.html.
If the router is tailored for a specific operator, then the username and password may differ. It is installed by the provider itself. Having entered the correct data, a special screen will open where you need to click “Browse”. Specify the path to the downloaded firmware and click “Update”.
Once the process is complete, you may need to configure your router again.
Source: https://nastroyvse.ru/devices/ruter/kak-nastroit-router-huawei-ws329.html
Setting up Wi-Fi: change the name of the network and set the password
Setting up the access point itself comes down to creating a network and changing the password from standard to more complex:
- Expand the third section “Home Network”. Select the third tab “Wi-Fi Settings”. Check the box next to “Enable 2.4 GHz Wi-Fi.”
- In the “Encryption” menu, if you want, set a new name for the Huawei router access point (if the model name does not suit you). Activate the SSID in the step below.
- In security mode, select WPA2-PSK. Leave AES in the menu below.
- Next, in the field, type a pre-created network password that other users will use to log into the access point. We recommend writing this combination down somewhere separately in a notepad as a reminder.
- Remove the checkmarks next to the last two items. Click "Save".
- Expand the "Advanced" menu. Set the transmitter power to 100% if you have a large area for Wi-Fi coverage. In network mode, set the combined value of b/g/n.
- Leave the channel at “Auto” for now. If you later notice low Internet speed while working, empirically select the freest channel for your situation (install one at a time and look at the speed).
- Leave the bandwidth at 20/40 MHz. Click on “Save”.
Indicator designation
The indications of Huawei routers are different: some models have a whole range of indicators, others have just one indicator operating in different modes
Not all router owners pay attention to studying the display, but in vain. Understanding what exactly the router is showing at the moment, you can quickly solve this or that problem
Let's look at the most typical indicator designations for routers (see picture below). The familiar power indicator is most often used to understand whether electricity is being supplied to the router. But he can also be responsible for the state of the system. The second indicator from the left shows which network the router is connected to.
The third icon from the left is responsible for Wi-Fi and (or) WPS, the fourth tells you whether devices are connected or not connected to the LAN/WAN ports, and the fifth shows the signal strength. In some models, the indicators are labeled with words, which eliminates the need to look at the instructions.