According to a study by specialists, .apk applications on Android for obtaining root rights are inferior to similar software for obtaining root using a computer (exe applications for Windows). The experiment was conducted on Huawei MediaPad T3 .
We recommend that you get root rights in 1 click using Rootkhp Pro
As the company’s chief analyst Nikita Nikonov said, such .apk applications as Towelroot , Kingoapp, Baidu, Framaroot and others have no prospects and will gradually leave the market, as well as morally and technically outdated versions of Android up to 7 Nougat, due to that the developers of these apk applications cannot or do not want to implement support for obtaining root rights on Android 8 Oreo, 9 Pie and Android 10 Q.
Thus, in 2021, to obtain root rights on Android, it is advisable to connect your mobile device to a computer running a root program, for example, Rootkhp Pro 3.1, VROOT 1.7.7 , ZYKUROOT 2.5 .
Program evaluation criteria
We investigated how to root Android using a PC , choosing the 3 best programs based on user reviews on the well-known forums 4PDA and XDA - RootKHP Pro, VROOT 1.7.7 and Zykuroot 2.4. Programs were evaluated based on:
- List of supported versions of the Android operating system
- Functionality
- Supported mobile device base
- Usability – ease of use for the end user
- Availability of an official website for the root utility
From 0 to 1 point for each item. All together up to 5 points inclusive.
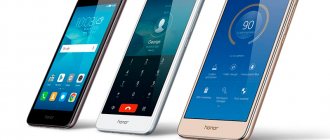
Here you will learn how to get RUT rights for a Huawei MediaPad T3 7 tablet running Android 6.0
The Huawei MediaPad T3 7 tablet was released in 2021 by Huawei. The tablet screen is an inch diagonal and has a resolution of . The tablet computer has a MediaTek MT8127 processor with a frequency of 1,300 and a video accelerator.
Characteristics
General
Manufacturer: Huawei Model: MediaPad T3 7 Year of release: 2017 Operating system: Android 6.0 Battery capacity. (mAh): 3,100
Dimensions
Dimensions (WxHxD, mm): 179 x 103.68 x 8.6 Weight (g): 250
CPU
Processor type: MediaTek MT8127 Clock frequency (MHz): 1,300
Kingo Root
Developer: kingoapp.com
Programs → obtaining root rights, system, miscellaneous
Application for root rights for Android. Versions for PC Windows and OS Android
Kingroot
Developer: kingroot.net
Programs → obtaining root rights, system, miscellaneous
A popular application for obtaining root rights for Android phones and tablets.
Root all devices
Developer: HEXAMOB SL
Programs → obtaining root rights, system, miscellaneous
A program that will help you learn how to get ROOT rights on your mobile device.
Root Checker
Developer: joeykrim
Programs → obtaining root rights, system, miscellaneous
This application will allow you to verify that you have full Root access (Superuser) and a full installation of BusyBox.
SuperSU
Developer: Codingcode
Programs → obtaining root rights, system, miscellaneous
The most necessary application for everyone who has ROOT access and superuser rights on the phone.
Framaroot
Developer: XDA
Programs → obtaining root rights, system, miscellaneous
Do you want to root your phone? This application will help
ROOT rights allow you to expand the functionality of the Huawei MediaPad T3 7 and the Android 6.0 operating system on which it runs. You will be able to change standard software, remove any applications, and be able to install third-party firmware and programs that require full access to the system. Installing RTH rights should be taken very seriously!
Obtaining ROOT rights to the Huawei MediaPad T3 7 Android tablet is possible using several applications:
How to get RUT rights to Huawei MediaPad T3 7 using KingRoot
How to get RUT rights to Huawei MediaPad T3 7 using Kingo Root
If you do not know whether you have received RTH rights on your Huawei MediaPad T3 7, then you can check their availability using the ROOT Checker application
What exactly do Root rights give to Android:
- Access to system files and programs with the ability to change and delete
- Activation of additional Android functions
- Increased operating system performance
- Creating firmware and data backups and transferring them
- Detailed change in the appearance of the Android OS
- Installing third-party firmware and mods
- Removing ads from applications
- Increased battery autonomy
- Overclocking or reducing processor speed
- Installing applications that require ROOT
And many other useful things.
Huawei MediaPad T3 root rights
Let's begin our experiment!. In all cases, you need to connect your smartphone to your computer via a cable, having first enabled USB debugging .
Installing root rights using Rootkhp Pro 3.1
The program supports all existing versions of the operating system; support for Android 10 in version 3.1 is still raw, but given that the program is constantly updated, this will not be a problem.
- Download Rootkhp Pro 3.1
- Launch without installation
- Click Root
- A notification appears, click OK and wait further.
- We receive a second notification that you have root access.
What to do if an error appears?
- Did you remember to enable USB debugging, if not, see below
- Try repeating all the steps again.
- Doesn't work or there's an error? Go to the program website and write about the problem to the developers via feedback
Using ZYKURoot 2.5
According to information from the developers' website, the program supports Android up to 10 Q, the latest version is currently in beta mode.
- Download ZYKURoot 2.5 and launch it
- Click Root and wait for the message. Based on our observations, it is important to note that the time indicated is approximate, in some cases it can be either more or less
- When I gain root access, this message appears:
- After this you need to reboot the device
The process took: 12 minutes.
Root using Vroot 1.7.7
The device database was not found, and the program does not position itself as a universal root tool, so we decided to try it blindly.
- Download Vroot 1.7.7. The link to the application has been removed because it did not bring the desired result.
- You may need to disable antivirus programs (depending on your specific antivirus, this action is at your own peril and risk, there are programs that are approved by antiviruses).
- Press the Root button and wait until the device reboots on its own. After this, you can disconnect the device from the PC and use it.
- After the reboot, the superuser application should be automatically installed, again in Chinese.
Expert review:
Unfortunately, the VROOT application is extremely unstable. I do not recommend for use.
For some reason the program did not work on this Android device; somewhere in the basement a Chinese programmer is crying.
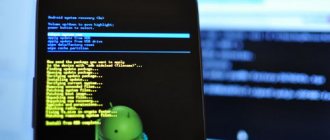
How to open Root rights on Android
If you decide to root your Android device, be prepared to void your warranty. In addition, you may have problems with over-the-air (OTA Update) updates. However, you can disable Root rights and return the warranty, as well as restore OTA updates.
Preparation
- First, back up your data. Please note that by opening root rights, you will completely clear the internal memory of the device.
- Charge your Android device's battery to at least 25%.
Warning : We are not responsible for what you do with your smartphone. If a failure occurs, interrupting the process, the Android device may turn into a “brick”. Be careful.
Let's sum it up
VROOT failed to obtain root access on Huawei MediaPad T3 .
We give a formal minus to RootKHP Pro and ZYKUroot - for the lack of support for languages other than English, they receive 0.5 points instead of 1, but let’s just say the minus is purely formal, because pressing 1 or 2 buttons in English does not require much intelligence. The information content in these programs is also lame, since there is no progress bar, but not to the detriment of the result.
The situation with VROOT is much worse, it does not receive points in the usability category, because there is no information about supported devices, supported versions of operating systems, the entire menu is in Chinese, it is very difficult for beginners to understand.
Our program evaluation
The rating was made on a scale from 0 to 5.
- VROOT – 0 points in this particular situation, since there is no result on this smartphone.
- Rootkhp Pro 4.5 points
- Zykuroot – 4.5 points
Material prepared by: Anastasia Gerasimova.
Reasons to remove root rights
Root rights have not only advantages, but also disadvantages. Firstly, without certain knowledge about the device of the phone and the nuances of the OS, the user can damage the phone and turn it into a “brick”. Secondly, security is reduced, since the operating system is not updated with changes, and, therefore, does not receive new security settings. And thirdly, a rooted device will lose its factory warranty.
So before we find out how to disable superuser rights on Android, let’s find out when to resort to deletion:
- When connecting root rights, you used an unreliable application and your smartphone was infected with viruses. The device malfunctions or does not turn on at all.
- You have installed extended rights on a gadget whose warranty has not yet expired. If you contact a service center, free repairs are no longer possible.
- You have decided to sell your phone. Or you bought a device with similar settings.
But most often, root rights are removed after all the necessary changes have been made and the need for a superuser account has disappeared.
Disconnection methods
There are several ways to disable root rights on Android. The choice of method depends on how serious the changes have been made to the smartphone, as well as on the type of OS. If we are talking about installing root rights on a smartphone with native Android, the removal takes place inside the installation application. But in devices with a custom ROM and the Xposed Framework, the process is more complicated. Below we will look at all the options.
Uninstalling using a file manager
Root rights allow you to make changes to all programs installed on your smartphone or PC. Therefore, with the help of advanced functions, you can remove Root settings by erasing the installation files. To do this, install one of the applications: ES File Explorer, Total Commander, X-Plore File Manager.
After installation, launch the manager and follow the instructions:
- In the search bar, enter the query “system – bin”.
- A list of files will appear; delete the one with “su” in its name.
- Now the su file needs to be deleted from here /system/xbin/.
- And at /system/app/ do the same actions with the Superuser.apk file.
Reboot your device, if all steps are completed correctly, you have removed root rights. You can check the success of the operation through the Root Checker application, download it and run it. The program will show whether the smartphone has superuser rights or not.
Uninstall using SuperSU app
SuperSU is the most popular and reliable utility for working with root on Android. Most people use this application to obtain superuser rights.
But the application can also be used in the opposite direction to disable root. First, make sure that SuperSU is installed on your smartphone, then follow the instructions:
- Launch the application.
- Open the Settings tab.
- Select the “Complete Root Removal” tab.
After removal, reboot the gadget to complete the command. That's it, you have given up extended user rights. True, disabling via SuperSU is only possible on those devices on which the original OS is installed, without third-party flashing.
Remember, before removing Root rights, back up your important files and folders. They can be transferred to a PC or saved to the cloud.
Kingo Root
The previous option is convenient for those who initially worked with root rights through SuperSU; now let’s consider the case when extended rights were installed through the Kingo Root program. Removing root rights on a smartphone:
- If you have already uninstalled Kingo Root, download the program again to your computer.
- Connect the gadget to the PC using a USB cable and do not disconnect it until the end of the operation.
- The first time you connect, you will need to install drivers or simply confirm the connection.
- Launch Kingo Root → click the “Remove Root” button. Removal will occur automatically, the procedure will take 3-5 minutes.
Once the operation is complete, disconnect your device from your computer and restart to save the updates. If you encounter problems: you cannot find the uninstall button, third-party windows appear, etc., contact the service center for help. Incorrect actions will lead to a complete malfunction of the phone.
Reset to factory settings
If none of the above helped, try a hard reboot via Recovery. To return the device to factory settings, follow the instructions:
- Turn off your digital device.
- Call Recovery, the key combination depends on the type of gadget and model (you can check the information on the manufacturer’s official website, for example, for smartphones this is a combination of the “volume” and “home” buttons, for laptops – Power + Volume Down).
- In the resulting command line, select “factory reset”.
The device will automatically remove all downloaded extensions. However, the method is not universal, so after the procedure, check for root rights using Root Checker.
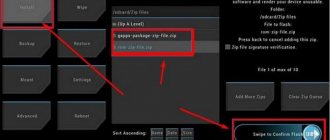
Flashing
An extreme way to remove root rights from a digital device is to demolish the old one and install other software. Save important data in the cloud or transfer it to a flash drive, fully charge your smartphone or tablet.
Flashing instructions using the example of a smartphone with Android OS:
- Download the firmware from the manufacturer's official website or from exchange offices.
- Find the Odin utility.
- Select the program for your specific model, download it to drive C and unpack it.
- Run Odin as administrator.
- Turn off the gadget and enter Recovery mode.
- Launch Odin on your computer and connect your digital device to your PC.
- The computer should recognize the device in the ID:COM line, specify the files for firmware in the AP field.
- Click the Start button.
Flashing takes a few minutes. Once the operation is complete, “PASS” should appear in the upper left corner.