Android has so many things that sometimes you can't even find a use for it. One of these things is USB debugging. Many people think that they don’t need it, but at the same time, as soon as they find out what it is, they begin to actively use it and resort to it on an ongoing basis. Although, for the most part, this is needed by developers or those who service smartphones. However, there are things that can only be done through this mode. If you don’t know what it is and whether you need it, I’ll try to tell you why you might need it. And most importantly, I will answer the popular question: “How to enable USB debugging mode?”
Developer mode on Android gives you a lot of options.
USB Debugging: What is it?
Despite the fact that the function activation button is located in the “ For Developers ” section, its functionality is often required by ordinary users even from older versions of Android. So, roughly speaking, you can send commands to a smartphone from a computer, and these are not just requests for file exchange, but something more technically complex. For example, this makes it possible to test applications from Android Studio “in one click” without running the APK installer.
An example of a more common application is working with ADB - through it you can delete system programs without root rights and roll back versions. Applications that expand the functionality of the device also require debugging. For example, XSplit Vcam, which allows you to use a smartphone camera to replace one that is purchased separately for a computer, for a stable connection to replace Wi- Fi , recommends using a USB connection that works only when debugging is enabled.
Moreover, we even removed the screen lock using both the ADB Run program and the regular Windows console, and these two methods also required USB debugging. Because of this, it may seem that this feature seriously reduces the security of the device. This is true, however, the device is made vulnerable only in case it ends up in the hands of an attacker - for viruses, the factor of enabling debugging does not play any role. In addition, in new versions of Android, this point is not a problem, since for extended work with the device you must first add the device to the list of trusted ones, and this is impossible until the check by pattern key or PIN code (if any) has been passed. .
Debugging is especially useful when problems arise with the device’s touchscreen, in which it does not respond correctly to touch. You can easily perform, for example, a factory reset by first downloading the ADB program onto your computer from the official website of the operating system. In the same way, a driver update is carried out to correct an unstable connection with other devices. In addition, one of the IMEI recovery options with which any device connects to the mobile network also does not work when USB debugging is not allowed.
Advantages and disadvantages of connecting via USB
The method of connecting the phone to the PC depends on what goals the user sets for himself. If the task is to copy or transfer a large amount of data, it is recommended to use a USB cable. Advantages of the method:
- high data transfer speed;
- the owner of the gadget can continue to use it, despite the active connection;
- Thanks to this type of connection, the user gains access to the internal folders of the smartphone.
If we consider the disadvantages of connecting a phone to a computer or laptop via USB, there is only one - the user is “tied” to the PC, so you should come to terms with the restriction of freedom in advance.
How to enable debugging on Android
Despite the possibilities opened up by debugging, it is absolutely safe to enable it. This will not lead to unstable operation of the software and will not void the warranty, unlike unlocking the bootloader and, in some cases, obtaining root access.
On Android 8, 9, 10, 11
The latest versions of Android not only make it as easy as possible to enable debugging, but also ensure the safe operation of this function by asking for confirmation for each connected device.
Follow these steps:
- In the settings section, find the “About phone” section, go to it;
- Tap the “Build Number” button seven times;
- Go back, open the “For Developers” tab that just appeared;
- Move the “USB Debugging” toggle switch to the right side. If a warning window appears, click “Ok” to confirm the action, having first read the description.
If you are using Android firmware, the procedure will be approximately the same, but the names of the interface elements may differ. We examined in more detail the options for gadgets of popular brands in the article.
On Android 5.0–7.1
For devices running less modern operating systems, the instructions look similar to those that are relevant for new devices:
- At the very bottom of the list of settings is the “About phone” section. Go to it;
- Tap "Build Number" several times until "You are now a developer" appears. Return to the main tab of the options menu;
- Tap “For Developers”;
- Enable USB debugging.
Don't forget that you not only need to enable debugging, but also all the functions in the section - the toggle switch for this is in the upper right corner. On Android 7.x, you can manage the “black” list of devices.
On older versions of Android (4.2 and below)
In earlier versions of Android, the function was not as “hidden” as it is now. Of course, hidden parameters are not so difficult to see on new versions, but before Android 4.2 the procedure has the following format:
- In settings, click "Applications";
- Go to the “Development” category;
- Check the box next to “USB Debugging”;
- Read the warning and tap “Yes”.
Here, using this feature is really unsafe - the system does not maintain “white” lists of devices that can use USB debugging, which is why it is available to all PCs connected to a smartphone. This makes the device vulnerable to theft or loss - it can be completely reset. The only good news is that such devices cost practically nothing and are not even compatible with modern programs available on Google Play.
The instructions for newer, but still outdated Android releases look like this:
- Going to the device settings tab, click “Developer options”;
- ABOUT.
Next, you need to connect the device to the computer and select “USB Debugging”. If it is not there and the function is activated, then debugging will be enabled automatically.
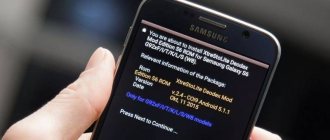
On Samsung
Modern models produced by Samsung run One UI, which guarantees compatibility with the functions of each brand device. The new firmware has inherited the procedure for enabling the developer menu from TouchWiz, where the actions are carried out as follows:
- Click the About device button located at the bottom of the screen;
- Go to the “Software” tab (Software info);
- Tap “Build number” seven times. You need to press quickly until a toast notification like “You are now a developer” appears;
- Return to the list of categories, select “For Developers” (Developer options);
- Click "Ok" in the window containing the section description. Find the “USB debugging” item and activate it.
On Honor, Huawei
Devices from both brands run on the same EMUI shell, so instructions for these devices are combined into one section of the article. Despite frequent firmware updates, the following list of steps has been relevant since the first versions:
- In the settings menu, open the “About phone” tab. It contains the “Build number” item. Click on it several times until a message appears indicating that developer features are enabled;
- Return to the settings, find the newly appeared “For Developers” category in the list and go to it;
- Enable USB debugging by tapping the toggle switch or swiping to the active position.
On Xiaomi
Users of MIUI firmware, even if the latest release of Android is installed, need to follow a separate procedure:
- After opening the device settings, go to the “About phone” tab;
- Press “MIUI Version” several times in a row until a message appears on the screen about unlocking features for developers;
- Return to the main page of the “Settings” application, from there go to “Advanced settings”;
- Tap “For Developers”;
- Find the “USB Debugging” item and move the toggle switch opposite it.
How to connect a smartphone as a modem?
Algorithm of actions:
- Connect your mobile phone via USB.
- Turn on mobile data.
- Go to the settings in the “Access point and modems” tab.
- Activate "USB modem".
- The PC will connect to the mobile Internet.
Enabling debug mode via computer
The method is especially relevant in case of problems with the screen. The option is only available if you have TWRP or CWM recovery Both can be installed via a PC, and using the latter as an example, instructions have been compiled:
- Turn off your device. Start it in fastboot mode by holding down the power button and lowering or raising (depending on the device) the volume. At this moment, an image of an android with an open window in the middle will be visible;
- . Rename the file with the view name recovery-clockwork-touch-6.0.4.8-flo.img into a simpler name, for example: recovery.img. Download the software included in the Android SDK;
- On your computer, use the keyboard shortcut Win+R, enter cmd and press Enter;
- Enter the path to the firmware using the command CD;
- Paste fastboot flash recovery recovery.img. Please note that if you did not change the image name to recovery.img, you need to enter the one that actually exists. Press Enter and wait for the process to complete, which will take a couple of seconds.
You can also install recovery through the Rashr utility, but it requires direct interaction with Android itself, so you won’t be able to use it if the display is broken. The situation is similar with ROM Manager, which requires root access and is also launched on the phone itself. Once you complete the previous steps, all that remains is to enable USB debugging:
- Download the archives (, ) to your PC. The second contains the QtADB.exe utility, which will automatically determine where the ADB files are located. If she fails, specify the path to the content yourself. Then go to the “Advanced” tab and, having connected the phone via USB, look in the “Status” window: “Ready” should be written here;
- Click "Files" on the left panel;
- The screen will be divided into two parts. The one on the left contains files on the computer, and opposite it is the contents of the phone. In the last one, follow the path /data/system/users/0/. Open the file settings_global.xml, it contains an XML tag with the name adb_enabled. Change the attribute value value on 1.
If you are using TWRP and not CWM, there will be no difference in these instructions. In some versions of Android, the document default.prop , in which you need to additionally set ro.adb.secure=0 so that the device can connect to any other computers without saving them to “white” lists.
When will this instruction be useful?
The instructions below will come in handy if your smartphone or tablet stops working normally. Most often this occurs due to the device being dropped, a system failure, or a damaged display. Please note that to successfully complete the tutorial, custom recovery must be installed on your phone .
Not many people know, but every Android device has a recovery menu that allows you to perform various actions with your smartphone. For example, resetting the phone to factory settings, removing viruses or updating firmware. By default, each device is equipped with Stock Recovery, installed by the manufacturer from the factory. Some users install Custom Recovery, that is, a recovery menu containing a number of additional functions. The most common types of custom recovery are TWRP and CWM.
If you have stock recovery installed on your smartphone, then don’t worry. The article will also discuss a method that allows you to enable USB on almost any device . There is just one caveat - it is advisable to have a wireless USB mouse, as well as an OTG cable.
Useful commands in debug mode
When USB debugging is properly configured, you can send commands via ADB or ADB Run. Since the latter program has a more accessible interface for novice users, the first application officially released by Google deserves more attention.
Taking a screenshot
To screenshot the screen without using the side keys and even the separate button provided on some ASUS phones, specify the following:
adb shell screencap /sdcard/screen.jpg
A screenshot called screen.jpg will be located in the root of the external MicroSD memory. You can specify any other name, and in addition to the JPG extension, PNG is supported. Afterwards you will need to “pull” the image from the device’s memory:
adb pull/ sdcard/ screen. jpg
The following command is suitable for taking a recovery screenshot:
adb pull /dev/graphics/fb0
Please note that in this case the file will have the extension fb0. You can convert it to PNG using the separately downloadable FFMPEG plugin. It requires this command:
ffmpeg -f rawvideo -pix_fmt rgb32 -s 1560×720 -i fb0 fb0.png
As a result, a document fb0.png will appear with a resolution of 1560 by 720 pixels. Please note that you need to indicate the actual screen size, and also take into account what position the device was in at the time the screenshot was taken: vertical or horizontal.
Video recording
There will be no problems in creating videos using ADB functions:
adb shell screenrecord --verbose /sdcard/video.mp4
A three-minute recording will be created and saved to the SD card as video.mp4. More detailed settings are possible:
- — size – screen size (native is used by default);
- — bit- rate – update rate (for example, 6000000 is equal to 6 Mbit);
- — time- limit – time in seconds during which a recording is made and logs are saved (by default – 180).
stop any ADB-related processes, use the combination Ctrl + C.
Receiving logs
Actions are recorded by the logcat and dmesg . They can be easily saved as files:
adb logcat > logcat.txt
adb dmesg > dmesg.txt
As a result, text documents will appear containing information about the actions performed with the device recently.
Software backup
You can create a backup of applications without utilities like Titanium Backup; for this you will need the adb backup . It supports the following optional parameters:
- — all creates copies of all programs available on the phone;
- — f – the name of the file under which the backup will be saved;
- - apk – include the executable file in the backup copy (if you do not specify or set - noapk , only application information will be saved);
- - obb – add files . obb to a copy (the opposite of - - noobb , which is the default);
- — shared – backup along with program data saved on the SD card (not enabled by default, so noshared is );
- - system (default) shows whether it is worth copying the system software (there is an option - nosystem ).
- all is not entered , you will need to specify the names of the applications that need to be added to the backup.
What to do if the computer does not see the phone
If Honor or Huawei does not connect to the computer via USB, then first check the type of connection of the device to the PC. To do this, you need to open the notification shade on your phone, find the “Settings” line with the USB icon and select the “File Transfer” or “Photo Transfer” settings that open.
Note! The device may not be displayed if the USB port is physically damaged, the cable or adapter is broken. In this case, use other ports or cables for connection, or use drivers if the damage is software.
There are many reasons why the computer does not see the Huawei phone. It is recommended to solve the problem incrementally: check another USB port, replace the cable, try installing or updating drivers, download and install HiSuite, use programs for data transfer via Wi-Fi, and so on.
Problems and solutions
The phone does not respond to commands
To work with ADB, the cable must support data transfer, and not just battery charging. If there are no problems with this point, then make sure that debugging is enabled and the connected computer is among the trusted devices (if such lists are maintained by the system).
Please note that you can only send commands that require USB debugging when the system is fully booted. For example, ADB cannot be used if the device is turned off or in fastboot or recovery mode.
USB Debugging button is greyed out
When connecting to a computer, older versions of Android offer to select the mode in which the device will operate (for example, “USB modem” or “File transfer”). If in this list the “USB Debugging” item is not clickable or is missing, but you have already enabled it according to the instructions in this material without removing the cable, go to the quick access panel and open the connection notification. Then all that remains is to activate the function through the window opened by this alert.
The functionality provided by USB debugging greatly helps with many tasks and is especially important in case of screen problems. Even if the feature was disabled at the time of the display failure, nothing will prevent you from activating it along with installing CWM or TWRP, following the procedure described in the material.
Share link:
Common problems connecting Huawei Honor to PC
There may be some problems when connecting your Huawei smartphone to your PC. For example, if a user tries to establish a connection in the standard way when connecting through a standard conductor, it happens that the system simply does not see Huawei. In this case, installing the specialized HiSuite utility almost always helps. It helps to establish an optimal connection between the gadget and the personal computer, thanks to which it is possible to perform not only standard operations, but also gain broader capabilities.
You can always try to reinstall the drivers, because the ability to display the gadget on the screen depends on them. If this does not help, the most rational thing to do is to try connecting the smartphone to another personal computer.
In some situations, problems arise due to incorrect operation of the wire. If the cable is damaged, you should replace it with a new one, because you won’t be able to achieve significant success when working with it.