What is an Android proximity sensor?
A proximity sensor is a small element of the device that is activated when the phone and any object are physically close. Thanks to the correct operation of the proximity sensor during a conversation, the smartphone display turns off automatically as soon as the user brings it to the ear.
The Android proximity sensor is very useful and even necessary for at least two reasons, namely:
- When the screen is turned off during a call, you will definitely not accidentally press any button on the touch screen, for example, with your ear or cheek
- The Android proximity sensor allows you to save battery power. If the phone screen was turned on during a conversation, the battery charge would be consumed much faster, and this is extremely inconvenient for people who are used to or are forced to talk on the phone for a long time
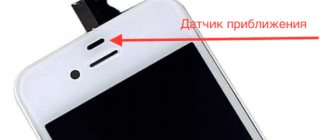
The proximity sensor is located at the top of the smartphone. As a rule, it is located next to the front camera lens. On some devices, the sensor is visible to the naked eye, while on others it is not so easy to detect. To locate the proximity sensor, simply remove the device from your ear during a call and place your finger next to the front camera. If the display goes dark, it means you have found the sensor.
Sensor location and functional features
The proximity sensor is located on the top plate of the front side of the device. Usually there is a speaker, camera, proximity and lighting sensors. In the latest models, these sensors are combined into one.
How to find out where the sensor is located? Call a friend and place your finger close to the sensor (example of location in the screenshot below). When the screen goes dark, congratulations, it’s a proximity sensor.
The main function of this sensor is to react to an object approaching the phone screen. This technology was invented to automatically lock the display during phone calls, Viber or WhatsApp. The next time you make a call, notice how the screen goes dark when you bring the device to your ear and then lights up when the call ends.
The sensor itself sends an infrared light signal to determine how far away an object is and blocks it when it approaches.
With this approach we get two big advantages:
- The screen is blocked from accidental ear presses, which prevents accidental termination of a conversation, turning on the speakerphone, you can also accidentally put the call on hold, etc.;
- The second point is saving smartphone battery power. The phone's display is the main source of power consumption; when the screen is on, consumption increases and the battery drains quickly. When making calls with the screen off, the battery lasts longer;
Other causes of the problem
The reason that automatic brightness is glitchy is due to incorrectly selected protection for the screen. Some glasses and films do not provide special holes for the sensor, which is located near the front camera. Check the protective film. Even if it is correct in size, it can cause interference in operation precisely due to the lack of the necessary holes. This problem especially often occurs among users with universal films and glasses.
The sensor often does not work after replacing the original Xiaomi screen. To solve this problem you need to contact a service center.
Another cause of problems is incorrect or old device firmware. This can be corrected by upgrading to new firmware versions. However, do not forget that after the update, all data and applications will be deleted. As well as unnecessary or harmful information.
Please note that all the given methods for solving the problem with the Xiaomi proximity sensor are advisory in nature. If the problem cannot be resolved, contact an authorized service center
Articles and Lifehacks
Sensors that detect the approach of an object without physical contact are built into many modern electronics products. The simplest example is a faucet in a public toilet that responds to the approach of a hand. Next is a dryer in the same toilet, etc. This is all clear, but what is a proximity sensor in a mobile phone?
How to turn on the proximity sensor
Before you enable the proximity sensor on your Android device, it is important to find this option in the settings of your mobile device. On equipment of different brands it is placed in different places.
Usually you need to open "System Applications" and go to the "Phone" .
Here you should select the “Incoming calls” and move the slider opposite the line with the module name to the working position (or set the checkbox).
On smartphones from some companies, the required section can be found by dialing the number and opening call settings. In other cases, for example, on Samsung smartphones, you should open call logs, go to settings and activate the desired function there.
What is the error in his work?
There may be several reasons for incorrect operation:
- in the Meizu Global or Mini settings the sensor is disabled;
- after the fall, the device has changed position and is not level;
- there is no seal, a small part is lost after removing the screen;
- the device is damaged or burnt out;
- the device may temporarily stop working correctly due to a failure in the firmware or bootloader;
- incorrect installation during repair.
Meizu proximity sensor calibration error may appear due to dirt on the display. It is also recommended to remove the protective accessory and try to make a call without it. In the Android settings you should check whether the element is enabled. If the situation has not changed, you can proceed to calibration.
Testing and calibrating the light sensor
Checking the light sensor
A fairly popular solution is to calibrate the proximity sensor of xiaomi devices. First, you need to check the functionality of the sensor in your phone, to do this, dial the following numbers *#*#6484#*#* (you do not need to press the call button), thanks to this combination you will be taken to the engineering menu, tested on xiaomi mi4 and xiaomi redmi 3 pro , other ways to get there are described in our article about the engineering menu. You will see 5 buttons on a black background.
Click on the top right, it should say “Single Item Test”.
In the list of components you need to find and select “Proximity Sensor”; it is usually located almost at the very bottom.
In the test itself, the inscription “far” or “close” will be displayed on the screen; closing and opening the light sensor (for example, with your finger), the inscription should change. If this does not happen, then this module is faulty. After this text, you can try calibration.
How to set up and calibrate the proximity sensor
If you notice signs of malfunctioning of the mechanism, such as untimely operation, calibration can help solve the problem. There are different ways to calibrate the proximity sensor on Android devices.
Checking the component
In order not to prematurely remove the screen from your mobile device, you need to check the serviceability of the proximity sensor on the Meizu M3 Note smartphone. The verification process consists of several stages.
- Open the engineering menu. To do this, you need to dial the combination on your smartphone: *#*#3646633#*#* and make a call.
- A menu will appear on the mobile phone screen. In it you need to open the Hardware Testing section, go to the sensor menu, open Light, and then go to the PS Data Collection subsection.
- In the window that appears, open the Get One Data tab.
- Rows of numbers will appear. Select the second line, where the number “0” initially appears.
- When you cover the sensor with your hand, paper or other object and press the “Get One Data” button, the number “0” should change to the number “255”. In this case, the proximity sensor works properly.
Calibration using OS tools
You can calibrate the module without third-party utilities using the system capabilities. In Android 9 and previous OS versions, sensor calibration is performed as follows:
- Let's go to the smartphone settings.
- In the “System” block, open the “Special Features” section (for some models, the option may be in the “Screen” section).
- Select the “Calibrate proximity sensor” item and confirm your intention.
- You will need to bring an object to the device, then move it away and bring it closer, following the instructions on the display.
- Upon completion of the procedure, apply the changes by clicking “Ok”. If the calibration was successful, you will see a corresponding message.
Engineering menu
What other way is there to configure the proximity sensor on Android? If you have the proper experience, dig into the engineering menu of your device. After dialing the code corresponding to your phone model, go to the menu, click on the “Hardware Testing” tab, click the “Sensor” button and select “Light/Proximity Sensor”.
Next, sequentially select “PS Calibration – Calibration – Calculate min value”. When the message “Calculate succeed” appears at the bottom of the screen, bring the object to the sensor and first click “Calculate Max value” and then “Do Calibration”. Upon completion of all manipulations, reboot the device.
If you do not know the code to enter the engineering menu of your smartphone, install the Engineer Mode MTK application.
How to check the Android proximity sensor using the engineering menu?
To check the Android proximity sensor using the engineering menu, you need to enter the combination *#*#3646633#*#* in the dialing menu. In the menu that opens, select the Hardware Testing tab, then select Sensor and click Light/Proximity Sensor. After that - PS Data Collection, and you will be taken to the proximity sensor testing window menu. You need to click Get One Data, and the number “0” should appear in the second line. Next, place your hand on the proximity sensor and press Get One Data again, the number “255” should appear. If everything is as in the above instructions, then the proximity sensor works correctly.
Special Applications
An alternative to the standard engineering menu is third-party applications. One of them is called “Proximity sensor: Reset”. After installing the program from the Market, launch it and click “Calibrate Sensor”. Cover the sensor with your hand or a piece of paper, click “Next”, then open the sensor and click “Next” again.
Now click the “Calibrate” button, confirm the action by clicking “Confirm” and reboot. The developer recommends using this application on rooted devices; if you do not have superuser rights, you most likely will not be able to calibrate the proximity sensor with it.
What to do if none of the methods helped solve the problem? The reasons why you cannot enable or disable, or calibrate the proximity sensor, in some cases are hardware in nature, and can only be eliminated at a service center. Also, the source of problems is often the “inappropriate” firmware of the gadget, which does not properly support all the functions of the hardware.
How to check the Android proximity sensor using the engineering menu?
To check the Android proximity sensor using the engineering menu, you need to enter the combination *#*#3646633#*#* in the dialing menu. In the menu that opens, select the Hardware Testing tab, then select Sensor and click Light/Proximity Sensor. After that - PS Data Collection, and you will be taken to the proximity sensor testing window menu. You need to click Get One Data, and the number “0” should appear in the second line. Next, place your hand on the proximity sensor and press Get One Data again, the number “255” should appear. If everything is as in the above instructions, then the proximity sensor works correctly.
How to resolve a calibration error
To resolve the proximity sensor calibration error on Meizu M3 Note L681H, you need to perform the procedure again.
To do this, you need to repeat the steps presented above.
Sensor check
But what to do if you suddenly notice that the proximity sensor on Android has stopped working on its own? There may be a system failure in which all standard settings are lost. This can happen due to the device falling, downloading malware, and so on.
How to check the proximity sensor on Android, the easiest way:
- Go to the calls section of your smartphone.
- In the lower right corner, click on the three dots and the available action options will appear in front of you.
- Click on the “Settings” button and you will be redirected to the control panel.
- Go to the "Incoming Calls" section.
- Scroll to the “Proximity Sensor” item and check the position of the slider. If it is gray, then it is turned off, move the slider to the right. If it is highlighted, then it is working properly.
Another way is to view the status of the option through the engineering menu. How to check with this method:
- In the dialing menu, enter the combination *#*#3646633#*#* and a list will immediately open in front of you.
- Scroll through the available options to the Hardware Testing tab.
- Next, select “Sensor” and click on it to go.
- Click on the "Light/Proximity Sensor" option.
- Next, “PS Data Collection”, you will be redirected to the next window where you can check the operation of the option.
- To check, click on the “Get One Data” button, and enter the number zero in the second line.
- Place your hand on the screen and press the GOT button again.
- If the number 255 appears, then the option is working properly.
How to disable the proximity sensor on Android?
- Turn on your smartphone, go to “Settings” -> “System application”;
- Scroll the application menu to the “Phone” item;
- Select the item “Incoming calls”;
- Disable the proximity sensor (uncheck the “Turn off the screen automatically when you bring the phone to your ear during a call”) option in this menu. The procedure and tools may vary depending on the model of your phone and the version of Android OS installed on it; in our case, we used a Xiaomi Mi5s smartphone with MIUI 9.
- Test your phone again during a call. If you turn off the proximity sensor, the screen should not turn off when you hold it close to your face, or if you place your palm close to the screen during a call.
Through your smartphone settings
To turn off the option through your smartphone settings, follow these steps:
- Go to the settings section of your smartphone and scroll down to the “System Applications” section.
- Among the available applications, find “Calls” and go to the section to view detailed information.
- Among the listed options, find “Incoming calls” and click on the line to go.
- Find the "Proximity Sensor" item and click on it so that the slider turns gray. This means it will be disabled.
Through the installation of special programs
First, let's look at turning it off using the Smart Screen on/off program. To do this, follow these steps:
- Find the program in the Play Store and install it.
- After successful installation, open the application and click on the “OK” button to allow access to the device.
- You will be redirected to the next page where you need to click the “Activate” button.
- You will be redirected to the main page of the application, where you need to move the largest slider to the left to disable the proximity sensor. It should turn red.
The last way to disable it is through the Sensor Disabler app. To use this shutdown method, follow these steps:
- Install the application of the same name in the Play Store.
- After installation, click on the “Open” button to start working with the application.
- Check the box indicated and click the “OK” button.
- Swipe right to go to settings or click on the three horizontal lines in the upper left corner.
- Scroll down the settings menu to the “Proximity” section and click on it.
- From the available options, select “Remove sensor”.
- Click on the save button, which is located in the lower right corner.
After saving the data, the parameter settings will be saved.
How to disable the proximity sensor via Sensor Disabler
If the required option is not available in the system settings, then on an Android phone you can try disabling the sensor using a third-party application. In this tutorial we will use Sensor Disabler. Procedure:
Step 1 . Launch Play Store and download Sensor Disabler to your phone. Wait for the installation to complete and click on the “Open” button to start working with the application.
Step 2 . Call the "Settings" menu. To do this, swipe right or click on the icon in the form of three lines (in the upper left corner). In the menu that opens, click on the “Proximity” item.
Step 3 . Select “Remove sensor” to disable the proximity sensor (“Do nothing” - leave the default values, “Mock sensor values” - calibrate the values manually) and click on the “Save” icon in the lower right corner.
The changes will take effect immediately. With Sensor Disabler you can also revert to default values at any time. To do this, select “Do nothing” in the “Proximity” settings.
Sanity
The first solution to the problem is the Sanity application, which is not available on Google Play, but is available on third-party resources. It specializes in changing the “hardware” parameters of the phone - vibration, camera, sensors, etc.
Download Sanity from w3bsit3-dns.com
- Install the application on your Android device and launch it. In it, tap on the “Proximity” tab.
- We put a tick next to the “Turn off in proximity” item and rejoice at the completed task.
- It is advisable to restart your phone for the new settings to take effect.
Via service code
The last option is to set a USSD command that will allow you to disable the proximity sensor on your smartphone. Please note that this method does not work on all devices, so we do not give you a 100% guarantee that it will work for you.
On your mobile, go to the dialing section and enter the command * # * # 0588 # * # * , followed by the call key.
Remember that this is a very important option that seriously saves battery consumption, especially if you make frequent calls, both incoming and outgoing. Having turned off the proximity sensor on Android, you can turn it on using the “reverse” method, following the same menu items and applications. If you suddenly have questions, be sure to leave comments under the material, and we will answer them as soon as possible.
How to disable the proximity sensor when making a call
If you cannot disable the module through your phone settings, you will need to use third-party programs. There are many programs on the Play Market that can turn off the sensor. As an example, consider Sensor Disabler:
- Download and install the program using the Google Play app store.
- When the utility is installed, run it.
- Go to sensor settings. To do this, swipe your finger across the screen from left to right or tap on the icon with three horizontal stripes.
- In the next menu, select proximity sensor.
- Remove it by clicking remove sensor. This will turn off the module. Save the changes by clicking on the appropriate button in the lower right corner of the screen.
The changes made will take effect immediately upon clicking the save button. Using the application, you can always turn the module back on. To do this, repeat the first 4 steps, and on the fifth, select do nothing and save the changes.
How to disable the proximity sensor on Xiaomi
If the proximity sensor on your Xiaomi phone stops working for some reason, you will need to configure it. But sometimes calibration doesn't help. In such a situation, it is better to turn off the module to save battery energy. Special third-party applications are suitable for this:
- Install any program for setting up sensors from Google Play Market. As an example, consider Proximity sensor reset and repair.
- Launch the program.
- Click on the fix it button in the main menu of the utility.
- Go through the sensor setup procedure following the on-screen instructions.
- Confirm changes when calibration is complete.
- Check the functionality of the sensor.
- If the setting does not help, disable the module.
- To do this, select Remove sensor.
- Confirm that you want to turn off the sensor and wait until the device reboots.
From this moment on, the sensor will no longer consume charge. To enable it again, repeat the same steps, but instead of remove, click activate.
Troubleshooting
I found many messages on the forums that after updating the software, custom firmware and other similar actions, the proximity sensor began to function incorrectly.
Among the negative factors, it is worth highlighting physical damage as a result of impacts and falls. In this case, the only solution is to go to the service center.
Ideally, use only stable versions of software and only official ones. Or carefully read reviews before any experiments.
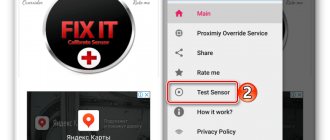
Also, calibrating the sensor using third-party software often helps. This application is in first place on Google Play. It allows you to test and repair the module:
The utility is partially translated into Russian, but when you click on the large “Fix it” icon, you will see four steps with explanations in understandable language. Just follow the instructions and then restart your device. The only negative is that advertising appears periodically, but it can be easily closed.
So we figured it out - the proximity sensor in the phone, what kind of component it is and how to activate and configure it.
How to change the proximity sensor seal
If, after disassembling the smartphone, it is discovered that the proximity sensor seal is torn or missing, it must be replaced.
The accessory is a small rubber band. If the seal is not in place, then you can inspect the smartphone case. If the device is dropped or hit, the rubber band may come off.
The seal can be bought at a specialized store or cut out of porous rubber into a circle of the appropriate size.
You need to install the rubber band carefully, using tweezers and a magnifying glass, so as not to damage the proximity sensor itself.
Why does it happen
Sometimes the problem is caused by dirt getting under the touchscreen. Most often this happens when:
Poor-quality replacement of the touch panel, when the sealing layer was not carefully put into place. When flashing or performing the next update. When fixing “ non-native ” protective glass. An inappropriate form of transparent polymer blocks the element, causing it to malfunction. We will do the iPhone 9 repair, good service, for every office, there are reviews.