Security measures
When carrying out all work related to the disassembly of electrical devices and their repair, a number of rules and recommendations are observed:
- Requirements for the work site: sufficient lighting, ventilated room with low humidity.
- Before starting work, you must read the operating instructions for the device. If it contains a description of the procedure, you must strictly adhere to it.
- The smartphone must be without a headset and disconnected from external power sources (from the charger). The power key is in the “Off” position.
- The battery must not be deformed, disassembled, or allowed to come into contact with food or liquids.
- The old battery must be disposed of properly. It must be thrown into special bins with the sign “For used batteries and accumulators” or taken to a household appliance recycling point.
- When disassembling the device, put the removed parts in order: cover, bracket fastening screws, bracket, etc. This will help when assembling the smartphone.
Method number 2. iFixit special tool for opening the BQ cover
In the second case, a special iFixit tool will help us remove the back panel of the BQ smartphone (you can look for any similar analogue among your tools).
The procedure itself is as follows:
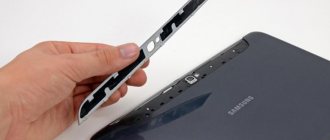
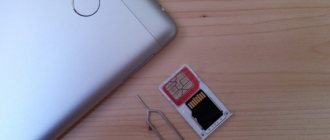
- Insert the tip of the iFixit tool between the back cover and the middle frame of the phone. A good option is the space between two SIM card slots;
- Smoothly slide the tool lower to open the plastic clips connecting the back cover and the middle frame;
- Moving smoothly around the perimeter, disconnect all the clips along the edges of the BQ phone. Slide the tool around the corner and along the top edge to also release the clips there;
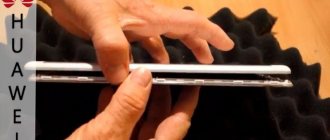
- After disconnecting the clamps, it was time to remove the back cover. Be careful not to bend the panel too much and break some of the clips;
- Grab it by the loose edge;
Hold the lid by the loose edge BQ - Gently bend and twist the flexible BQ back cover slightly to release the remaining clips;
- Remove the panel.
Having practiced, subsequent removals will take place without any problems.
We recommend reading: How to split the screen into 2 parts on Android, Windows, Samsung, Honor.
How to close the lid back
It's even simpler here - you don't even need your nails. Take your smartphone and place it in a plastic case. Make sure that all elements, such as buttons and the camera, line up with the slots on the cover. Lightly press the phone against the body and walk around its entire perimeter in this way. You will hear characteristic clicks. Ready! Now you know how to open the cover of a BQ smartphone without damaging the case and screen. If something is not clear, watch the special training video.
Models with permanent cover
Starting in 2021, Samsung, following the trend generally accepted by manufacturers, has switched to creating devices whose cases are not intended to be disassembled independently. In such models (and at the time of writing this article there are a majority of them in all lines), the back cover is either glued to the body with a special compound, or is integral with the main chassis. In the first case, it is not easy to unfasten the required element at home, but it is possible, while in the second you cannot do without a visit to a specialist. To determine, use an Internet search: open your preferred search engine, in which enter the query *name of your smartphone model* disassembly, then read the instructions. If they say that disassembly is done through the screen, alas, you will have to go to the service center, but if they mention sticking up the case, you have a chance.
Attention! You perform further actions at your own peril and risk - we are not responsible for possible failure of the phone as a whole or its individual elements!
- To perform this operation we need the following:
- hair dryer - both a special one for soldering and a construction hair dryer are suitable, plus you can also use a household hair dryer;
- pick, thin plastic card or plastic spatula;
- a suction cup with which you can remove the lid;
- a solvent that is non-aggressive to electronics – a circuit board cleaner containing isopropanol and/or pure gasoline (for example, “Galosha” or its equivalent);
- double-sided tape or adhesive or special sealant to which you will need to glue the lid back.
- Turn on the hair dryer and set the temperature and flow to medium (soldering and construction equipment) or to full power (household equipment) and heat the joints and corners of the back of the device - this must be done to soften the adhesive. Heat should be no more than 2-3 minutes.
- Check whether there is a gap between the lid and the frame - if so, insert a pick or plastic card into it; if not, warm the edges a little more, but no more than a minute. You can also add solvent, which will remove any remaining glue.
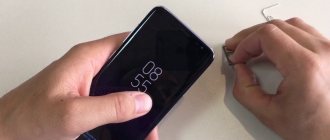
- Attach the suction cup to the back cover (preferably approximately in the center), then run the plastic tool along the seam, separating the elements from each other and at the same time pull the suction cup towards you.
Attention! Don't use too much force, especially for devices that have a fingerprint scanner on the back cover!
- The cover should come off. Disconnect all cables from the case if any are found.
- In order to install the part back, make sure that all cables are connected, then be sure to remove any remaining old glue from the connection points, degrease the corresponding areas with solvent, apply tape or glue, and then firmly press the elements together. It is also recommended to use plastic clamps or hair ties, with which you should fix the device for a period of several hours to a day (depending on the adhesive composition used).
If these instructions seem complicated to you or you are not confident in your skills, it is better not to take risks and take the device to specialists.
We are glad that we were able to help you solve the problem. In addition to this article, there are 12,286 more instructions on the site. Add the Lumpics.ru website to your bookmarks (CTRL+D) and we will definitely be useful to you. Thank the author and share the article on social networks.
Describe what didn't work for you. Our specialists will try to answer as quickly as possible.
iPhone 7 cables
The phone contains 3 main cables. The system loop is diagnosed as “5 volts”. The main purpose of this cable is to charge your phone and synchronize with your computer.
Bottom cable iPhone 7
The system cable contains the following components:
- connector for connecting vibration motor
- main microphone
- charging connector
- auxiliary microphone
- coaxial cable
- contacts for connecting a polyphonic speaker
- connector for connecting to a connector on the board
Power button and volume control cable
This cable contains the following elements:
- power button membrane
- compensation microphone
- led flash
- mute switch
- volume button membranes
- connector
Front camera cable
The front camera cable contains the following components:
- the front camera itself
- contacts for connecting a hearing speaker
- distance sensor
- ambient light sensor
- front microphone
- connector for connecting to the motherboard
Main details
- The touchscreen with display is the main and most massive part of the device
- Back cover made of metal or plastic.
- The frame increases the rigidity of the body - it goes along the end.
- Motherboard (main) board with processor, graphics accelerator and memory.
- Speakers - conversational and polyphonic.
- Antenna modules - Near field communication (NFC), 3G, LTe, Wi-Fi and others.
- Cameras - main and front. Flash and proximity sensors are integrated into the same modules.
- The battery is usually a lithium polymer battery.
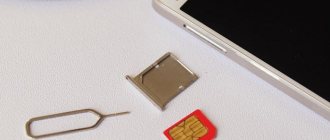
- Tray for SIM cards and memory cards.
- Volume and power buttons.
- Cables for board-to-board connection of modules.
- A bunch of screws and closing plates.
Removing the motherboard
In fact, the motherboard (or system, depending on who cares) is what you will see first when you remove the back cover. Tweezers are most useful here, since there are quite a lot of different wires, and one is smaller than the other. The base of the monitor has almost already been removed and is held on by one connecting segment, so it is recommended to disconnect it first.
Next there are quite small wires from the camera, as well as the lithium battery, which should be removed strictly with tweezers, since a fingernail, needle or toothpick can almost certainly damage something. If the camera is built separately from the motherboard, so much the better, it will be easier to remove.
If you need to remove the lithium battery, remember that such things are sometimes held in place by glue. After these not too labor-intensive operations, we will proceed to removing the board. Most likely, it is held solely on plastic fasteners, so move them slightly, and then, being careful not to damage the connections, disconnect the board. If it comes out tightly, most likely, a cable or wire is stuck in the holes - help it get inside with a screwdriver, or, at worst, push it in with a toothpick or a needle. Besides this, it is unlikely that any other difficulties will arise with disconnection - the main thing is to check whether everything is unscrewed, whether the wiring and other similar little things are in the way.