To another Android phone
Transferring data to another device running Android OS is possible using the CLONEit - you need to download it on both devices. Next, let's look at the example of gadgets Meizu Note 8 (1) and Samsung J4 (2) .
After opening the program on smartphones, you need to select a status :
- “Sender” - the smartphone from which contacts will be sent (1);
- “Recipient” is the smartphone that will receive the data (2).
Further actions will be as follows:
- Select the found Android device on the second smartphone.
- Click on the Tap to Scan button and scan the code on Meiza.
- Allow connection on the first gadget.
- Select “Contact” and click “Start”.
After completing the steps, the numbers will be transferred to another device.
The instructions are valid for any Android devices (Samsung, Xiaomi and others).
NET.Gadget
Articles
Content
Methods to transfer contacts to Xiaomi
Often, novice users who have purchased phones from a Chinese manufacturer have difficulty finding various functions that would make life much easier. The article is devoted to how to transfer
contacts on Xiaomi, taking into account various methods for implementing this task.
Working with the device and SIM card
The simplest method of exporting/importing contacts involves moving them between the phone and the inserted SIM cards. It remains quite easy for our client to implement, but the first thing you need to do is launch the contact management menu. Of course, to quote the most experienced users: “To launch any hidden menu, you need to hold down the multifunction button on the touch panel under the device screen.” The manufacturer Xiaomi marked the appropriate button with 3 horizontal lines.
After launching the appropriate menu, you need to act like this:
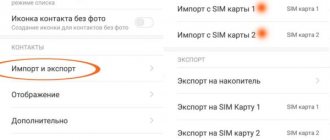
- You need to open “Import and Export” in this section.
- The “Import” block allows you to move contacts from a SIM card or your device to Google and Mi accounts.
The import option from a drive implies that the device contains vcf format data previously exported there, which is called vCard. After clicking this button and confirming the import, the user activates the process of searching for vCard data in the phone.
On the contrary, the data is imported from a SIM card, then after selecting the account where the transfer will be carried out, you will need to select one or several entries. To mark several entries at once, you should not only press down on each of them, but press in front of the cells created for marking.
- The “Export” block allows you to create a vCard, placing it in the phone; if you transfer
contacts to a SIM card, then when pressed, the device will immediately notify the number of records that are usually moved.
READ How to Install a Memory Card on a Tablet
Also, through the “Import and Export” menu, there is an option to send contacts from the SIM (device) through various system and installed programs: SMS, Bluetooth, email, and also Skype, WebMoney Keeper or other official applications of various social networks.
The last item “Import to Mi account” allows you to transfer between Mi and Google accounts.
Problem with contacts on Meizu phones. There is a solution!!!!
Whose contacts do not open or disappear on their Meizu (Flyme) phone? this video is for you! Who liked the video?
Transfer between devices
In earlier versions of the firmware on Xiaomi Redmi and other devices from the Chinese manufacturer, there was a function for transferring data between different devices via Bluetooth. Now it is absent due to uselessness, according to the manufacturer’s recommendations, so there is nothing else left but
postpone
data via a downloadable application. For example, they use the Xperia™ Transfer Mobile application, developed for Sony Xperia devices, but also works with phones (iOS, Android, OS Phone).
Also, of course, import suitable content from Xiaomi Redmi 3 or other models. In addition to contact information, of course, transfer various multimedia files, individual information, applications and configurations. The transfer of a Wi-Fi Direct™ wireless connection via a cable means is realized, in other words, directly from a device to another device.
READ How to Enable 4g on iPhone 7
The 3rd of the described methods is not common, as it involves the generation of a special QR code through the use of a special application. Then the download of contacts is carried out by scanning this code with the device where you need to add the encrypted data. There is an option to implement this function by using the QR Droid Code Scanner application, simply downloaded via Google Play.
You can transfer any data from Xiaomi Mi4 and other devices on the Android platform. For which the design with contact transfer is intended, you must enter the “Import and Export” menu described above, and then select the “Send” function. Then you should select “Send contact
how..." and encrypt into an XQR code using the simplest intuitive scheme.
Working with cloudy technologies
The main advantage of gaming slots of this method is, of course, why it is used less often is not easy to explain. For you, this is caused by a lack of trust in Internet services, where the risk of personal data theft is higher. Let's look at our client using the example of Xiaomi Redmi Note 3 Pro. Information on how to copy contacts from SIM to one of the accounts was discussed above. Next, the user’s task is only to download the data to the new device. Mass synchronization of all existing devices with Google or Mi accounts allows you to distribute one card with information between all connected phones, tablets, and computers. However, it is worth keeping in mind that the platform plays an important role in synchronization: with iOS it is impossible to use MIUI resources and vice versa.
How to copy contacts from phone to SIM card
Sometimes a user needs to copy contacts from their phone to a SIM card. This video tutorial explains exactly what it is.
READ AMD Report Suggests Measures for Retailers to Stop Big Navi Profiteers
Also, standard services can be replaced by popular cloudy resources: Yandex. Disk, DropBox. They work with it according to the same scheme: first the data is sent to the account, and then downloaded through the required device.
Problems with displaying contacts
In addition, it is worth talking about the aspects of data display on Xiaomi devices, since incorrect actions by a novice user lead to the fact that certain contacts simply stop being displayed in the list. What will you need if the “Settings” menu was enabled (described earlier), you need to go to where “Display”.
The menu has a range of different sorting methods, display configurations and a smart grouping feature. For example, if you sort by first or last name, they will be shown in alphabetical order. On the contrary, the contacts are not shown in the list, alas, the user is sure that certain entries were there previously, then it is necessary to check whether the sliders are disabled: “Only with phone number”, “SIM card contacts”.
What you need, transferring contacts within the 1st Xiaomi device to other devices is quite easy. Based on the tips presented above, there is an option to easily customize the display of contacts, additionally export or import them. Study all the information quite carefully and choose the best method.
Source
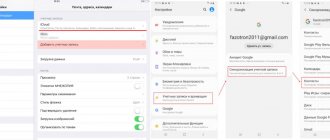
Synchronization with Google account
Contacts on your Android smartphone can be synchronized with your Google Account so that they are stored in the cloud. To do this, in the settings menu of your old smartphone, you need to open the “Accounts” item, select your Google account, check the “Contacts” box, click the context menu button and start synchronization. After this, you need to log into the same account on a new device and repeat the procedure. If synchronization in Android OS is always enabled, then in the future you can copy contacts, even if your old smartphone is broken or lost.
On iPhone
iPhone developers took care of their users and created a special application for copying contacts from Android devices to iOS - Move to iOS . You need to download it to your Meizu gadget and go through the following steps:
- MEIZU M8: smartphone unboxing
- Open the program and give all requested permissions.
- On your iOS device, click “Transfer data from Android.”
- Find the code on the iPhone and enter it on the first smartphone.
- In the data menu, select what you want to transfer.
- Wait until the procedure is completed.
The instructions work on any version of iOS.
Transferring contacts to a PC may seem impossible to some users, but in reality it can be done, and in just three steps. Detailed instructions:
- Perform a backup of numbers through the device settings.
- Connect your phone to your computer using a USB cable.
- Send a folder called backup and a record.info .
When transferring numbers to a PC, they will not go anywhere from the SIM card, so you should not worry and copy the data in the second round to avoid a large number of copies.
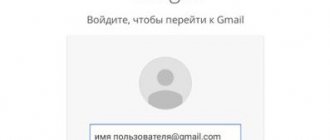
How to view the list
If the question arises: where are they located, then open a browser on your computer and go to the Google search page. In the upper right corner you will need to go to your profile. If you are logged in, then click on the avatar and make sure that the profile you need is at the very top (this is if, as in the example, several accounts are connected at once).
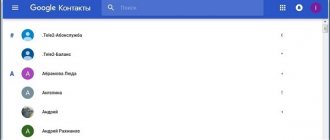
Then click on the button with nine squares, at the end of the list, select “More” and click on the “Contacts” item.
The next page will open your available contact list. There will be a main menu on the left; you can hide it by clicking on the three horizontal stripes at the top. In the middle, the following information is shown for each entry: name, email, phone number, job title. At the top of the list are contacts that are important to you and have been marked with an asterisk. Then they go alphabetically.
The “Similar contacts” tab will show those for which the same name or number is indicated; here they can be combined into one.
If you open the “Other Contacts” tab, you will see a list of users to whom you have previously sent emails.
Synchronizing contacts
In order to synchronize contacts, you must enable this function on your smartphone. How to do this depends on your device.
On Lenovo, go to “Settings”, then go to the “System” tab and in the “Accounts” section select “Google”.
Please note that if you synchronize contacts, they will appear on your phone from your account, but not vice versa. All records that are on the smartphone will not be added to Google contacts. The same applies to adding a new user. Create it in Google Contacts and it will appear on your phone. Create a user contact on your phone - it will not be added to your Google profile.
This is how the article turned out. Let's summarize what we've discussed a little. To the question: where are contacts stored in a Google account, how to view them and add a new one, we answered. We figured out how to create groups, delete and restore deleted contacts. To transfer contacts from your phone to a Google account or from one account to another, you need to use the import/export function. If you need to restore your phone contacts through your Google account, you need to enable synchronization on your device. If you have any questions, ask them in the comments.
How to recover deleted
Now let's figure out what to do if the user deleted contacts in his Google account, how to restore everything he needs? To do this, click on the “More” menu – “Cancel changes”.
Please note here that you can restore records if you deleted or merged them, imported or synchronized them. Moreover, no more than 30 days should have passed from the moment you did this.
Select the appropriate item with a marker and click “Confirm”. After this, some records will be restored.
Restoring contacts by import/export
Please note that almost all applications focused on working with contacts have functions for importing/exporting phone book entries. If you really value your contacts, make periodic copies and save them on a memory card or built-in memory
. Also, almost all applications implement the function of sending contacts by email.
If you suddenly want to restore contacts on Android if they are damaged or accidentally deleted, all you have to do is import the saved files. By the way, if you saved contacts as a vCard, then you may find applications for bulk importing them useful.
Contacts do not sync with Google: problem solving
The Android mobile operating system, like almost any modern platform, provides functionality that ensures the safety of the user’s personal data.
One of these tools is synchronization of contacts, passwords, applications, calendar entries, etc. But what if such an important element of the OS stops working properly? One of the common problems in this case is the lack of synchronization of the user's contact list. Such a failure may be short-term, in which case after a certain time the exchange of data with the Google cloud is restored.
It's another matter when the termination of contact synchronization is permanent. We will talk further about how to correct such an error in the system.
Troubleshooting Contact Sync Issues
Before performing the steps described below, you should double-check whether the device is connected to the Internet. Just open any page in a mobile web browser or launch an application that requires mandatory network access.
You should also be sure that you are logged into your Google account and there are no problems with its operation. To do this, open any application from the “Good Corporation” mobile application package, such as Gmail, Inbox, etc. Better yet, try installing any program from the Play Store.
Read on our website: How to fix the error “The process com.google.process.gapps has stopped”
And the last point - auto-sync must be turned on. If this function is activated, the necessary data is synchronized with the cloud automatically without your direct participation.
To find out if this option is enabled, you need to go to
“Settings” - “Accounts” - “Google”. Here in the additional menu (vertical ellipsis at the top right) there should be o.
If all of the above points are in perfect order, feel free to move on to ways to fix the contact synchronization error.
Method 1: Manually synchronize your Google account
The simplest solution, which in some cases can be effective.
- To use it, go to the device settings, where in the “Accounts” - “Google” section, select the account we need.
- Next, in the synchronization settings for a specific account, make sure that the switches next to the “Contacts” and “Google+ Contacts” items are in the “On” position.
Then in the additional menu click “Synchronize”.
If after performing these steps, synchronization begins and completes successfully, the problem is solved. Otherwise, we try other ways to resolve the error.
Method 2: Removing and Re-Adding Google Account
This option is even more likely to fix the problem with syncing contacts on your Android device. You just need to delete your authorized Google account and log in again.
- So, first we delete the account. You don’t need to go far here: in the same “account” synchronization settings (see Method 1), select the second item - “Delete account.”
- Then we simply confirm the selected action.
Our next step is to add the newly deleted Google account to the device again.
- To do this, in the “Accounts” menu of the operating system settings, you need to click on the “Add account” button.
- Next you need to select the account type. In our case, Google.
- Then follows the standard procedure for logging into your Google account.
By adding a Google account again, we start the data synchronization process from scratch.
Method 3: Force Synchronization
If the previous troubleshooting methods do not work, you will have to “cheat,” so to speak, and force the device to synchronize all data. There are two ways to do this.
The first method is to change the date and time settings.
- To do this, go to “Settings” - “Date and time”.
Here, the first thing you need to do is disable the “Network Date and Time” and “Network Time Zone” options, and then set the wrong date and time. After this, we return to the main screen of the system. - Then again we go to the date and time settings, and return all the parameters to their original state. We also indicate the current time and current date.
As a result, your contacts and other data will be forcibly synchronized with the Google cloud.
Another option for forcing synchronization is using a dialer. Accordingly, it is suitable only for Android smartphones.
In this case, you need to open the Phone application or any other “dialer” and enter the following combination:
*#*#2432546#*#*
As a result, you should see the following message in the notification bar indicating a successful connection.
Method 4: Clear cache and delete data
A very effective method of dealing with contact synchronization errors is to completely delete them and clear the associated data.
If you want to save your contact list, the first step is to make a backup.
- Open the Contacts application and through the additional menu go to “Import/export”.
- From the pop-up menu, select “Export to VCF file.”
- Then we indicate the location to save the created backup file.
Now let's start clearing the cache and contact list.
- Go to the device settings and then to “Storage and USB drives”. Here we find the item “Cache data”.
- By clicking on it, we see a pop-up window with a notification about clearing the cached data of our applications. Click "OK".
- After that, go to “Settings” - “Applications” - “Contacts”. Here we are interested in the “Storage” item.
- All that remains is to click on the “Erase data” button.
- You can restore deleted numbers using the “Import/Export” menu in the Contacts application.
Method 5: Third Party App
It may happen that none of the methods described above will fix the problem with contact synchronization. In this case, we recommend using a special tool from a third-party developer.
The “Fix for contact synchronization” program is able to identify and correct a number of errors that lead to the inability to synchronize contacts.
All you need to do to fix the problem is click the “Fix” button and follow the application’s further instructions.
We are glad that we were able to help you solve the problem. Describe what didn't work for you. Our specialists will try to answer as quickly as possible.
Did this article help you?
YES NO
lumpics.ru
Transfer contacts to Meizu from Google account
To transfer contacts using the Google service, you will need to enable synchronization . This is done as follows:
- Open phone settings.
- Go to the “Account and Synchronization” tab.
- Open a Google account.
- Scroll down and activate the slider next to the word “Contacts” (two items are displayed on the screen, since synchronization was carried out using two SIM cards).
To get data on your new phone, you just need to go to Google cloud storage.
Can I move a contact to my desktop?
No, the Meizu developers did not provide for moving the contact to the main page of the screen. But speed dialing can be configured in another way:
- Open the phone book and go to settings.
- Select "Speed Dial".
- Press the button with the desired number and select a contact.
In the future, dialing of this contact will be carried out after a long press of the button under the specified number.
How to restore deleted contacts? If deleted numbers were previously uploaded to cloud storage, you can restore them from there. Another option is instant messengers (Whatsapp, Viber, etc.), where contacts are saved automatically. What to do if Meizu does not see the SIM card contacts?
In this situation, there are several options for solving the problem yourself:
- Checking the SIM card memory. When the card is full, new contacts are not saved on it, and old ones stop being displayed. To resolve the problem, you must delete some contacts.
- Flashing a smartphone. Contacts often disappear from the Meizu phone book if the OS version is outdated. Therefore, you should check the current version of the operating system and update it if necessary.
- Freeing up internal memory. Software failures, including loss of contacts, sometimes occur due to full internal memory. It’s not difficult to free it – you just need to remove unnecessary images, videos, applications, etc.
Transferring contacts takes minimal time and does not harm the smartphone in any way. To do this, you don’t even need to have special skills or study in detail all the functionality of your gadget. The instructions presented in the article are suitable for each user, they save time and allow you to save contacts in their original form.
Need help solving an important problem? Then ask any question about Meizu and we will answer it!
Making calls is the main function of a mobile device. For this reason, owners of Meizu smartphones should know the details of setting up the “Phone” section. After studying the instructions, users will learn how to change a contact in Meizu, set a photo on it, or save a new phone number.
- How to set up a Meizu phone
Content
How to copy contacts from Android phone to computer - methods
Let's figure out how to copy contacts from an Android phone to a computer with the possibility of further transferring them to other devices (for example, transferring to iPhone). We will use the Google online service, as well as connecting the phone directly to the computer. At the end of the article, we will consider popular programs for copying contacts.
This article is suitable for all brands that produce phones on Android 9/8/7/6: Samsung, HTC, Lenovo, LG, Sony, ZTE, Huawei, Meizu, Fly, Alcatel, Xiaomi, Nokia and others. We are not responsible for your actions.
Copying contacts via Google account
All Android phone users must create an account on Google, with which applications are updated and installed. Copying numbers through your own account can be done in 2 stages.
Before you transfer contacts from your phone to your computer, you should synchronize:
- Go to the gadget settings.
- Select "Accounts".
- Click on the “Google” section or use the command in the list to add it.
- Opposite the line “Contacts” we set the switch.
- Click on the menu in the upper right corner.
- Select Synchronize.
Google account sync won't work on Android
After this, you can begin the process of copying numbers. This happens using the settings of the Contacts system program. This application has an export and import option. All numbers will be packed into a vcf file, which can then be sent by e-mail:
- We launch the Internet on the phone.
- Open “Contacts”.
- Click on the drop-down menu.
- Select "Import/export".
- We indicate the internal memory or SIM card as the export source.
- Select email.
In a couple of seconds, all contacts will be sent by email. They can be transferred to the computer's memory or left in an electronic mailbox.
Contacts from the phone book can be copied in vcf format to an SD card, and then, using a card reader, transferred to the PC hard drive. In this case, it is important that there are no programs installed on this card that will be deleted after it is removed.
Copy contacts via Android connection via USB cable to computer
If you urgently need to transfer contacts from your phone, but there is no time to synchronize with Google accounts, you can copy the phone book to your computer via USB. First, you should move all numbers to the phone memory:
- In Android settings, open “Contacts”.
- Select import/export.
- In the “Source” view, select the SIM card.
- We assign the storage location to the phone memory.
How to sync Android with computer via USB and WiFi
Now all contacts from the smartphone’s memory can be transferred as a vcf file to an SD card. We check that the copying process was completed correctly, and connect the phone to the computer using a USB cable:
- On the phone, in the USB launch menu, we assign file transfer.
- On the PC, open the folder with disks.
- We find the phone in the list.
- We go into the internal memory.
- We copy the business card file to the computer memory.
Copying contacts through third-party programs
In the Play Market, in the “Applications” section, utilities are available that can be used to copy phone numbers to your computer. Although they have differences in interface and settings, they are united by the fact that you first need to create a vcf file and then send it to your computer.
The most convenient program now is the AirDroid service, with which you can remotely control your smartphone from your computer. In this service, an account is created as follows:
- We open the official resource of the service https://www.airdroid.com/ru/ and go through the registration process.
- Install the AirDroid application on your phone.
- Login to your account.
Google Play Market is not working today - reasons and what to do
Troubleshooting encoding issues when copying contacts
The main problem in transferring contacts from a phone to a PC is that the list of contacts may not be displayed correctly due to incorrectly set encoding. The Android OS uses its own standards, which are different from those used in the Windows system.
How to find contacts on a smartphone
The software of most smartphones runs on the Android platform. The control program (launcher) allows the owner to carry out various operations. Their loss from the phone’s memory as a result of various unprofessional manipulations is common. In order to avoid unpleasant consequences, a backup is usually made. There is another way to avoid the risk of losing counterparties in Android. Contacts are stored in the same place as other information. This place is the SQLite database. Since programs for all gadgets are written in the same computer language, the file is called the same everywhere:
/data/data/com.android.providers.contacts/databases/
The file manager illustrates the file address on the screen:
This is what the contact storage looks like
The storage name is contacts or contacts2, extension is .db. To open it on Android, it is not enough just to specify the path. Most new owners do not have the right to manage the superuser account as an administrator. This opportunity appears only after installing root rights.
The file is of the SQLite database type. To view it, you need to install specialized software on your phone. This is a standard application on Android smartphones.
Viewing a file on a personal computer screen
To avoid repeating the same set of actions several times, you can simplify the task. In Android, using the import/export function, the database is transferred to the section required by the phone owner. Then you will not need to use root rights to view and manipulate contacts, except in one case. If changes were made during operation, updated information can only be obtained by performing the entire set of actions again.
Transfer data using standard smartphone software
Important!
When copying, the owner can specify the path. This prevents the risk of data loss.
How to save phone contacts in your account
To copy contacts from your phone to your Google account, you need to use import/export. How can I transfer contacts this way? First you need to export them to a file from your phone, and then import it into your Google account.
- Find Import/Export Contacts on your device. On Lenovo, you need to open “Contacts”, and then go to the “Settings” section at the bottom.
If you have a Samsung, then the required item is located along the path: “Menu” - “Contacts” - three dots in the upper right corner - “Manage contacts”.
- Next, select “Export to storage device.”
- Remember where the file will be saved and what it will be called. Click "OK".
- Use File Explorer on your phone to find the file. It can be built-in, or you can use a third-party application, for example, ES Explorer.
- Long press on the file to open an additional menu. Select “Send” or “Transfer” in it.
- You can add the file to Google Drive, and then you will need to log in from your computer and save it from there. I'll send it via Skype. Only this should be a person you trust, for example, sister, mother, husband, since this is your personal data.
After sending, go to your Skype and download it from the dialogue to whom you previously sent it.
- All downloaded files are located in the Downloads folder on your computer. So open it and transfer the contacts file to your desktop.
We exported all contacts from the phone to a file and transferred it to the computer.
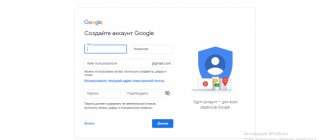
- Now you need to upload your contacts to your Google account. Go into it, select “More” - “Import”. A window will open where you click on “Import from a CSV or vCard file.”
- Since we are considering a new version, and it does not currently support this function, we will be prompted to go “To the old version”. Select the appropriate item.
- Then in the menu on the left again click on the “Import...” button.
- Click on the “Select file” button.
- Find it through Explorer, in the example it is on the desktop, select it and click “Open”.
- When its name appears in the window, you can click on the “Import” button.
- After this, the total number of contacts will increase. If this does not happen, you need to refresh the browser page by clicking on the circular arrow to the left of the address bar. Also, all these records will be automatically added to the “Imported” group.
- Go to the new interface and, if there are no more contacts, also refresh the browser page. After this, a message may appear that similar contacts have been found, click on this button.
- Here you can merge identical entries. Click on the appropriate button. To apply this action to all users in the list, select Merge All at the top.
- Now your contacts in your Google profile are the same as on your phone. And if, for example, you lose a device, then with the help of synchronization (which we will talk about in the next paragraph) everything can be restored.
By the way, using the described import/export procedure, you can transfer Google contacts from one account to another.