Uninstalling unused apps
Almost every user has applications on their device that are not used or are used extremely rarely. Why keep them in memory if you can download them from the Play Market and use them at any time.
Some applications take up quite a lot of space, including cached data, while running in the background and consuming battery power and, accordingly, taking up RAM.
If you find it difficult to identify such applications, use the Google Files application. Since Android 8, it comes with the device and you can find it among other applications.
1. Launch the application and open the “View” mode
2. Go to the Applications section
3. You can filter all applications:
- by name from A to Z and vice versa
- by date (new, old)
- by size (large, small)
What is Internal Storage and where is it located?
Internal Storage in Android, as the name suggests, is the internal memory of the device. Every device has it, regardless of whether memory cards are supported. Internal storage is a protected area of built-in memory where user information can be safely stored. The Internal Storage folder in Android is located in the /data system partition.
Users often mistakenly believe that internal memory and built-in memory are the same thing, but this is not the case. The Android SDK defines internal storage as a separate unique directory where the program will place its files. If an application stores information in the built-in memory, other software, as well as the user, will not have access to this data, except for the intentional use of such privileges after obtaining root rights on the device.
IMPORTANT. It is worth remembering that access restrictions are implemented in Android for a reason; such measures are taken to prevent disruption of the device’s functions as a result of changing or deleting the system directory due to the user’s carelessness or ignorance.
Removing a program from the device also means that the system automatically clears the internal memory of associated files that are not needed in the absence of this software, which allows Android not to accumulate unnecessary garbage.
Memory amount in smartphone settings
Typically you can find the folder in data/data/your.application.package.appname/someDirectory/
ATTENTION. The exact location where the files will be placed on an Android device may differ depending on the device model and OS version, so there is no need to use preset paths.
The internal memory space of the device is limited, and if you need to store a large amount of data, it is better to use another type of storage.
ADVICE. Although applications are installed by default in Internal Storage, you can specify the android:installLocation attribute in the manifest file, after which the program can be installed on External Storage. This feature comes in handy when the file is too large.
Removing unnecessary files
Any file manager is suitable for manually clearing your phone's memory. To free up memory on Andro > Cx Explorer or Total Commander.
Be careful and delete only unnecessary files that you created or copied from the gadget’s memory.
So, go to any file manager, open the root of the internal memory and start searching for files and deleting those that are no longer used.
Files that should be deleted (or transferred to microSD) first:
Photos, videos and other documents stored in internal memory instead of SD;
Documents received by email or via social networks (usually they are saved in the Download folder)
E-books and files stored by third-party applications in the memory of your device;
Contents of the DCIM, bluetooth and sounds folder.
What is cloud storage?
First, let’s define what kind of service this is. Roughly speaking, this is file storage in the form of allocated disk space for a company providing such services.
In other words, in a sense, it can be called a kind of virtual flash drive on which a certain amount of data is placed. However, if you need to constantly carry a USB device with you to access downloaded information, then such a service (for example, the Mail.Ru cloud or the corresponding Google service) can be accessed both from a computer and from a mobile device. That is, the files are synchronized in the cloud itself, and you can view or download them simply by entering your registration data (although in some cases this is not required).
Quite a lot has already been written about how to use the cloud. Now let’s pay attention to some main points, and also consider the simplest principles of its use, explaining the situation in detail.
How to save photos to the cloud on Android
To upload photos to cloud storage, you can use Google Drive or Cloud Mail. To save an existing photo, you need to do the following:
- Launch the cloud storage application.
- Click on the “Add” button or the “+” icon.
- Select the required file, photo or video to upload.
After a photo is uploaded, it is located both on the phone memory and in cloud storage. If desired, you can delete it from the smartphone’s memory. In the future, it is possible to return the data back by downloading a photo from the cloud.
You can upload photos either manually or automatically. To auto-sync all new photos, go to settings and enable the auto-upload function. After that, every time you create a new photo, it will be automatically uploaded to the cloud.
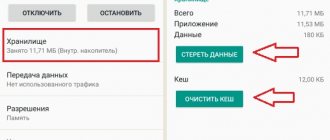
Clear cache
In Android Nougat and below, you can simply go to your storage settings and bulk clear all the cache on your phone. This is very practical because users do not need to clear the cache of each application individually.
Settings → Storage → Internal storage → Cache data.
Clicking on the latter will open a dialog box where you confirm the cleaning.
Starting with Android 8 Oreo, when Google redesigned the cache clearing mechanism in Android. Namely, Oreo removed the ability to bulk delete complete cache data, leaving you to go through each app's settings and clear the cache individually.
Unfortunately, this trend continues with Android 9 Pie. You're still limited to clearing the cache on a per-app basis, and that doesn't seem to be changing anytime soon. In fact, Google hasn't made any significant changes to the caching system since Android 8.
Let's look at two ways to clear cached data in Android 9 Pie. Of course, each method has its pros and cons, so you can choose which one suits you best.
Clearing the cache of an individual application
Each application, as it is used, collects cached data; it is needed for faster launch and operation of the application. But over time, this data becomes large and the application, instead of working quickly, may, on the contrary, slow down. Among the new cache data there are also old ones that it is advisable to get rid of.
Clearing the cache of each application is another task. But let's consider this method anyway.
In Settings go to:
Storage → Applications → select the desired application → Clear cache
Clearing cache with third-party applications
At the moment, the Play Market store has a large number of different cleaners. Which one to choose is, of course, up to you, but I want to recommend SD Maid.
There are free and paid versions. It copes with its tasks very well and can clear the cache using more flexible settings.
I talked about it in more detail in the article “SD Maid – a cleaner for Android”
What should you pay attention to before starting work?
Now let's look at some important points, without which the use of cloud services is out of the question.
The very first and most important thing is pre-registration, and in some cases it is absolutely unimportant whether it will be done via the Internet using a regular browser or a special computer or mobile application. The whole process takes a few minutes.
Mobile devices with operating systems installed on them differ favorably from stationary systems. The fact is that when you turn it on for the first time, to access some advanced functions or stores such as AppStore or Google Play (Play Market), the system initially prompts you to create an account (registered email address and password). At the same time, your smartphone or tablet already has a pre-installed application for working with cloud services. For convenience, you can install their desktop counterparts on your computer or laptop (although access can also be obtained through a browser).
How to expand internal memory?
Starting with Android 6.0 and higher, it became possible to combine internal memory with a flash drive to expand storage.
- As soon as the card is in the smartphone tray, swipe the notification shade down.
- Click "Customize".
- There you can choose to either consolidate the memory or leave the flash drive as a portable storage device.
Attention! If you choose the second path, the phone will format the memory card and change its file system. So don't forget to make a backup.
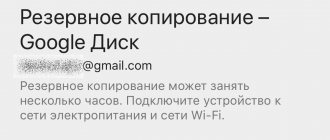
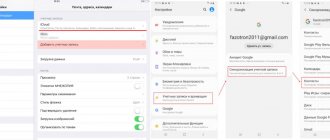
How to disable synchronization with all accounts
To disable backup for multiple accounts at once, the user needs to:
- Go to Gadget Settings.
- Select the "Synchronization" tab.
- In the “Automatic data synchronization” tab, drag the slider to the “Off” position.
- Save changes.
Before deactivating the data backup function, the user must explain to himself the reason for such actions. This is important, because the problem of random loss of information from the phone is difficult to fix. Data may be irretrievably lost and cannot be recovered.