What is an engineering menu
A function such as the engineering menu provides the user with the opportunity to set settings for the built-in equipment and change the capabilities of the device . Not every modern person knows why it is needed and how to open it, so our article will give detailed answers to these questions.
The engineering menu allows you to:
- manufacturers to carry out a final check of the gadget for any malfunctions;
- Service center employees configure the smartphone after repair procedures.
List of all functions
The list of engineering menu options differs depending on the specific Meizu phone model. But we will look at a basic set of functions that the owner of any version of this gadget will be able to use. This includes the following sections:
- Telephony . This section offers the following functions: changing mobile network parameters, determining the compatibility of the gadget with a cellular operator, setting automatic reception of an incoming call, returning to factory settings.
- Module tests (Hardware Testing) . Here, the engineering menu on Meizu allows you to increase the volume, check it in headphones and on both speakers of the smartphone, and identify problems with the screen, sensors and modules of the device.
- Connectivity . This category makes it possible to check the functionality of Wi-Fi and Bluetooth modules, turn off the screen when Wi-Fi Display is running, etc.
- Debugging (Log & Debugging) . Here are links to tests and utilities from MediaTek, as well as suppliers of other gadget parts.
- Location . The most common features in this category are: checking location, GPS operation, disabling A-GPS detection.
- Others . In this category you can change, for example, the font used in your smartphone.
How to configure (calibrate) the proximity sensor
In cases where the module does not work correctly (the display does not turn off when approaching a person’s head or goes out when moving away from it), it will need to be adjusted. To do this, it is important to know how to calibrate the proximity sensor on Android. This problem can be solved using built-in system tools, through the engineering menu, or through third-party utilities.
We recommend: Restoring root rights
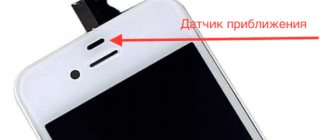
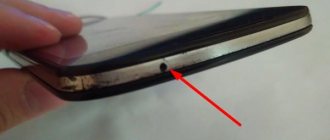
Before you begin calibration, you need to find the module on the smartphone body. Most often it is located at the top of the display, near the front camera. To find it, when making a call, move the mobile device away from your ear so that the screen lights up, and then move your finger to the selfie camera and swipe left or right from it. If the display turns off, it means that the required node is located in this location.
In some cases, the functionality of the module is impaired due to dust. To fix such a breakdown, just turn off the gadget and thoroughly blow and wipe the area around the element. Next, you should restart the device and check its functionality. If the problem persists, you should proceed with calibration.
System capabilities
Built-in services are the easiest way to perform calibration. To do this, you need to go to the settings of your smartphone and select this option “Display” or “Accessibility” Next, you will need to follow the system prompts during the operation.
First you need to remove all objects located in front of the sensor, and then activate the setting. After this, you need to place a sheet of paper a few centimeters opposite the element, and then successively move it closer to the module and away from it. If the screen goes out and lights up again during these steps, it means the calibration was done correctly.
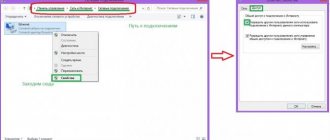
Engineering menu
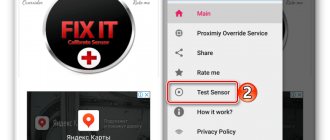
The module can be diagnosed and, if necessary, adjusted through the engineering menu. To do this you need:
Select number entry and enter *#*#3646633#*#* or *#*#6484#*#* .
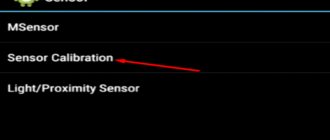
- Go to testing components ( “Hardware Testing” ), open the “Sensor” , then “Light/Proximity Sensor” (light and proximity sensor).
- To perform testing, collect module information ( “PS Data Collection” ).
- Click “Get One Data” when “0” lights up on the screen, bring your palm closer to the element and click “Get One Data” .
- “255” appears on the screen , the module is working.
- To configure, you need to select “PS Calibration” , then “Calibration” .
- Click “Calculate min value” , and the module should be open.
- “Calculate succeed” on the screen , move the paper sheet a couple of centimeters closer to the screen and click “Calculate Max Value” , and then “Do Calibration” .
After these steps, you need to restart your mobile device.
We recommend: Reinstalling Play Market on your phone
Checking and calibrating your phone
The engineering menu is considered to be quite functional, so there are quite a few changes for the phone. Next, we will look at the main points that the user can independently check and calibrate.
Increase volume
The silent phone problem can be fixed in a few clicks. The speaker volume function, as mentioned above, is located in the Hardware Testing , Audio_ ModeSetting . Having found it, you should set the desired value (the maximum is, as a rule, 225 , but in some models it reaches only 160 ). Then you should press the Set button next to it, which will mean that you have successfully changed the volume of the gadget.
Proximity Sensor Calibration
Here, the first thing you need to do is get into the engineering menu on your phone and open the same Hardware Testing . Next you need to follow the path Sensor – Light/Proximity Sensor – PS Data Collection . Then the testing window will open, where you will need to click Get One Data. the number 0 appears in the second line , you should place your palm on the sensor and then press the same button again. Next, if the number 225 , this will mean that the sensor is functioning normally.
Before entering the engineering menu settings and starting the procedure, it is important to make sure that the proximity sensor is not covered with anything (film, glass, etc.).
Checking the accelerometer
Accelerometer calibration is required on Android devices when the auto-rotate function does not work correctly. Changing the situation through the engineering menu is not difficult. To do this, you will have to enter the already familiar Hardware Testing , go to Sensor and Sensor Calibration . Calibration will only be possible if you press the buttons in the correct sequence:
- Clear Calibration.
- Do Calibration.
Then you need to exit the menu. And the “Level” application, which is available in every Meizu device in the “Tools” folder, will help you check the changes.
Meizu M5 Proximity Sensor Calibration Error
Repair Meizu, proximity sensor does not work: video
The proximity sensor in the Meizu phone is responsible for locking the screen during a telephone conversation.
Thus, when you bring the handset to your ear, the sensor is triggered and the screen fades away, so as not to accidentally open one of the applications. The failure of this sensor makes the conversation with the interlocutor problematic; every now and then a click signal is heard at the other end of the line, which is very annoying. From this review you can learn how to try to solve the calibration problem without the help of others. If the tips below do not help your company, call an authorized Meizu service center. As soon as a proper installation is carried out, how to begin the annotation, it is necessary to eliminate mechanical obstacles that can block the operation of the sensor.
- Wipe the upper part of the phone from dust and dirt, you will like it because they make it difficult for the proximity sensor to work smoothly.
- If your Meizu has an additional protective device of unknown origin installed, it can also impair your functionality. We are talking, then, about universal protective glasses and films. This part must be removed or a hole must be made in the sensor area.
READ Error Starting Apple Mobile Device Service
Meizu smartphones: proximity sensor calibration error. How to fix?
Note on checking the sensor:
- We go to the engineering menu of the phone. This can be done by dialing a number, a combination of characters and numbers. Enter the following combination as for a regular call. ##3646633## and press “call”.
- In the menu that appears, you need the Hardware Testing tab, from it go to the detector menu, then Light. PS Data Collection.
- You are now in the options menu for the component you are looking for. In the interface, find the Get One Data item and click on it.
- Information lines with numerical values will appear. In the 2nd line of numbers indicating the state of that same proximity sensor, “0” should appear first.
- All that remains is to cover the sensor, using your palm and a sheet of paper. Now the zero will change to the number “255”, but this is in this case if the component is working.
How to fix a calibration error on Meiza?
- The process is somewhat different, but it also involves manipulation in the engineering menu, so we immediately go to it, indicated above as.
- Now in the Light section, select the “calibration” item.
- Make sure that the sensor is not covered by anything, and click on Calculate min value.
- Place a sheet of cardboard or plain paper in front of the phone, at a distance of approximately a couple of centimeters, and click on Calculate Max value.
READ New privacy laws such as the CCPA may be heading to your state
This completes the setup, everything should work correctly. Otherwise, contact the service center for help.
Source
Android touchscreen calibration through the engineering menu
This method is considered the best.
Algorithm of actions:
- Go to the Calls section of your phone.
- Enter a special code. There is one for each smartphone: *#*#3646633#*#*, *#*#4636#*#*,*#15963#* or *#*#6484#*#* Or download the MTK Engineering Mode utility, install and Click Android Settings.
- We are looking for a section with display calibration. We need an inscription with the word sensor.
- When we go to the submenu for calibration, click on the Start sign.
- To remove old settings, click Clear calibration.
- To increase the sensitivity of the sensor, select Do calibration (20% tolerance). To make standard press 20%.
- Click on the back button a couple of times. Exit to the main display. After this, all changes will be saved.
- Reboot your gadget.
- If your actions are correct, then soon you will see the result of the work done.
A small example of entering the engineering menu on a Xiaomi Mi 5 device.
Linear acceleration sensor in a smartphone
The principle of its operation is almost identical to the accelerometer, the only difference lies in inertia. That is, the readings of this sensor do not depend on any global external factors (like gravity). The only thing it registers is the speed of the smartphone’s movements in space relative to its previous position.
The linear acceleration sensor is not capable of determining the position of the device in space (there is no reference to external landmarks), but this is not necessary (the gravity sensor and accelerometer do an excellent job of this task). The absence of reference to external landmarks allows you to rotate objects on the display without reference to these landmarks, for example, in games. Also, this sensor, in combination with others, increases the overall accuracy of movement detection.
Causes of problems
There are many different reasons why the Meizu M3 Note proximity sensor is not functioning properly.
Before fixing the problem, you need to find out what caused it. The most common causes of problems are:
- The proximity sensor is disabled in the device settings;
- the component seal is lost (the reason occurs after removing the display);
- Dirt has gotten into the device or under the smartphone screen;
- reversing the sensor after the smartphone falls;
- displacement of the seal after a phone impact;
- incorrect installation of the device (the distance from it to the display is large);
- small hole in the screen for the sensor;
- malfunctions in the device itself.
Temperature sensors
A modern smartphone is abundantly stuffed with digital thermometers. Structurally, they are a thermocouple: a resistor with two terminals, the resistance between which varies depending on the temperature. Since it is relatively primitive, it can even be implemented inside a semiconductor chip.
Every smartphone must have a battery temperature sensor. If it overheats, it turns off charging or reduces the output current to prevent the electrolyte from boiling, which leads to a fire or explosion. Thermometers inside the SoC are also common (from a couple of pieces to a dozen or more). They measure the temperatures of processor cores, graphics accelerators, and various controllers. Sometimes there are also ambient temperature sensors, but they are not widespread. The reason for this is low accuracy, since heat from the inside of the device and the user’s hands distorts the readings.
Rotation sensor
It determines the direction and frequency of rotation of the smartphone relative to one of the axes of three-dimensional space. Like the acceleration sensor, it is independent and not tied to external reference points. Often performed as part of a single module with a linear acceleration sensor. Separately, as a rule, it is not used, but it allows you to adjust the operation of other sensors to improve accuracy. It also helps with gesture control, for example, by twisting the smartphone in your hand, the camera is activated.
Cutaway MEMS gyroscope
Pressure sensor (barometer) in a smartphone
The barometer on your smartphone measures atmospheric pressure (in mmHg, bar or pascals). It allows you to more accurately determine your location and altitude above sea level, since the pressure decreases as you rise. It can also be used as an altimeter, measuring altitude above sea level, but the accuracy leaves much to be desired, since atmospheric pressure changes with the weather. The function of adjusting the weather forecast in meteorological programs and widgets is even less in demand.
Positive Features
Now you know - when the description of technical characteristics indicates the presence of the sensor discussed in the article, it means accelerometr. It is used in the following situations:
- In pedometer applications - to clarify data on the distance traveled. Very useful functionality for supporters of a healthy lifestyle;
- If the “Automatic screen rotation” option is active, then the gravity sensor in the smartphone measures the direction of the motion vector, analyzes the information and changes the image orientation (from vertical to horizontal, and vice versa);
- In games (racing simulators, airplane control, etc.) you can control the vehicle by tilting the device;
- Support for different gestures - shaking of different strengths and amplitudes. Some applications can actually be configured so that device movements activate certain functions;
- An additional source of information for geolocation programs (navigators, maps, barometers, altimeters, etc.).
I am sure that the publication was useful and shed light on inexplicable facts in the field of mobile technologies. And to “see the light” even more, look through our selection with a description of the sensors used in smartphones. Well, to get the “Guru” status, we advise you to study our useful tips for Android and iPhone.
OUR SITE RECOMMENDS:
Interesting facts about speakers
15.12.20190
Contents1 Features and habitat2 Character and image...
Seagate 5tb hard drive
15.12.20190
Contents1 Easy-to-use storage solution2...
How to add a new paragraph in an Instagram post
15.12.20190
Contents1 How to make paragraphs on Instagram?1.1 Paragraph sign1.2 …
Carbon dioxide concentration meter
15.12.20190
Contents1 Operating principle2 Gas analyzers2.1 Option No. 12.2 Option No. 22.3 ...
The last notes
How to recover Instagram page without email
15.12.2019 0
How to restore a VK page without a last name
15.12.2019 0
How to restore a VK page if the number is lost
15.12.2019 0
How to restore a column in Excel
15.12.2019 0
Heart rate monitor or heart rate sensor in smartphones
The heart rate monitor is capable of measuring the frequency and rhythm of heart contractions. During sports, it makes it possible to monitor the work of the heart and adjust the load to increase the effectiveness of training. The disadvantage of a heart rate monitor is the need for close contact of the smartphone with a part of the body in which the blood vessels are close to the surface (for example, fingers) in order to catch the slightest pulsations. Because of this, it has not gained popularity in smartphones, but is found everywhere in smart watches and fitness trackers.
Heart rate monitor
Accelerometer
The accelerometer measures acceleration and allows the smartphone to determine characteristics of movement and position in space. It is this sensor that works when the vertical orientation changes to horizontal when the device is rotated. He is also responsible for counting steps and measuring movement speed in various map applications. The accelerometer provides information about which direction the smartphone is facing, which becomes an important function in various augmented reality applications.
This sensor itself consists of small sensors: microscopic crystalline structures that, under the influence of acceleration forces, transform into a stressed state. The voltage is transmitted to the accelerometer, which interprets it into data about speed and direction of movement.
Checking the component
In order not to prematurely remove the screen from your mobile device, you need to check the serviceability of the proximity sensor on the Meizu M3 Note smartphone. The verification process consists of several stages.
- Open the engineering menu. To do this, you need to dial the combination on your smartphone: *#*#3646633#*#* and make a call.
- A menu will appear on the mobile phone screen. In it you need to open the Hardware Testing section, go to the sensor menu, open Light, and then go to the PS Data Collection subsection.
- In the window that appears, open the Get One Data tab.
- Rows of numbers will appear. Select the second line, where the number “0” initially appears.
- When you cover the sensor with your hand, paper or other object and press the “Get One Data” button, the number “0” should change to the number “255”. In this case, the proximity sensor works properly.