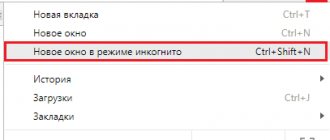
Don’t know how to enter recovery on Huawei and Honor? We offer brief instructions for activating the mode on Android. It’s worth starting with the fact that Recovery is a special option for resetting settings to the initial state. When you turn on the mode, all data on the smartphone is automatically destroyed. The phone is reset to factory condition. Most often, the function is used in case of a problem or failure. Reset is included in rare cases when other methods are not suitable. Before turning it on, we recommend saving important files on a flash drive or “cloud” on the Internet.
In addition, the mode of the same name has other options. They can be used without difficulty. You can launch recovery after turning off the gadget. Otherwise, the option is not activated. Thus, it will not be possible to return the smartphone to work by pressing one button. If you hang for a long time, you need to disconnect or remove the battery.
What can you do in recovery mode?
- Install official, custom firmware, any archives with programs, for example, GAPS, programs for obtaining ROOT rights and much more.
- Perform a factory reset, delete the cache, clearing the memory of unnecessary “junk” and garbage.
- Back up data and then restore it.
- Mount and format specific partitions of the file system.
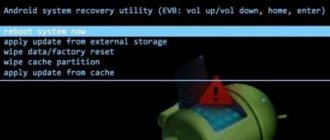
- wipe cache partition
Reset the application cache partition, it can help if the device becomes slow or applications do not work correctly - wipe data factory reset
Reset the data of all applications, in other words, do a Hard Reset (more details) - reboot to system
Reboot and go to normal mode, essentially exiting recovery
Update using hisuite:
- Download, install and update to the latest version the HiSuite program - a utility for synchronization, backup and much more from Huawei (contains ADB drivers).
- To further flash the phone firmware, enable USB debugging in the phone settings in the developer section.
- Launch the HiSuite program on your computer.
- We connect the phone using a USB cable in HiSuite mode.
- When you first connect, HiSuite begins installing drivers on your computer and Daemon on your phone. (a shortcut to the HiSuite program will appear on the phone - this tells us that the drivers have been installed successfully).
- Select the EMUI ROM item in the HiSuite program.
- If we DO NOT have a pre-downloaded firmware version, then select the Download ROM item, follow the link and download the required firmware version from the site. If we HAVE, or you have just downloaded it, a firmware version, then select the Loading ROM item, we will be prompted to select the location of the firmware file. We find the file and confirm the choice.
- The file download process begins.
- We are asked to save our phone data. We select the necessary backup items, if necessary, and confirm the choice. Or refuse if we think that we already have saved data. After saving or refusing, select NEXT.
- The HiSuite program begins the firmware process.
Important!
- During the firmware installation process, do not disconnect the cable from either the phone or the computer.
- Don't touch the phone at all.
- Do not switch to other processes on your computer.
- Wait for the firmware to finish.
- After flashing the HiSuite program, the phone will reboot and enter Recovery mode. A message will appear on the white screen indicating that the phone itself has started flashing the firmware.
- We are waiting for the successful completion of the firmware in the form of a tick. The phone will reboot itself.
- We turn off the phone and see a window on it about updating applications. We are waiting for the operation to complete.
- We go to the settings and in the update item we make sure of the version we have installed.
How to reset settings on Android
In order to reset settings on Android, you need to activate the system recovery mode and select Hard reset in it. To perform a hard reset on a Chinese device, you must first copy all the important information to another device. Decoding of all recovery points is standard for most models - Lenovo, Samsung, Xiaomi.
Recovery allows the user to roll back the Android operating system to the factory version and clear all available memory of the smartphone. Using the Wipe data factory reset item, it is possible to save media files after resetting. System functions make it possible to restore the operation of the smartphone and remove unnecessary applications that cause crashes and errors. On Chinese phones, items are described in the manufacturer's language or in English. To decipher the points, you must follow the instructions, which are the same for most Lenovo (Lenovo) and Xiaomi models; for this reason, translation is not required.
On any device running the Android operating system, there is a special . Service specialists use it to test the operation of the smartphone and debug the installed software. An ordinary user resorts to Recovery services only in one case: when it is necessary to restore the phone to factory condition.
This operation is called Hard Reset
and is used in the following situations:
- It is impossible to restore the functionality of a device damaged by installing new firmware or applications by other means;
- Pre-sale preparation of the device is carried out.
note
A hard reboot completely deletes all traces of the user's presence: the contact database, the message archive, all saved files and installed applications. Therefore, before resetting the settings, you need to transfer useful information via a cloud service or simply to an SD card.
What is hard reset
Hard reset – forced clearing of all information on the device to remove all installed programs, linked accounts, and user data. Hardware cleaning is most often required if there are any stutters or bugs in EMUI and Android in general.
A hard reset deletes all user data:
- Linked accounts;
- SMS messages;
- Saved passwords;
- Huawei account;
- Photos, videos;
- Audio files;
- Programs, games;
- Other information.
After using a hard reset, the phone turns into an out-of-the-box device. After this, you can re-enter Google Play, install the necessary programs and use the gadget as usual.
Options for solving the problem
At the moment there are several options to solve the problem. They differ in the degree of complexity and the number of steps required to exit tablet mode in Windows 10. But almost all methods are effective. They help solve the problem and return your computer desktop to its normal appearance. These are the methods:
- Switch in the notification center. Windows 10 has an updated notification center. And it has tiles for turning on or off certain functions of the operating system. There you can also find a button to switch to tablet mode or turn it off.
- Options menu. It helps in situations where there is no toggle tile in the notification center for some reason. But the number of actions to turn off this mode increases greatly.
So, there are two ways to solve the problem. And now we will analyze both in detail. If you find the tile you want in the notification center, consider yourself lucky. And if not, then you will have to do a little work before removing tablet mode on Windows 10. So, let's look at the first option.
Why update firmware on Android
The answer is as simple as three pennies, often in the software, specifically in the shell made by the smartphone manufacturer based on the Android OS, for example, FlymeOS, there are many shortcomings and bugs. As a result of these shortcomings, the user experiences various problems and inconveniences. Let's look at examples:
- Terrible photo quality with a good camera, for example, you have a top-end camera, like the LG G5, and the photos are a blurry mess, “neither fish nor fowl”.
- The smartphone does not want to turn on or reboots on its own
- Hanging and dulling
- Very strong heating, in this case it is advisable to lower the processor clock frequency, that is, do a downgrade
- The SIM card disappears or blinks (the problem may also be in the hardware, but it’s worth trying to reflash it)
- Slow multi-touch screen response
- Some other problems
There are other reasons, for example, I wanted to get new functionality or look at a new Android.
How to enter recovery on Android
Literally every person may need access to Recovery on Android. This menu is used to restore the functionality of Android devices, to format memory and much more. This mode is present in almost all smartphones and tablets, so accessing it will not be difficult. Let's figure out what Recovery mode is for and how to activate it.
What is Recovery on Android
During the operation of Android devices, various errors may occur in the operating system. Their appearance leads to a decrease in operating speed, as well as regular freezes. In the most difficult cases, smartphones and tablets lose their functionality - when turned on, the name of the phone or the Android logo (green robot) appears on the screen, but no further loading is observed.
In order to restore the device to functionality, you need to perform a general reset or clear the cache. A master reset is also performed through the user menu. If the operating system does not load, we will not be able to get to the desired function. In this case, you need to go to Recovery Mode and perform a complete reset using the “Wipe data/factory reset” item.
All data from the device will be deleted, after which it will be able to boot - then you need to perform the standard initial setup from scratch. If your smartphone is frozen, but you don’t want to lose valuable data, you can do it differently - delete the cache.
In some cases, this method gives excellent results, allowing you to restore the functionality of the Android operating system. There are also other functions in Android System Recovery:
- Reboot Android;
- Installing updates (for example, from an SD card);
- Installing the update via ABD;
- Installing updates from the cache;
- View recovery logs.
Depending on the smartphone/tablet model, there may be some other functions.
If you don’t know what a particular function in the Recovery Android menu is for, don’t try to select them at random - this can lead to the complete deletion of all data and other not very pleasant consequences.
In some models of phones and tablets, there is a flashing launch point here. You should not try to reflash Android devices yourself without having the appropriate experience to do so. If you got into the menu completely by accident and want to get out of here without unpleasant consequences, use the volume control buttons to select the “reboot system now” item and press the power key - the reboot will begin in normal mode (without data loss).
How to enter the Recovery menu on Android
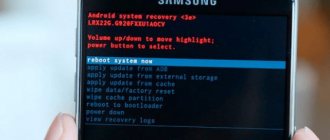
In order to activate Recovery Mode on Android, you need to know the name and brand of your phone. If you don't remember the name of your original handset, find the box or look under the battery - you will find the information you need there. Next, we look for a key combination to enter Recovery Mode on specialized forums or in search engines. Here are the most common key combinations:
- For Samsung phones - power key, volume up key and Home key (center key);
- For LG phones – power key and volume down key;
- For Nexus phones - the power key and the volume down key, then select the desired item;
- For Motorola and Lenovo - power key, volume up key and home key;
- For Sony - press the power button and wait for the double vibration, then move your finger to the volume up button.
Please note that sometimes these combinations do not work. If you can't access Recovery on Android, look for the key combination for your phone model
The ADB Run program is also used to enter Recovery Mode. But you can use it only when the smartphone is operational and you have the opportunity to enable “USB Debugging”.
If all else fails, it means that your phone does not have Recovery Mode, and you need to install it separately - it is best to entrust this procedure to experienced users.
Instructions for installing Recovery are published on specialized forums dedicated to mobile devices. Please remember that such interventions often void the warranty.
How to use the new functionality
To update Huawei firmware in this way, you must initially meet two important conditions:
- The smartphone battery should be as fully charged as possible. That is, it is recommended to initially charge the gadget;
- The mobile phone must have the correct Wi-Fi settings, allowing the phone to easily connect to a wireless network.
If everything is fine with these points, you can proceed with the upgrade. How to do it:
Then the phone begins to search for available Wi-Fi points. Will offer a list of available ones. Naturally, you need to choose the one that the owner of the smartphone constantly uses. Next, enter the password and wait for the result.
Attention! In some situations, the connection is interrupted at the moment and the error Getting package info failed appears on the screen (we wrote about its solution here). If this does not happen, then the smartphone will independently find the necessary and suitable firmware, download and install it.
What is Recovery Mode and what is it for?
Recovery Mode or recovery mode is a special mode designed to restore the functionality of the iPhone. This feature will come in handy if a critical software error occurs, the device malfunctions, or an unsuccessful Jailbreak.
However, do not confuse a software problem with a frozen iOS loading indicator. Often this process slows down due to writing or reading a large number of files. It may seem that the device is frozen, although it is not. You can check the functionality of your iPhone by pressing any button. In this regard, when updating/resetting the device, you should not use Recovery Mode.
Ask your question to a specialist
Don’t know how to solve a problem with your gadget and need expert advice?
Recovery mode should be used in the following cases:
- iPhone won't boot or hangs at the apple icon with no loading indicator
- The screen displays "Connect to iTunes"
- iTunes does not recognize iPhone correctly
Causes
The problem occurs due to root errors on internal servers, which in turn occur when data is lost during an update. As a result, it becomes very difficult to operate the phone. There are significant lags in work.
Problems appear as follows:
- the upgrade occurs incorrectly;
- the database is not responding;
- installation occurs in a non-standard way;
- The phone automatically uses not Wi-Fi, but mobile Internet.
Clicking "Shutdown" or notifying developers about a breakdown shows a dark display with no option to select other tasks.
Cannot exit recovery mode reasons and what to do
There are situations when the iPhone cannot exit recovery mode. This situation is called Recovery Mode Loop. Its appearance is due to the fact that during recovery a complete diagnosis of the system is performed. If errors occur, the iPhone starts the Recovery Mode procedure again and so on ad infinitum. The reasons for the appearance of Loop are most often associated with software errors. For example, with installation interruption.
A similar situation is also possible when trying to roll back to a lower version of the system. Most often, Apple closes this option and downgrading is not possible. But in exceptional cases, Cupertino allows you to rollback (iPhone 4S and iPad 2). You can check your iPhone for supported iOS on the website.
Increase
You can exit recovery mode through iTunes. You should connect your iPhone to your computer and see if the device is detected. If yes, then restore your smartphone. Please note that as a result of this procedure, all user data will be erased and the latest version of iOS will be installed on the device.
Increase
If you couldn’t exit Recovery Mode using iTunes, then you need to use third-party programs. Their functionality is largely similar; we will look at the Reiboot application. It allows you to both enter and exit recovery mode. This is all done with one button, and you just need to connect your iPhone to your computer. The advantage of using third-party utilities is saving data on iPhone.
Increase
How to create a backup?
Attention! Resetting will erase all data on your Huawei Ascend P7 phone. If you haven't backed up your contacts, pictures, videos, documents, and everything else, you should do so, otherwise you'll lose all the personal information you had on your device.
To avoid losing your data, follow these recommendations.
- Upload photos, documents and videos to your computer via a USB cable. You can also use Google Photos to backup pictures, and the Google Drive cloud service is suitable for documents and folders, but you can “upload” the number of files onto it. You will have to pay to expand your storage.
- To avoid losing contacts and applications, activate cloud synchronization in the settings. Follow the path “System” - “Advanced” - “Backup”. Enable Backup to Google Account.
Once you finish this, you can perform Hard Reset Huawei Ascend P7.
Recovery in Chinese
Devices made in China are equipped with a system menu in the manufacturer's language. For ease of use, you need to compare the recovery menu items in Chinese with standard items that are identical in content and set of functions.
To call the recovery menu you need to:
- Power off the device
- Press and hold the power and volume up keys at the same time
- Holding the buttons will turn on the device and display the required mode
The user can move up and down through the settings using the volume buttons; to select a specific action, use the home button.
The main sections of the recovery system menu in Chinese correspond to the standard translation:
- Auto Test – checking the basic parameters of the operating system and testing it for errors
- Wipe eMMC – hard reset of all parameters and settings of the smartphone without the possibility of recovery
- Reboot - reboot
- Version info – help
- Mounts with Storage – gadget memory management, information about the amount of free space or formatting
- Wipe Cache Partition - clearing the cache
- Wipe Cache Partition – copying all existing information
- Factory Reset - restoring factory settings
To exit the settings, just press the power off button.
To restore the device to factory settings, perform a hard reset. This item can be accomplished in two ways - in the menu and, for cases when the smartphone does not turn on, using a key combination. Hard reset on a Chinese phone in the menu is convenient to use only if the items are configured in Russian:
- Select "Settings"
- Activate "Backup and Reset"
- Additionally, click on “Reset settings”
For those cases when the device does not turn on or the Russified menu is not available, a hard reset on a Chinese phone is performed through rakveri or by pressing the “Power” + “Home” + “Volume Down” buttons, then select wipe.
Performing a hard reset will delete all the user’s personal data from the gadget’s memory.
Resetting the settings on a Chinese device Wipe data factory reset allows the user to clear the cache, remove installed applications and errors caused by their operation, while saving media files - music, photos, images.
You can call up the recovery menu on Android OS on a Xiaomi device by following the standard sequence of actions. Turn off the smartphone, then simultaneously hold down the volume up, home and power buttons. The volume up/down buttons are used to move through items, the power key is used to select or activate one of the actions. In this mode, it is possible not only to return to factory settings or restore functionality, but also to update the TWRP, CWM system folders.
On Android, in the system recovery menu you can not only reset, but also test the phone’s operation in the Factory mode item. It is represented by several subparagraphs, deciphering their meaning in Russian:
- Full Test – all phone parameters are checked
- Item Test – custom scan
- Signaling Test – SIM card and signal level test
- GPS – diagnostics of the correct operation of the location system
How to return a Huawei tablet to factory settings
You can reset Android on a Huawei tablet in the same way as any smartphone, but not all tablets have Android version 9.0. With an old shell, the process may differ slightly.
To reset for Android 8.0 and 8.1 and below, you must:
- Launch settings.
- Open the “System” item
- Select "Backup and reset".
- Next, click on “Reset to factory settings”.
- Confirm the action and, if necessary, enter a password.
When resetting through recovery, the situation is no different from resetting a smartphone. In fact, all devices run Android OS, so there are no significant differences in the processes.
What kind of animal is this
What does Android System Recovery 3e mean? This is a kind of BIOS of a mobile device. Any operating system has its own BIOS - a basic input/output system that can work even if the main OS is damaged. Sometimes the BIOS is different from the standard one (as, for example, in Android devices). It is used to restore the functionality of a smartphone or tablet, apply critical updates or reset to factory settings. The Android System Recovery 3e menu has many items that correspond to one or another action. But the trouble is that the names are written in English. Therefore, many people do not even know how to use recovery correctly.
That is why this article was written. Android System Recovery, the instructions for which are absolutely necessary, is a powerful tool for setting up and resuscitating a smartphone. You need to know everything about how to use this recovery in order not to waste money on specialists. Doing everything yourself is much easier and cheaper. We will analyze each item in the recovery menu and tell you everything we can about it. So let's begin.
Telephony
One of the main points that catches your eye when you first enter the engineering menu of an Android Huawei smartphone is the telephony menu. In this menu you will have access to many useful settings, including such important items as:
- Auto Answer. Here you will be able to enable or, conversely, disable auto answer to an incoming call.
- Band Mode. Here you can manually select frequencies for the GSM module. This menu will show you all the frequencies your phone supports. You can uncheck those bands that your mobile operator does not provide, which will ultimately save your battery power.
- CFU Setting. This option enables or disables conditional call forwarding.
- AT Command Tool. A utility for developers that supports AT commands.
- Modem Test. Fine-tuning compatibility with different types of devices.
- Network Selecting. Here you can also select mobile communication standards (GSM, WCDMA, LTE). For greater energy savings, turn off those not in use.
- NetworkInfo. A very convenient option for checking the quality of mobile operator services.
- GPRS. Setting up mobile internet connections. A choice of active SIM card is also available.
- HSPA Info. Information about the 3G network if this type of service is supported by your telecom operator.
- Mobile data service preferred. Using this item, you can increase the priority of the Internet over voice traffic. However, be careful, as incoming calls in this case may sometimes not reach you.
- Fast Dormancy. Allows you to save some of your phone's energy on third generation networks.
- RAT Mode (Phone Info). Using this menu you can select the most used communication standard. However, use with caution, as these settings block the action of the Network Selecting item.
- RF De-sense Test. Selecting a frequency range and a specific channel for testing communication quality.
- SIM ME Lock. Makes it possible to configure the regional parameters of the GSM module in manual mode.
More about Huawei: Huawei MediaPad M5 lite 10 tablet review
Modern custom Recovery
TWRP
The youngest of all three Recovery. It only has a touch interface, but it also provides a separate view for tablets (see screenshots). The touch interface is self-sufficient and is not a kind of add-on over the text interface (like CWR and 4EXT), which in my opinion is more convenient
Particular attention is drawn to the element for confirming any operation - it is designed in the form of the famous “slide to unlock”. In general, using the TWRP interface is noticeably more convenient than that of its competitors
And I haven’t yet mentioned the changeable design themes, which can affect not only the appearance, but also the functional arrangement of elements. Among the functional differences is the ability to select partitions saved in the backup, and, in addition to the standard ones, you can add a backup copy like this - You can also add a cache and Recovery itself. I was also very pleased with the ability to immediately specify a name for the backup archive - very convenient. For example, I gave the original firmware the name “original”, which allows me to skip it when clearing backup copies of unnecessary ones without specifically looking for them among similar names. Repeating the words from teleshops, “but that’s not all” - the backup copy can be compressed (takes up less space, but at the same time it takes significantly longer to create) and disable the generation of MD5 sum (it is created faster, but if the archive is damaged, this will not be detected ). It is also worth mentioning that when creating a backup, TWRP immediately, even before starting, shows the amount of memory occupied by the partitions, as well as the free space on the drives. In general, when it comes to backup/restore, TWRP is head and shoulders above CWR and 4EXT, which is good news. Just like 4EXT, this Recovery allows you to mount a memory card like a drive to a computer without switching to the firmware. Moreover, this is done even on SGS3, where full-fledged firmware cannot, without special crutches, connect a flash drive as a regular drive, and not via MTP. What’s also notable about this recovery is its support for full disk encryption technology, which can protect your data if your phone is lost. However, it is quite possible to bypass it, so you still shouldn’t store any particularly valuable information on your smartphone, at least in open form. Nevertheless, this is a significant advantage of this recovery for those who care about the security of their data.
TWRP on Smartphone
TWRP on Tablet
In general, this recovery is perhaps the best that exists at the moment: convenient, functional, completely free. Highly recommend. I almost forgot - when creating an archive with a backup copy, this miracle of programming thought is capable of using several cores of your smartphone - which has a very positive effect on the speed of operation.
Installed using the GooManager application (MENU => Install OpenRecoveryScript)
Download free version
How can I find out the current firmware version?
To check the current software version, you need to go to Settings – About phone/About tablet PC – System update. The version is the three numbers after the letter B. For example, build number V100R001C00B122 means that you have firmware version 122 installed. Any firmware with numbers greater than these is newer.
More details about firmware versions:
So, let's take a look at the firmware numbering of Huawei smartphones. For example, let's take the firmware from Huawei Ascend Mate - MT1-U06 V100R001C00B907.
As you probably guessed, MT1-U06 is the name of the device. MT1 is the main base, that is, Huawei Mate, U06 is a revision of the device. Devices come in different revisions, in this post I will not go into details of their designation, I will only say that the letter U is UMTS (regular 3G), and the letter C is the CDMA version. Devices with revision MT1-U06 are supplied to Russia.
CxxBxxxSPxx - This is the most important option in the firmware, it shows which version of the “base” the firmware is built on. Bxxx - the numerical class of the base for the SPxx firmware - Service Pack number. The higher Bxxx and SPxx, the newer the firmware. (Bxxx has higher priority than SPxx). Cxx is a region of the country.
Next, let's look at the firmware version itself - V100R001C00B907. V100 and R001 are the main version and firmware revision. They change in very rare cases, when there is a big change compared to the previous firmware version (for example, the transition from Android 2.x to 4.x). Even within Android 4.x versions, these values usually do not change.
C00B907 - for most new devices, the value of C00 no longer changes, and in general it means binding to the region. Now the region can be determined in the “Special version” menu item - CUSTC10B907.
So, for smartphones, the Russia region (channel/ru) is CUSTC10. The binding to the region can easily be changed with a special firmware file; in some official firmware there is an update.app file in the cust folder weighing several megabytes or kilobytes, which changes the region to Russia.
B907 is the firmware version itself. I think there is no need to explain that the higher it is, the newer the firmware.
Using TinyUmbrella and RedShow
For the TinyUmbrella program to work correctly, the NET Framework 3.5 and Java must be installed on the computer, otherwise the application will not start in the Windows environment. Once the program is running, you need to perform three steps:
- Connect iPhone/iPad to computer.
- Select the device in the left window of TinyUmbrella.
- Click “Exit Recovery” in the right window.
The device should work normally after rebooting. If TinyUmbrella did not help solve the problem, use the RedSn0w program:
- Launch the utility. You will see two buttons - click "Extras".
To exit recovery mode, select “Recovery fix”.
In the notification that appears, click "OK". The device will reboot and then start in normal mode.
If, after using the listed programs, the iPhone boots into recovery mode again, this indicates that it has entered an endless Recovery Mode. The only way out in this situation is to restore the device through iTunes.
Free consultation! Free diagnostics! Work guarantee!Select section:
| Repair iPhone | iPad repair | iPod repair | MacBook repair | iMac repair |
We can repair all Apple equipment
If you have a backup copy of your data, then nothing bad will happen: you will return the information to your iPhone or iPad after a full reset.
Message This cable or accessory is not certified...How to sync iPhone notes with Google or YandexiPhone X/8/7/6/ does not flip the image. Reason: How to disable iPhone's constant passcode request
How to fix "software install failed" manually
Often the bug Software install failed! appears when updating Huawei devices manually. This result is often caused by cases where the gadget in standard mode does not notice the update, and the owner of the smartphone wants to switch to updated versions of the software.
- Download the desired update to your PC from official sources. There are many developers, one of the recommended ones is 4PDA - make your decision yourself. Archive volume is 2-5 GB.
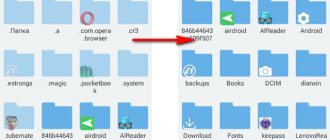
- Create a “dload” folder and extract the UPDATE.APP file into it. Please note that there is often a downloaded directory with the necessary content, so it is available for extraction in its entirety.
- Check on your PC that the elements in the folder are available for opening and launching.
- Connect your Huawei smartphone via USB cable to your laptop or PC. Then drop the dload folder with all the files into the root of the smartphone’s SD memory.
- Disconnect from the computer and turn off the gadget.
- Press the volume buttons and the power button of the device at the same time. After 5-10 seconds of holding these keys, the smartphone will launch a forced update and flashing.
More about Huawei: Huawei Honor ShotX 16Gb prices, description, photos, video reviews Manual flashing of a smartphone
If these steps are performed correctly, if the error persists, check the following nuances:
From Android 6.0 onwards, the creators of the Huawei brand no longer give chances for updates via SD card and have stopped producing standard packages. If you have Android 4.2 or 4.4, then the best thing to do is download the official update to version 5, and then update over the air. Or pay attention to updates to standard firmware.
The main cause of errors in Huawei brand smartphones is an archive with broken files or inaccuracies when the user creates the dload folder on his gadget. To fix it, the best way is to perform all the steps again after checking the correctness of the downloaded archive.
Useful tips
- The first thing we'll notice when we change our desktop to Continuum is the change in the Start menu. It automatically switches to full screen. Application buttons and individual notification area elements are no longer visible in the taskbar. Buttons are now separated by large empty fields, making them easier to hit with your finger. With all this, the Start menu remains the active desktop, and its interface is often compared to the iPad.
- Launched applications expand to full screen, but window headers are not so easy to see - to view them you need to move the cursor to them.
- If you no longer need an application, you simply pull it down and release it - it closes.
- For ease of switching between applications, there is a “Back” button located in the taskbar. For the same purpose, it is convenient to use the Task View.
If you want to use two applications at the same time, use the pinning feature. Its essence is that you move the window of one of the applications to the right or left border of the display. It remains there, and in the meantime you choose the second one. Very convenient: in front of you there are two windows, the size of which can be changed as needed.
Now we know how to enable and disable Windows 10 tablet mode on a laptop or tablet, we know how to use it and know about its benefits. We welcome your comments on this topic!
Installing cwm recovery
Since CWM recovery is an unofficial solution, you will need to install a custom recovery environment on your device before use.
- The official way to install recovery from the ClockworkMod developers is the ROM Manager Android application. Using the program requires root rights on the device.
- If the device is not supported by the ROM Manager application or the installation does not proceed correctly, you must use other methods for installing CWM Recovery. Methods applicable to various devices are described in the articles listed below.
- For Samsung devices, in most cases the Odin application is used.
- For devices built on the MTK hardware platform, the SP Flash Tool application is used. Lesson: Flashing Android devices based on MTK using SP FlashTool
- The most universal method, but at the same time the most dangerous and complex, is flashing the recovery via Fastboot. The steps taken to install recovery using this method are described in detail at the link: Lesson: How to flash a phone or tablet via Fastboot
Lesson: Flashing Samsung Android devices using the Odin program
Firmware via cwm
Using a modified recovery environment, you can flash not only official updates, but also custom firmware, as well as various system components represented by cracks, add-ons, improvements, kernels, radios, etc.
It is worth noting that there are a large number of versions of CWM Recovery, so after logging in on different devices you can see a slightly different interface - background, design, touch controls may be present, etc. In addition, some menu items may or may not be present.
The examples below use the most standard version of the modified CWM recovery. At the same time, in other modifications of the environment, when flashing the firmware, items are selected that have the same names as in the instructions below, i.e. A slightly different design should not cause concern to the user.
In addition to design, the management of CWM actions differs in different devices. Most devices use the following scheme:
So, the firmware.
- We prepare the zip packages necessary for installation into the device. We download them from the Global Network and copy them to a memory card. Some versions of CWM can also use the device's internal memory. Ideally, the files are placed in the root of the memory card and renamed using short, clear names.
- Enter CWM Recovery. In most cases, the same scheme is used as for entering the factory recovery - pressing a combination of hardware buttons on a switched off device. You can also reboot into the recovery environment from ROM Manager.
- Before us is the main recovery screen. Before you start installing packages, in most cases, you need to “wipe” the “Cache” and “Data” sections - this allows you to avoid many errors and problems in the future.
- Let's move on to the firmware. To install the zip package, select “install zip from sdcard” and confirm your choice by pressing the corresponding hardware key. Then select the item “choose zip from sdcard”.
- A list of folders and files available on the memory card opens. We find the package we need and select it. If the installation files were copied to the root of the memory card, you will have to scroll to the bottom of the list to display them.
- Before starting the firmware procedure, recovery again requires confirmation of awareness of your own actions and understanding of the irreversibility of the procedure. Select “Yes – Install ***.zip”, where *** is the name of the package to be flashed.
- The firmware procedure will begin, accompanied by the appearance of log lines at the bottom of the screen and the filling of the progress bar.
- Once the message “Install from sdcard complete” appears at the bottom of the screen, the firmware can be considered complete. Reboot into Android by selecting “reboot system now” on the main screen.
Using custom Recovery
The stock recovery mode has somewhat limited capabilities, which in some cases are simply not enough. So, you won’t be able to reflash your smartphone using it or install the required application from a memory card. Therefore, advanced users replace the standard Recovery with a custom one (CWM or TWRP), which is equipped with more advanced functionality.
As an example, let's look at the installation procedure and subsequent use of ClockWorkMod (CWM) Recovery:
The installation of Android CWM Data Recovery will begin. This process will not take much time. After it is completed, you can enter the custom recovery environment using the same keys that were used to load the stock Recovery.
In addition to the standard set of tools, the new resuscitation area will be supplemented with the following functions:
Having figured out how to work with the Recovery environment, you can flash smartphones or tablets, reset settings, create restore points and perform other specific actions without third-party help.
Dear site reader! Dear Android OS user!
The Android operating system has one “secret” mode that allows you to do non-standard operations in some non-standard situations
I mean Recovery Mode, which is recommended to be used with caution (!). Because how can you not restore, but on the contrary, seriously damage the system if you have a bad idea of what you are doing?
Therefore, entering this mode is not done in an obvious way and differs for different models.
So, Recovery
or
Recovery Mode
is a special device boot mode that allows you to restore the system or install updates for it.
It starts with the system completely turned off (!)
device using the combination of mechanical keys
Home + Volume Up + Power
for Samsung,
Volume Down + Power
for Nexus.
Here the “ +
” sign means the following procedure: you need to press the first key, then,
without releasing it
, press the second and,
without releasing the first two
, press and
hold
the third.
After the product logo appears, you need to release the Power
and continue to hold the others until you enter the mode.
In general, the key combination specific to your manufacturer may be different, so I would advise checking it before experimenting.
Supported Huawei data recovery devices
HUAWEI Data Recovery Tool - Android Data Recovery can be used to recover lost or deleted data including photos, contacts, messages, call logs, videos and many other files from Huawei phone and SD card. This HUAWEI Android data recovery tool can recover data when deleted, formatted or lost after factory reset, OS update, rooting, etc. It supports almost all HUAWEI phones and tablets:
Huawei Mate: Huawei Mate 20 / Mate 20 Pro, Huawei Mate 20 X (5G), HUAWEI Mate 20 RS Porsche Design, HUAWEI Mate RS Porsche Design, Huawei Mate 10 / 10 Pro, Huawei Mate 10, MNATEX MATEX XUMUMX, MNATEX MATEXEUMEX, MATEX XUMUMX, Huawei Mate 10 Pro, Huawei Mate 9 Porsche Design, Huawei Mate 9, Huawei Mate 9, Huawei Mate S and Huawei Mate RS Porsche Design.
Huawei P: Huawei P40 / P40 Pro, P40 Pro, Huawei P30 / P30 Pro, Huawei P20, Huawei P20 Pro, Huawei P10, Huawei P10 Plus, Huawei P9, Huawei P9 Plus, Huawei P8, Huawei P8max, Huawei P8 Lite, HUAWEI P smart 2021, HUAWEI P smart 2021, HUAWEI P smart
Huawei Honor: Huawei Honor V9, Huawei Honor 8, Honor 8 Pro, Huawei Magic, Huawei Honor 7/6, Huawei Honor 6, Honor 6X, Huawei Honor 5X, Huawei Honor 4c/3c, Huawei Honor 4x
Huawei Nova: HUAWEI nova 5 Pro, HUAWEI nova 5, HUAWEI nova 5i Pro, HUAWEI nova 4 / nova 4e, nova 3 / nova 3i, nova 2s, Huawei Nova Xova, Nova Nova
Huwei G: Huawei G9, Huawei G9 Plus, Huawei G9 Lite, Huawei G8, Huawei G7 Plus, Huawei GR5 2021, Huawei GT3, Huawei GR5, Huawei GR3, Huawei Ascend G
Huawei Y: HUAWEI Y9 Prime 2021, HUAWEI Y7 2021, HUAWEI Y9 2021, HUAWEI Y6 2021, HUAWEI Y5 2021, HUAWEI Y6 Prime 2021, HUAWEI Y6 2020, HUAWEI Y9 2021, HUAWEI Y5 Prime 2021, Huawei Y5 2021, Huawei Y6II, Huawei Y5II, Huawei Y3II, Huawei Y6 PRO
Ascend: Huawei Ascend P8, Huawei Ascend G7, Huawei Ascend Mate 7, Huawei Ascend Mate 6
Other Android phones and tablets: Samsung Galaxy, LG, HTC, Sony, Google Pixel, Nexus, OnePlus, Motorola, Xiaomi, Redmi, Oppo, Meitu, Windows Phone, Sharp phones and more.
This Andriod data recovery can be installed in multiple languages including German, English, Japanese, French, Portuguese, Spanish and Italian depending on your condition.
Free download HUAWEI Android Data Recovery for Mac and Windows and try it now:
How to format a Huawei phone using the built-in method
After completing the preparatory operations, it’s time to move on to the most important thing - resetting the settings. The developers of Huawei and Honor smartphones offer to implement their plans using built-in methods. And this is really the best option if the device does not glitch and allows you to easily navigate through the menu items.
To reset the settings, you need to follow the following instructions:
- Open settings.
- Go to the “System” section.
- Select "Reset".
- Click the “Reset all settings” button.
- Confirm the operation.
Resetting all settings only deletes the smartphone's settings, but does not eliminate personal data. If you want to completely clean your Honor or Huawei, select “Reset phone” from the “Reset” menu.
Please note that menu options may differ depending on the operating system version. If your settings are not similar to those presented in the screenshot, just start from the “Reset” section. It is available on every Huawei and Honor smartphone.
How to reset using other programs
Up to this point, we have considered the main reset methods, which involve using a smartphone without additional funds. At the end, we suggest that you familiarize yourself with an alternative option that allows you to roll back settings via a computer.
First you need to download and install the HiSuit program on your PC. This is the official application of Honor and Huawei, so the download link should be found on the company’s website. Next, you need to connect your phone to your computer using the included USB cable.
If pairing is successful, the device name will be displayed in the HiSuit program. In addition, all information stored on the smartphone will be available for editing.
Among the suggested actions, select “Restore”. It is this that will ultimately lead to a complete and irrevocable reset of settings. If you have not created a backup before, you can correct the situation by clicking the “Backup” button.
Remote method via Google website
All Android devices interact with Google services. Among the useful options of the American company is one called Find My Device. It allows you to find a missing smartphone, as well as perform any actions with it from a distance. In particular, reset settings.
To roll back settings in this way, you must be authorized with a Google account on Huawei or Honor. Next, you should open a browser on any device (for example, a computer).
The page will ask you to select your phone or log in if this has not been done previously. When you see Honor or Huawei in the list, click the “Find” button.
Pressing will take you to the next menu. The location of the device will be indicated on the map, and to roll back the settings, all you have to do is select “Clean device” and follow the further instructions that appear on the screen.
If you need to reset because your phone has been lost, it is better to click the “Lock devices” button. This way, the person who finds the device will not be able to use it. Well, resetting the settings will delete all parameters. Therefore, decide for yourself which method suits you best.
On new Huawei and Honor models released after 2019, this method of rolling back settings does not work due to the revocation of the Google license.
What problems may arise and how to solve them
In most cases, resetting data on Honor is not difficult. If for some reason it is not possible to do the work through the menu, you can always turn to a hard reset. Let's look at possible problems:
- The battery was discharged during the reset process. Theoretically, this situation is possible, so you will have to go through the hard reset procedure again.
- After rebooting, the problems with the OS did not disappear. If you successfully reset your phone, but the situation has not changed, you may need to contact a service center. To solve the problem, you may need to flash the device to an older version.
- The phone doesn't turn on. This problem is possible if the work is not performed correctly. There are two options here - try to go through the hard reset procedure again or take the device to a service center (if you still can’t turn it on).
In conclusion, we note that the problems discussed are extremely rare. Knowing how to reset Honor to factory settings, you can always restore your phone to its original state. If difficulties arise with this issue, contact the service center. Before resetting, do not forget to make a backup copy to return the device to its original state, but without errors.
I can’t start recovery, what should I do?
Most likely, you release the volume up key after Huawei appears. This cannot be done; after the logo appears, you can only release the lock key; you must hold down the “volume” until the recovery menu appears.
Now you know that it is quite easy to reset the system of phones from Huawei and Honor to the factory state. But, if you do not know the password for the linked account, performing such an operation is quite risky. Therefore, we advise you to recover your password in advance and reset it afterwards.
Possible consequences of a reset
Before performing a reset operation, a person must take into account all possible risks that will make themselves felt during or after resetting the settings. The main thing to focus on is deleting files. Yes, resetting the settings completely clears the internal storage. And although all data can be saved during the process, many people forget about this, and therefore lose their personal data.
Fortunately, rolling back settings does not have any further consequences. After completing the operation, the smartphone will not suddenly start to fail or reboot. On the contrary, a reset will help solve many problems that previously arose when using Honor and Huawei.
Phone won't turn on after update
After the update, my Honor phone does not turn on, what should I do? If it was installed from the settings and downloaded from an official source, then if an error occurs, you can apply for warranty. You will need to reinstall the operating system.
If the user independently changed the firmware downloaded from third-party resources, and after the update cannot turn on the phone, then the only solution is to reinstall the firmware, and ideally install the official one.