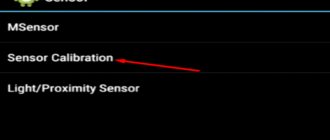
Android is a popular operating system for smartphones and tablets. Like any other OS, it requires cleaning the memory, resetting, and restoring some applications and elements. The phone's operating system already contains a program to perform these functions. We are talking about the Android System Recovery 3e menu. The instructions contain a description of it, as well as information on how to use the application.
What is System Recovery 3e
Recovery Android menu (translation: Android recovery) - BIOS (BIOS) of a smartphone or tablet. That is, this is a basic input/output system that works even if the main OS is damaged, and therefore mastering the use of Recovery is very important. Even if other applications are installed to clear the memory of a mobile device, as well as restore it, if the basic elements of the system are damaged, you can only restore the device using this function.
The BIOS menu includes a huge number of items and makes it possible to both update the smartphone and correct errors in the device’s operation, reset settings to factory settings, etc. However, for many users the problem will be that the interface of the Recover system is entirely in English. Therefore, it is important to know how to enable the BIOS, and also study the instructions on how to use System Recovery.
Installing Recovery
Installing recovery on your Android is quite simple. Follow the step by step instructions:
Step 1. Through the Market you need to install “Rom Manager 4.2” or “Rom Manager 4.0”.
Step 2. Launch the program and give root rights.
Step 3. Click on Install clockworkmod recovery, which is listed as the first item.
Step 4. Wait for the message that the installation was successful.
A little about Photo Data Recovery
Photo Data Recovery is a program for recovering deleted files on Android.
The main functions and features of Photo Data are as follows:
1) easy to use and convenient interface;
2) quick installation and small installer volume;
3) a filter to search for the desired deleted file;
4) the ability to select time intervals at which the android memory will be cleared;
5) permanent removal of unwanted files.
Photo Data Recovery is a must-have for those who like to store important information on their phone. You can install this program using this link.
How to enable BIOS mode
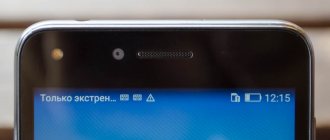
The first difficulty that many users will encounter is how to enter BIOS mode. On most devices, for example, Samsung, Lenovo, Nokia, you need to enter Recovery Mode by simultaneously pressing and holding the power and volume keys of the device.
In order to enter BIOS mode, you need to turn off your smartphone or tablet, then press and hold the indicated buttons. On some devices, you can go to the Recovery menu only when the device is connected to charging. After pressing the keys, the device manufacturer’s logo should appear on the screen. When this happens, you can release the buttons. After a few seconds, the BIOS menu should appear.
As for the mode buttons, you mainly need to hold down the volume up key, but on some devices you can use volume down or both buttons. In older smartphone models, you sometimes need to hold down the power key and the Home button.
If none of the proposed options worked, then you need to study the instructions for the device. Typically, non-standard ways to enable BIOS mode are found only in unpopular smartphone models, as well as Chinese-made devices. All modern devices from well-known manufacturers are manufactured according to certain standards, and therefore the method of enabling and working with System Recovery on them will be similar.
How to enter the Recovery environment
Transferring a mobile device to Recovery mode can be done in several ways:
- Using a combination of mechanical keys;
- Via the ADB debug bridge;
- Through special software, which is installed directly on the phone.
In the first case, to enter Recovery Mode, a certain combination of the Power and Home buttons (if available) and the volume rocker are used. However, this combination may differ among different manufacturers. Thus, in almost all Nexus series smartphones, the resuscitation area is loaded using the Power + Volume Down keys. For Samsung, the current set is “Power” + “Home” + volume rocker sandwiched in the middle. The above steps are performed with the device turned off.
If you cannot find the required combination, you can open Recovery on Android using the ADB debugging bridge or its automated version ADB Run:
You can also get into recovery mode using additional software installed directly on the mobile device. One such application is Quick Boot. Just install it from the Play Market and, after launching, click on the appropriate button.
Main functions
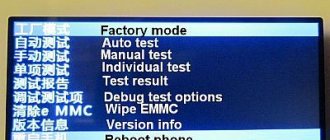
Through the BIOS menu you can perform many actions with the device. Typically, the Android System Recovery menu consists of 9 sections, including sub-items. Let's consider the main ones with translation into Russian.
Reboot now is one of the main commands that allows you to reboot the device without additional actions. This item is not divided into subsections. By executing the command, the smartphone will reboot without any changes in the operation of the system.
Install from SD-card is one of the large sections of the BIOS menu, which includes 5 commands.
The main task is CWM (Clockwork Mod) - installing the necessary packages with an arbitrary file name. Main functions of CWM:
- installation of custom (official and unofficial) firmware and kernels;
- additions and correction of errors in the OS, installation of factory updates;
- creating a full backup copy of the device’s current firmware;
- restoring the system from a previous backup.
In this section of the Recovery menu of the Android in Russian you can see several commands. Each of them allows you to perform one of the above functions:
- choose zip from SD-card - install the package from the memory card;
- check md5sum of a file — checking the hash sum of a file;
- apply/sdcard/update.zip - installation of the CWM package in the update root folder. zip from the memory card directory;
- toggle sigrature verification - verification of the signature of the Clockwork Mod package to verify the authenticity of its contents, this function is disabled by default;
- toggle sclipt assert - checking whether the script matches the device settings, must be performed before flashing the device firmware.
Toggle usb storage - this mode allows you to connect a memory card to your smartphone to use the device as a USB drive for a PC or laptop.
Wipe (Format) - section intended for Wipe. You can either completely reset the data or delete only some files, for example, the cache, or format a specific partition of the device.
Let's look at the main options of this function:
- Wipe data (may also be called factory reset) - an option that allows you to reset your smartphone to based (basic) factory settings;
- Wipe cashe - function for formatting a cache partition;
- Format system is an option that allows you to completely remove the system, that is, all system files are formatted and the installed firmware is reset.
Backup (restore) - section where you can backup the firmware and restore the system. To create backup copies of the main sections of the software, use the backup function. If you select the restore option, this will allow you to restore the system from previously created backups. The Advanced Restore and Advanced Backup sections are designed for more advanced users, as they allow selective backup and recovery of main software sections.
EXT3 - 4EXT - a section that allows you to convert the system, as well as its individual elements from EXT3 to EXT 4 and back.
Mouts|strage is a function designed to mount and unmount system partitions. Thanks to this option, you can perform operations with the following sections: cache, data, sdcard, and system.
Advanced - a section with advanced settings that includes various unclassified functions. The Advanced option includes the following items:
| Function | Description |
| File System Check | a function that allows you to scan all system files |
| Print Partition Info | system analytics and display of view logs on the screen |
| Copy recovery. log to sdcard | option to copy the recovery log and write it |
| Fix Permission | function that allows you to change permissions on files in the /data partition |
| Partition SD Card | option to create ext and ext2 partitions on a memory card. Here you can either create partitions (to do this you need to go to Remove all partitions and start from scratch), or go back to the main Recovery menu without saving changes (to do this you need to go to the No - save my fat32 partition section). |
Power menu - literally translated as “power menu”. Here you can perform the following operations: completely turn off the device (power off), reboot the smartphone (reboot), reboot in Recovery mode (reboot recovery).
All these functions are present in the Recovery section of almost every device. Depending on the model of smartphone or tablet, the functionality of System Recovery may expand or contract.
Extra menu
The last paragraphs are intended for all other actions possible when working with the system. They can be divided into 2 points, the first of which, Advanced, consists of the following sub-points:
- FileSystemCheck – check system files;
- PrintPartitionInfo – analyzing the system state and displaying the result on the screen;
- copying and saving the Recovery recording file;
- PartitionSDCard – creating EXT and EXT2 partitions;
- RemoveAllPartitionsAndStartFromStratch – transition to creating the specified partitions;
- No-SafeMyFAT32Partition – to refuse creation and return to the previous menu;
- FixPermission – to correct rights to files in the Data section.
The last one is PowerMenu (in Russian this means power menu), in which you can find the following sub-items:
- RebootRecovery – restarting Recovery itself;
- RebootIntoBootloader – restart with login from Bootloader;
- Reboot – normal restart of the device;
- PowerOff – power off.
Step by step instructions
Let's look at the main features of Android System Recovery 3e:
- how to flash a mobile device,
- how to reset settings,
- clear partially or completely the device memory,
- make a backup.
Basically, Recovery mode is used in extreme cases. For example, when a smartphone needs to be reflashed after some damage to the internal system files, which makes it impossible to turn on the device. Here are brief instructions in Russian for Android System Recovery 3e.
If you need to reflash the device, then you need to go to the Install from SD-card section (may also be called Apply Update from External Storage). Here you can install the firmware from the memory card. To do this, you need to enter the Choose Zip from SD-card sub-item, if the new system is saved in the archive, or select the firmware image using the Apply Update from SD-card item.
If the firmware is being installed for the first time or there is no confidence in the compatibility of the new version of the system with the device, then before installation it is recommended to use the toggle sclipt assert option. It will allow you to verify the serviceability, authenticity and compatibility of the firmware and smartphone.
After updating the system, you need to use the Reboot now function, which will reboot the smartphone. Before rebooting, you should make sure that all necessary operations have been completed, since after the reset the version will be updated and all changes will take effect. Using Reboot now, you can also reboot if the user entered recovery mode by accident and needs to make a backup (return to the main menu of the system).
Reboot system now
This menu item performs a complete reboot of the device. After selecting this option, the smartphone will load the standard Android operating system without any changes. Typically, this item is used after completing all manipulations in recovery. Or if you loaded into this mode by accident. Although it is unknown how this can be done accidentally. Be that as it may, Android System Recovery 3e, the instruction manual for which is simply vital for the user, has such a clause. And we have to take this into account.
The Reboot system now menu item should be used as a last resort. That is, when all operations are completed, all components are updated, factory settings are reset and firmware is installed. This is the essence of a reboot: to allow the device to apply all the changes made. True, after some of them the smartphone may not boot at all. But that's a completely different story.
Using custom Recovery
The stock recovery mode has somewhat limited capabilities, which in some cases are simply not enough. So, you won’t be able to reflash your smartphone using it or install the required application from a memory card. Therefore, advanced users replace the standard Recovery with a custom one (CWM or TWRP), which is equipped with more advanced functionality.
As an example, let's look at the installation procedure and subsequent use of ClockWorkMod (CWM) Recovery:
The installation of Android CWM Data Recovery will begin. This process will not take much time. After it is completed, you can enter the custom recovery environment using the same keys that were used to load the stock Recovery.
As you know, the Android operating system provides the user with enormous functionality, using which he can realize the full potential of his smartphone: from advanced configuration using the engineering menu to a complete factory reset using a special mode - Android System Recovery 3e. You will learn what to do in this menu with a smartphone in this article.
This settings mode was designed for working with system files and system parameters. With its help, you can activate or block almost all functions of your Android device. Here you can perform such complex manipulations as completely cleaning or restoring the system in just a couple of clicks. Due to the important role this menu plays, getting into it is not so easy, but more on that below. In order not to harm your device, you need to know the mode items, their meaning in Android System Recovery 3e and what to do to carry out certain actions.
Option 1. Recovery Mode
Turn off the device and boot into Recovery Mode by holding several keys together. Each manufacturer has its own buttons:
- “+” on the volume rocker and the “ON/OFF” button;
- “-” on the volume rocker and the “ON/OFF” button;
- Volume “+” and “-” together and the “ON/OFF” button;
- Volume “+” and “-” together, the “Home” key and the “ON/OFF” button;
- In Chinese devices, hold down the volume key and connect the charger.
The Volume Up/Down buttons allow you to move up and down through the recovery menu, and the ON/OFF button selects commands. In the latest devices, control in “Recovery Mode” can be normal (touch).
Select "wipe data/factory reset" and confirm the system reset by selecting "Yes - delete all user data". When the wipe is complete, select the “reboot system now” option.
It will be a little more difficult to see the reset on Chinese phones. For example, in the “iconBIT NetTAB Mercury XL” or the clone “Samsung Galaxy S4 GT-I9500” the recovery menu is in Chinese. If you have the same situation, the picture below shows the Russian translation of the “Recovery Mode” menu.
To navigate through the menu, use only the volume “-” key, because The “+” key is intended to return to a higher level. To select the highlighted command, press the ON/OFF button.
To run a full reset of Android settings in Chinese phones, you need to select the 6th option. What's funny is that after selection, the command will be executed without confirmation.
After a few minutes of waiting, your Android device will boot up as it did when you first started it after purchase, possibly asking you to add a Google account.
Types and capabilities of Recovery
Since it is software, it is written by someone. Depending on the creator, recovery is divided into two types:
1. Stock Recovery – created by the device’s “native” manufacturer. 2. Custom Recovery – an alternative version that is created by individual programmers. Has more features than the official one.
The “basic” capabilities of this mode are as follows:
:
1) restart android;
2) install updates on Android;
3) flash the phone, that is, reset the data to factory settings;
4) copy and restore the system;
5) delete the cache from the device;
6) install the archive from the memory card;
7) enable USB-MS mode to transfer data to SD.
Custom Recovery, in addition to the above, has many more functions. For example, you can flash Android, but selectively, saving the necessary files.
There is also Photo Data Recovery - a program that we will talk about below.
Option 2: Restore and reset
In you can see an item such as “Restore and reset”. It is designed to reset system settings and restore from a backup saved on the Internet.
Click on the "Reset settings" option.
Scroll down and optionally check the box next to “Clear phone memory - card” to delete personal data from the SD memory card, such as photos, music and other user data. Click on the “Reset phone settings” button.
User data will be deleted and factory data will be restored.
Once again, let's talk about the Recovery menu, since almost always instructions for flashing and upgrading Android involve performing certain actions specifically from the Recovery menu.