why and how to solve this problem
Music is the main attribute of a mobile device. It is very important for owners to install their favorite ringtone on their smartphone. Therefore, if the melody for the Android call is not set, then you should find out the causes of the problem and solutions.
Android ringtone is not installed: main reasons
It's easy to put music on your device. The ergonomics of the platform are carefully thought out, and the interface is clear. But there are many topics on the forums where owners are interested in why they don’t put music on calls on Android.
Reasons include:
- Features of setting up the OS for a particular gadget;
- incorrect ringtone format;
- user errors;
- "glitch" of the OS itself.
Methods for solving the problem on Android are discussed below.
A common mistake among inexperienced users is trying to play the wrong audio format. It also often happens that after transferring a melody from another device, it stops being listened to. The cause of the error is a different set of codecs in gadgets.
How to solve this problem on Android
Some Android models only play MP3 sounds, while others can play everything. If the melody is heard by the player on the phone, then the device is functioning normally.
Read the instructions suitable for any smartphone model:
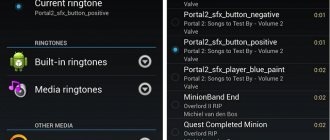
- Using a file manager. It is recommended to use both the built-in explorer and an application downloaded from an official source. For example, ES Explorer. Then you should open the root folder with the track and press for a few seconds. A menu will open, then click “Set as ringtone”. If your device model does not have this item, click on the 3 dots in the upper right corner and the gadget’s advanced capabilities will open.
- Using a standard player. Let's open the built-in player. Next, find the folder in which the desired track is located. Press and hold until the context menu appears. Here we click “set to call”. Instead of the built-in player, use third-party programs to play songs.
- Through OS installations. You can access them through the main menu of your smartphone. Here we select the sub-item “Sound”, then “Vibration”. Click “Ringtone”, look for the desired song from the list and install it.
- For non-rooted devices, you need to create a folder. It should be located in the gadget’s internal memory or on a memory card. Its name: media/audio/ringtones. A subsection of this folder should be created for the selected purpose of the composition: alarms - for an alarm clock, notifications - for a notification. If the owner has root rights, move the melody to system/media/audio.
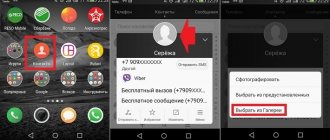
- To place a track on the selected contact. To do this, visit the appropriate menu, find the person you need, and press his name. In the drop-down menu, click “Change”, then “Ringtone”. If your device does not have this feature, download the Rings Extended utility to Google Play.
The ringtone does not change even though I did everything correctly
If you are wondering why the melody still does not change, although I followed all the recommendations, try more radical measures:
- Perform a “rollback” to the original settings. This will solve the problem, but all files will be deleted. Therefore, it is recommended that you back up your data first.
- Remove "junk from the system." In recovery mode, find the clear flash section, click “Activate”.
If none of the methods help, the problem may be with the device. Show it to a service center specialist.
How to remove screen lock on Android
To prevent the gadget from ringing on its own, it is usually blocked. Blocking means that the gadget does not respond to any presses, touches or other external signals. This was done so that the gadget itself does not start calling where it is not asked, causing anxiety to other subscribers and unnecessary expenses for its owner.
You can usually remove the screen lock on Android by pressing the main button so that the screen starts to light up. And then you need to slide your finger across the screen diagonally (diagonally) from right to left.
Some users also set a password so that no one but them can use the device. In this case, in addition to unlocking the screen by moving your finger diagonally across the screen, you also need to enter the password correctly without errors from the on-screen keyboard.
Others install a screen lock that can be unlocked using a fingerprint. For such a blocking, download the appropriate Android application.
After unlocking, the standard home screen usually appears on the screen (Fig. 1).
Rice. 1. Android home screen after unlocking
If this initial screen does not appear after unlocking the device, you need to press the main button of the gadget. Usually this button is located at the bottom under the gadget screen. By pressing it, the user removes all open windows of active programs from the screen and returns to the home screen of the device, as shown in Fig. 1.
You can call someone using one of two icons
- “Phone” (1 in Fig. 1),
- “Contacts” (2 in Fig. 1).
Let's look at both options in more detail below.
Help me please! How to set your own ringtone on Android.
everything is very simple: In the root of the memory card, create a folder called “media” In it, create a folder called “audio” In it - the folder “alarms”, “notifications”, “ringtones” (respectively for alarms, reminders and call signals). Thus, the path to the folders will look like this: /sdcard/media/audio/alarms/ (alarm clock) /sdcard/media/audio/notifications/ (events, SMS) /sdcard/media/audio/ringtones/ (calls) To folder /sdcard/media/audio/ringtones/ save your ringtones. Then go to Contacts, select the desired contact, press Menu/Options/Default ringtone and set the desired one. With this program you can create a folder https://play.google.com/store/apps/details?id=com.estrongs.android.pop
Find melodies in apps. It says download new and my ringtones. Choose the second one. Click on the cross on the side. Your music will come out. Click on the song and save it, when it is saved, click on it and settings will appear. Put it on call.
Andriod 6.0 itself should, in theory, create a “media” folder in which it is not necessary to create an “audio” folder, as Arthur Pirozhkovsky wrote. It is enough to create 3 folders right in the “media” folder: the “alarms”, “notifications”, “ringtones” folder, which will be responsible for the alarm clock, SMS and your ringtones, respectively. Move the melodies to the appropriate folders and when changing melodies they will already be visible in the lists of the same alarm clock, in the lists of notifications and in the lists of ringtones... The path is /sdcard/media/alarms/ /sdcard/media/notifications/ /sdcard/media/ringtones / I personally use HTC one M8. since I combined the internal memory with the SD card, the path to these folders is like this: internal memory\Android\media\com.google.android.talk\alarms\ ________________________________________________\notifications\ _________________________________________________\ringtones\
The Play Music app must be enabled on your phone
2nd answer, clearly!
We go to the settings, go to the profile, look for what we need and that’s it!)
There is no ringtone and only vibration
Here is a good instruction https://www.youtube.com/watch?v=RCqBScj7jtU
How to make the first call on Android
Now, to make a call from the device, you need to tap (lightly touch with your finger) the icon with the image of a green handset on the main screen (1 in Fig. 1).
A window for calls from the device will open (Fig. 2).
Rice. 2. “Phone” window for calls from Android
This picture shows the Call window opened on the Keyboard tab. This tab allows you to make calls by dialing a number on the keypad, much like we do on a regular landline telephone. To open this tab, you need to tap on the “Keyboard” inscription located in the top menu of tabs (1 in Fig. 2).
How to set a ringtone on Android: setting a ringtone
On an Android phone, you can use not only standard ringtones, but also set your own ringtone. Moreover, thanks to the openness of the Android file system, there are several ways to do this. In this manual we will look at them in detail.
How to change the default ringtone on Android
Depending on the smartphone manufacturer, firmware and Android version, the phone comes with different ringtones preinstalled. To listen to them and select a specific one, follow the instructions.
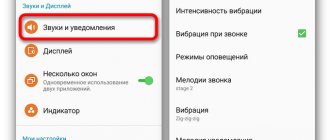
Go to “Settings” and open “Sounds and notifications” (the item is located in the “Device” section, it may be called “Sound” or “Sound and vibration”).
If your firmware has standard profiles, click on the gear icon. If not, you will immediately be taken to the menu where the “Ringtone” item is located. Click on it.
When the "Run with app..." message appears, select "Media Storage" and "Only Now."
To set a new ringtone, mark it and click OK.
Changing ringtone on Android 8.0
On Android 8.0, the path is slightly different: Settings → Sound → Advanced settings → Ringtone → Media storage.
Installing your own ringtone on an Android smartphone
To set your own ringtone, you first need to download it to your smartphone. You can download it to your computer, then connect your phone to your PC using USB and transfer the track to any folder on your SD card or internal memory.
If you download music through a browser on your smartphone, the downloaded audio file will be located in the “Download” directory.
Change the melody through “Settings” and the file manager
For this method you will need a file manager. If Explorer is not pre-installed on your system, download any Explorer you like from Google Play, for example, Solid Explorer.
Then open Settings → Sounds & Notifications → Ringtone. Now select not “Media Storage”, but a file manager (in my case Solid Explorer) and click “Only now”.
Go to the folder where you downloaded the song and click on it. That's it, the ringtone is selected.
On Android 8 Oreo and 9 Pie
The method described above also works on Android 8 and 9, but in the latest versions of the OS a new function has appeared: go to “Ringtone” → “Multimedia Storage” and go to the very bottom. There is a button “Add ringtone”. Click on it, after which you will be taken to the “Files” application and you can select the desired song.
The track will appear in the list of ringtones and become available for selection.
Create a folder “Ringtones” and move the song there
Another way to put a song on a call is to create a “Ringtones” folder in the internal memory of the phone using a file manager and place the downloaded track in it, after which it will appear in “Ringtones”.
To do this, while in the root directory, click on the “+” in the lower right corner of Solid Explorer and select “New Folder”. Then enter "Ringtones" and click "OK" to save.
Move the song to "Ringtones". To do this, press and hold your finger on the audio file until additional options appear. Click on "Copy", go to the "Ringtones" folder and click on the "Paste" button in the lower left corner.
Now the ringtone will appear in the Settings → Sound → Ringtone → Media Storage menu and you can select it.
How to put a song on a call using a music player
You can also install any music player from Google Play and play a song using it. PlayerPro was used as an example.
Go to the folder with the track and click on the three dots to the right of it. In the menu that opens, select “Ring.”
If a window appears telling you that the app needs permission to install ringtones, click Allow. You will be redirected to the settings page. Activate the toggle switch “Allow changes to system settings” and go back. The track will be set as a ringtone.
How to set a ringtone using other music players is shown in the video.
Using ES Explorer
Using the ES Explorer file manager, you can also put a downloaded track on a call.
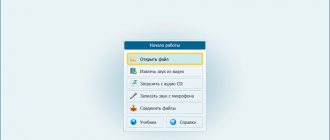
Go to the main screen of the application and open the "Music" section. Click on the desired track, select “ES Media Player” and click on the “Just this time” button.
The track will start playing. Click on the three dots in the upper right corner. A menu with options will open - select “Set to call” in it. In the pop-up window, also select “Set to ring.”
If a window appears warning you about the need to grant ES Explorer permission, click on the “Allow” button and activate the switch on the settings page. Go back and the ringtone will be set.
These were all the ways to put your favorite song on the ringer. If you have any questions, ask them in the comments.
How to install a ringtone on Android OS via the player
Most programs for playing music on Android have a built-in function that allows the device owner to set the song they like as a ringtone. Settings differ in different players. However, the essence is the same, so there should be no problems.
How to put music on a ringtone on an iPhone - change to downloaded music
One of the most common music players for Android is PlayerPro. In the official application store, where the software can be downloaded, it was installed more than 10 million times. After launching, the utility will ask you to provide access to photos, videos, audio files on your smartphone. In the program you will need to open the folder in which the song is located, click on the icon in the form of three dots and use the “Put on call” option.
Sometimes a window with the title “Set ringtone resolution” pops up. In this case, you need to click “Allow”. PlayerPro asks the user for access to system settings.
Important! It is not recommended to use software from unknown sources. If you give access to a malicious application, the user may lose confidential information or infect the smartphone with viruses.
Standard music player of Xiaomi and Huawei
Smartphones from the Chinese concern Xiaomi have a built-in player called “Music”. You can use it to put downloaded audio on a call. This is done as follows:
- Run the program. When you first start, you will need to provide access to photos, multimedia and files on the device.
- After this, you need to click on the song that you want to set as your ringtone.
- In the player that opens, click on the three dots in the upper right corner of the display.
- Then select “Set to call”.
For Huawei, the instructions are almost identical: in the main menu of the player, select “All songs”, find the file, click on the context menu (three dots) - “Set as signal”, select a SIM card or another option: notification signal (SMS messages), alarm.
Adding music to a call via Xiaomi player
Xiaomi News, New Products, Reviews, Comparisons
We are very, very often asked how to put your track on a call on Xiaomi phones? We will show you two simple ways to set your own ringtone.
Method 1 - Through a standard player
All manipulations will be carried out in a standard music player. To prevent questions like “my player doesn’t see anything”: check in the player settings to see if the size limit for displaying files is set too large. All sorts of Facebook and many other applications store various small sound files in the phone’s memory, such as a proprietary notification sound, etc. There is a limit in the player to filter out such garbage.
- First, download the desired track from our internet sites and upload it to your phone in any convenient folder.
- Go to the music player. We hope that you did not play with root access and did not delete it.
- Let's open the same track.
- Click on the button with three dots, an additional menu will open.
- Click on “Set to call”.
- Profit!
Method 2 - Through settings
A more logical way, but not the fastest.
- Go to Settings;
- Open the Sound and vibration item;
- Open the Ringtone item;
- Open the Ringtone item again;
- We look down and click on the Browse button;
- We choose from four proposed file locations: from all audio files, through Explorer, select a ready-made recording in the voice recorder, select a track from the player;
- Confirm your choice;
- Profit!
PS Don’t let the situation repeat when your favorite song on the alarm clock becomes hated