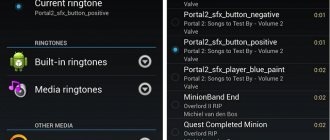
Thanks to the capabilities of the open Android operating system, each user has the opportunity to customize their smartphone, which is called “for themselves.” For example, . And today you will learn how to put a photo on a contact in Android.
You can add a photo or picture to a contact in different ways. Below we will describe in detail how to do this.
Using standard Android tools
In order to use these methods, contacts must be saved in the phone's memory or in your Google account. If phone numbers were saved in the SIM memory, you must first copy them to the phone memory.
First way
In the main menu, open the Contacts
"("Phone Book"), select the desired contact, on the contact page click on the place where the picture should be.
In the submenu that drops down, select the desired action, for example, “ Select from gallery
”:
To the system’s request “ What to use
“select a storage location, in this case “
Gallery
”, from any folder in the gallery we find the desired photo, click, the word “
crop
” and a frame will appear on the top panel, move it with your finger to select the fragment that will be displayed, save the changes by putting tick (or “OK”), you’re done. Now when you make a call, the contact photo will be displayed on the main screen:
Second way
In this case, we go straight to the gallery, select the desired image in any of the folders there, open it, and now call up the action menu. These can be three dots on the right side of the top panel or three lines on the left, at the bottom of the display. From the list that opens, select “ Set picture as”
“, then in the window that appears, select “
Contact photo
”:
The contacts will open, we find the one on which we will place the image, after which we will see a frame in the picture, move it with your finger, selecting the desired fragment, save (“ OK
«):
Using special software
There are applications that are not only capable of doing an excellent job of installing a photo on a contact, but also perform a number of other useful functions. Ultimate Caller ID Screen HD example.
.
A few words about the program itself. Ultimate Caller ID is capable of displaying the desired image on the entire screen, and also functions as a contact image manager. In addition, with the help of this application it is possible to block incoming calls or hang up a call; to do this, simply turn the smartphone over with the screen facing down.
In general, it is worth noting that managing the functions is extremely simple, and the interface is intuitive, so working with the application is very easy.
So, install the Ultimate Caller ID program from Google Play
, on the top panel you can select the “
Appearance
” section, you can select the theme of the SMS message screen, text size, hide the name of the incoming call, buttons, number, etc.
By pressing the “Preview” button, you can see how the parameters we have selected will look. To set a photo on the top panel, go to the “ Settings
” section, there we click “Contact Manager”, a phone book will open in front of us, in which there is a default image opposite each contact.
Now, from the proposed photo storage locations, select the one you need (by the way, you can select and set a video for an incoming call). I chose “ From Gallery
”:
We go to the gallery, select the album from which we will take a picture, and you can immediately edit it (enlarge or crop). Click on the “ Preview”
“, if everything suits you, click “
Done
” (or “
OK
”):
Now, when this contact calls, his photo will be displayed in full screen.
Of course, Ultimate Caller ID Screen HD is not the only application that solves the issue of how to set a photo to a contact in Android. But the principle of operation in similar programs is not much different, therefore, I see no point in describing the work of other installers, just choose the one that suits you best. I have nothing more to add on this topic. Good luck!
All mobile devices with factory settings are almost the same, but every user wants to make their device special - beautiful and convenient at the same time. You can personalize your Android phone in many ways, for example, set your favorite ringtone, use a beautiful picture or personal photo as desktop wallpaper. Another option is to set a photo for incoming calls from subscribers. This is not difficult to do, but if you couldn’t put a photo on a contact in Android, let’s try to figure out this problem.
Ordinary method
To put a picture on a contact in Android, you can use several methods. Most devices offer this feature as standard settings. There are two options for changing the photo:
- through the "Gallery";
- through “Phone Book” or “Contacts”.
To add a photo to a contact in Android through the “Gallery”, open the menu on your phone and find the corresponding application in it. There may be faster access to it, depending on the features of the Android device and user settings. It is assumed that you already have photographs or pictures in your smartphone, from which you can choose the one that you are going to put on an incoming call from a specific subscriber. Having found the desired image, click on the button that brings up additional options. Among the large list of functions, such as “Move”, “Copy”, “Rotate” and others, there should be an option “Set to ...”. When you click on this option, several more choices appear. Typically, the user is asked to set an image on the lock screen, desktop and a number from the phone book. By selecting the last option, you will automatically open a list of subscribers in your phone, where you need to select the desired name and save the changes made. When you call a subscriber and receive calls from him, the set image will appear on the screen.
The second method is even simpler than the first. To add a photo to a contact in Android, you need to do a few simple steps:
- Open the list of numbers on your phone in the usual way.
- Find the phone number you are going to link the photo to.
- Enter the contact change mode by clicking on the corresponding button – “Change”.
- The menu that opens contains settings with which you can add new subscriber numbers or delete old ones, attach additional information, etc. However, you are interested in the image, so select the option you want.
- The system will automatically launch the gallery or file manager of the Android gadget, which contains all available images.
- Mark an individual picture and save changes.
Editing system resources
This section discusses fixing errors by changing system files. You must have root access. You carry out all actions at your own peril and risk.
One solution to the problem would be to replace the incallui.apk file, which is responsible for the operation of the telephone module. This method is suitable for all phones, if you find a “dialer” from an earlier firmware version specifically for your phone (it is advisable to choose a firmware that is not too old, at least the previous version or the one before last). The operation of a dialer from third-party firmware is not guaranteed, and may generally lead to the crash of the operating system.
Using any root explorer, find the incallui.apk file in the system/prv-app/InCallUI folder, and replace it with the one you downloaded earlier, assigning it 644 rights using the explorer. To avoid complete loss of system functionality, it is advisable not to delete the old file , and keep it in a safe place. After that, restart your phone - it should display the photo as before.
Using apps
There are cases when a photo is not installed on a contact from a telephone directory. You will have to use the help of third-party applications, which are abundant in the Android Google Play store. The following are considered the most popular:
- Ultimate Caller ID;
- Full Screen Caller;
- HD Caller ID.
These applications not only help solve the problem when a photo is not installed on a contact, but also have additional functionality. Ultimate Caller ID
provides the user with the ability to create black lists of subscribers, as well as block incoming calls to the phone. The main feature of the application is the option that allows you to reject a call without touching the buttons of your mobile device. To do this, just turn the device screen down.
Full Screen Caller
offers to put photos from an SD card, camera, or Facebook account. You can choose the font, size, and text writing style to make the caller names look beautiful or unusual. The “highlight” of the program is the option to pronounce the subscriber’s name out loud when he makes an incoming call.
Many Android smartphone users do not know how to set a large image to a number from the phone book. It is possible to attach a picture or photograph, but they are significantly reduced in size. HD Caller ID application will help you cope with this problem.
. It sets pictures in excellent quality for incoming calls. At the same time, they occupy the entire display.
Selecting an image from the gallery
To add a photo, you will need to go to the gallery, which is located in the device menu. Click on the desired image there. In the upper right corner of the phone there is an active button in the form of three horizontal dots. After clicking on it, a list of actions that can be done with the image will be displayed. In this case, you should prefer the first item: “Set image as” .
The same information can be obtained through the “Menu” button on the phone. Next, options will be offered, from which you need to click again on the first item “Contact photo”. All that remains is to select the phone number of the desired person from the list and click on “Ok”.
How to set a photo to a contact in Android OS
Via "Contacts"
- Open the Phone app, and then go to your Address Book. Among the entire list of contacts, find the one you need and tap on it. A page will open with a detailed description of the contact (home and mobile phone, email, address). Here you will see an area with a light or dark silhouette inside it. This is the place for photography. Click on this area. Click on the area with the silhouette
Android will ask you where to get the photo: take a photo now or from the gallery.
Select where you want to take the image from
In the latter case, the “Gallery” will open, select the desired photo, click on it. When the preview appears, select the desired photo size: you can enlarge or reduce the area of the photo that will be displayed during a call, then click on the checkmark. In the first case, the camera will open. Take a photo, when the preview appears, click on the checkmark. The photo will be attached to the contact and will be displayed during calls.
Photo set
Some versions of Android do not allow you to set a photo to a contact in viewing mode - in this case you will have to go to editing. To do this, you need to find the “Change” or “Edit” option in the view. All information about the contact will open. The same photo area will appear here. Then we perform the same steps as described earlier.
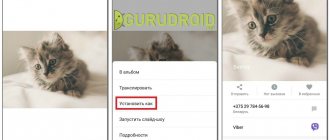
From gallery
You can set a photo to a contact without opening your address book
. All you need to do is find the photo you want in the gallery. In the additional menu, click “Install as...”. Select "As contact photo." In the address book, select the desired line, click the checkmark. The photo will now be attached to your friend's profile. And during the call this photo will be displayed.
You need to select “Contact Photo”
Video: how to put a photo on a contact in the Android operating system
How to delete or change a photo
You can edit a photo in just 3 steps:
- Open the contact whose photo you want to change or delete.
- Click on the “sheet with pen” icon.
- In the window that opens, select a photo. A list of possible actions will appear below.
- Delete or change the photo.
How to set a photo to full screen for an incoming call
In order for the photo to be displayed on the big screen during a call, you need to use programs from the Google Play Market.
Ultimate Caller ID Screen HD
The program displays the caller's image in full screen mode. Ultimate CallerID Screen HD can not only display a full-screen photo of a contact when calling, but also display full-screen SMS or missed call notifications. The program acts as a photo manager for contacts, with its help you can customize a photo for each contact individually and sort your address book by image. Caller ID Screen can block calls and add numbers to blacklists. You can also customize gestures as you wish: for example, hang up by shaking the phone.
Ultimate CallerID Screen HD can perform a number of different functions
Unlike the previous application, Full Screen Caller ID is less functional. The only thing he can do is open a person’s portrait in full screen during a call. No additional settings or complications. One application - one function. If this is exactly what you need, here is the download link from Google Play: https://play.google.com/store/apps/details?id=com.androminigsm.fscifree&hl=ru.
Full Screen Caller ID was created specifically for installing photos on contacts
Possible problems and how to solve them
What should you do if you have linked a photo to a contact, but the photo still does not appear during a call?
The photo is not attached to the contact
For one reason or another, the photo was not attached to the contact. Perhaps you forgot to click on the checkmark. Perhaps there was some kind of bug. In any case, check the person's profile in your address book. If in the photo area there is still a standard avatar (dark or light silhouette), and not a photo, then the picture is not attached to the number. Try it again.
The contact is stored in the smartphone's SIM card memory
Photos are reproduced only when the number is stored in the phone’s memory, not the SIM card
. Make sure of this by transferring all contacts to the phone memory.
Select the "Copy contacts" option.
Select "Copy Contacts"
Click on “Phone”
Check the call. It should work.
Operating system failure
There might be some error in the Android processes. Try rebooting the device and rechecking the functionality of the function. If you still fail to assign the photo, try reflashing the system (detailed instructions for reinstalling the system are always available on the manufacturer’s website). As a last resort, contact technical support.
So, we figured out how you can set a photo on a contact so that it is displayed during a call. Using third-party programs from the Google Play Market, you can ensure that the caller's photo appears during a call in full screen mode. It is worth remembering that the contact photo function only works with those numbers that are or have been added to the phone’s memory, and not the SIM card.
One of the nice features of modern smartphones is the ability to customize them. We are given a chance to change fonts, themes, and select applications that we like in appearance and functionality. Even in the phone book you can make pleasant changes, for example, adding a photo to a contact in Android and iPhone. Below are the most universal and simplest ways to help you do this.
Via Viber app
To transfer a profile avatar from Viber to your phone's address book:
- Log in to Viber.
- In the lower right part of the screen, tap on the “More” icon - this will take you to your profile.
- Go to the “Settings” menu from it.
- Among the settings, select the “General” section.
- Check the boxes next to “Synchronize contacts” and “Show all contacts.”
How to assign a photo to a contact in Android?
To get started, go to the menu and find the Contacts application. Then search for the right person manually or using the built-in search (in the top line, enter the first name or first letters of the subscriber's last name). Open the entry and follow one of the two suggested options.
Method one:
- if you take a photo, select the camera you need, and when the photo is ready, mark the area that will begin to appear when you call;
- if the photo is in the gallery, upload it and highlight the part you need.
It’s easy to set a picture to a contact on your phone using this method, but if it doesn’t work for you, read the next one, which is more universal.
Method two:
- when you have found the desired contact, there will be a pencil icon in the upper right corner;
- click on it to start editing;
- on the template where the picture should be there is a plus icon, tap on it and a new window will open;
- you will be asked to take a photo of the person right now or pull up a picture from the gallery.
Choose the adding method that is convenient for you and repeat the third and fourth steps from the first method.
In the standard Gallery application
If you have a finished photo, upload it from the Gallery. Follow instructions similar to the previous one. Only from the pop-up window select the “Select photo from Gallery” option. However, the Contacts & Calls app must have access to photos, media, and files on your device . If you did not give such permission, the application will ask for it, and you will have to click on the “Allow” button.
Select a suitable photo from the Gallery. Crop the photo in the editor, if necessary, and click “OK” - it will be attached to the name and phone number.
How to assign a photo to a contact on iPhone?
You can add a photo to a contact on iPhone by following this short guide.
Method one:
Method two:
- In the phone book, select a contact and open it;
- in the upper right corner there is an “Edit” button, click on it;
- when the menu opens, the image template will say “Photo”;
- click on it.
All that remains is to take a photo of the person or select a ready-made photo from the list of images. Now it will not be difficult for you to put the desired image on the contact of a friend, girlfriend or relative on any smartphone.
It is much more informative to receive calls when you can see a photo of someone who wants to get in touch with you. Modern smartphones allow you to do this. To do this, you just need to set a photo for each contact in the settings. If you do everything correctly, then you will not need to look at the contact’s signature - the call will begin to be displayed much more informative. So, let’s figure out how to put a photo on a contact in an Android phone: Samsung Galaxy, Huawei Honor and others.
Installing a photo via “Contacts”
The easiest way to install a photo is through the phone book. You will have to spend about 2 minutes on it. Before you put a photo on a contact, you need to make sure that the number is recorded. If your phone is saved, you can add a photo in a couple of steps:
- Go to “Contacts”.
- Select a subscriber.
- Click on the icon next to the name.
- Options for action will appear below. You can take a photo of a person or put an existing photo from the gallery. Let's select the second point.
- In the window that opens, select a photo and confirm the action with the “OK” button. You must first crop it to a 1:1 format.
- If everything is done correctly, a photo will appear in the contact at the top of the screen.
How to set a photo to a contact on your phone using “Gallery”
If you have not replaced “Gallery” with a non-standard application, then this application will be the fastest way to install a photo on any contact. The “Gallery” contains all your photos, which allows you to find the right person in a couple of gestures. On all versions of the Android operating system, the steps will be the same:
- Open the selected photo in " ".
- Click on the three vertical dots in the top right corner of the screen.
- From the list, select “Set picture as contact photo.”
- Select the desired person from the list.
- Crop the photo if the system allows you to do this - to do this you need to move the frame and control its size using your fingers.
- Save your changes.
This is a good way, but it may not always work. A photo is not placed on an Android contact in several cases due to limitations or features of the operating system. Some operating systems do not allow you to change contact photos in this way if they were originally saved on the SIM card.
Using the Contacts application
This method is a little more complicated, but you can put a photo on a contact on Android 6.0 this way. In this version of the operating system, installation from the “Gallery” often does not work. Follow the instructions:
- Through the general menu or the corresponding tab of the “Calls” application, go to “Contacts”.
- From a long list, select the contact you want to highlight from others and open their card with a simple tap.
- Now you need to find the “Edit” tab. It can be located in the form of a pencil at the top of the screen, or in the context menu. If you don't find anything similar, just click on the area of the card intended for photos. In some versions of Android, the contact card immediately displays an icon in the form of a camera. If you see such a horse-drawn horse, you need to click on it.
- Regardless of how you access the menu, you will be presented with several options. You can take a photo right now, select from the “Gallery”, edit an existing picture or delete it. The advantage of this option is that you can choose a picture for a contact not only from standard applications. All file managers and application options are available to you.
- Now you should find the desired photo in the folders and select it.
- A contact's photo can be cropped, that is, cropped so that only the person's face appears in the profile, and not the background. It is very comfortable. To crop, you need to select a utility, for example, “Crop Photo” or “Google Photos”. A frame will appear on the photo that you can move with your fingers, and you can also change its size by squeezing and stretching the corners.
- We complete the work on creating a contact photo by clicking the “Check” icon or the “Done” button.
Now all you have to do is confirm the changes completely using the “Check” box. On some versions of the operating system, you do not need to take any additional steps. The described algorithm works on the vast majority of smartphones running Android. You do not need to take any additional steps to change the appearance of the contact sheet. It is enough to have a stock of photos and some free time.
Video on how to set a photo to a contact in a Samsung Galaxy phone
Watch a short video clip, after which everything will become clear to you:
Video on how to set a photo to a contact on a Huawei Honor phone
For all Huawei phone models, the process is practically the same. I think that once you understand the principle, it won’t be difficult for you to figure it out even if this video doesn’t show your specific model. However, this method will only work if all your contacts are transferred from the SIM card to the phone's memory.
Adding contacts from instant messengers
If you don’t have photos of all your relatives, but they use popular instant messengers, then you can borrow a photo from there. Let's look at changing the contact list using the Viber application as an example. To install photos on contacts, you need to follow the instructions:
- Go to the application and find the person whose photo you want to receive.
- Find a common group or correspondence with this person. If you have not communicated using this application, then you will need to start a dialogue. You can even write something, and after all the manipulations, erase the message.
- Remove the selected person from your phone's contact list.
- Now you need to swipe from right to left to open the additional menu.
- In it you need to select the contact of the desired person and click on it. In the menu that appears, the line “Add to contact list” will appear.
- When moving a contact, you can give it a different name.
If you change your device to another, the added contacts will be saved - they will be synchronized with your account. Photos will also be transferred. The only drawback of this method is that you will receive ready-made photos for your Android contacts. A similar scheme works with many instant messengers that have the “Add to phone contacts” function.
Google Contacts service for installing a photo on a contact on your phone
If you have your phone synced with Google services, you can use the standard ability to change your contact sheet. The easiest way to edit your profile is through a computer. To do this, you need to remember the password for your account and follow the instructions:
- Go to Google Contacts service.
- Enter your username and password. Your login can be your Gmail email address or phone number.
- A list of contacts will open in front of you. In it you will need to select the desired contact and click on the “Pencil” icon. Or, on the left side, click on the icon with a pictogram depicting a camera.
- Now you need to select a photo, first download it or find it in a folder in your computer memory.
- All you have to do is click on the “Done” button to save the desired photo.
After the next synchronization, the selected photo will appear in your contact list.
Useful program Ultimate Caller ID Screen HD
If none of these methods work, then you can install a third-party utility to change the settings for displaying photos on contacts from your phone book. It is distributed through the Play Market. The advantage of this utility is that it has an intuitive interface and expands the capabilities of your smartphone. The main features of this utility:
- placing a photo on the contacts screen on Android;
- display inboxes on full screen;
- large notifications about missed calls;
- possibility of creating a black list;
- call control using gestures;
- block calls by turning the phone over.
There are two versions of this program - free and professional. You may not use all the functions of the utility, but only those that are necessary. Immediately after using the application for the first time, you need to configure it:
- Enable interception of messages and calls.
- Configure types of notifications and ways to reject calls.
- Select the appearance of the window for an incoming call. The utility offers one of five options, but the developers promise to expand the capabilities in the near future.
- Customize or download a theme for known and unknown contacts. You can set different themes to immediately understand who is calling you.
- Set up gesture control for calls and SMS.
- Configure sensors. This will allow you to reject incoming calls by simply turning your phone face down.
- If you need it, set up call blocking and a blacklist.
- The last setting item does not need to be changed; it only helps to associate the changes you have made with the standard functions of the phone.
To solve another problem, how to install a photo on a contact in Android, you need to use the built-in manager. It is located in the "Settings" section. You have several options where you can get a contact picture:
Using this application, you can even set a video to an incoming call - it looks very unusual. Once you select a photo, you can enlarge or crop it. After these manipulations, all you have to do is click on the “Finish” button. The selected photo will be displayed on the entire screen when there is an incoming call to us.
How to delete or edit a contact's photo
There are several ways to solve the problem of how to delete a contact photo on Android or edit it:
- through the Contacts application;
- via Google Contacts;
- through third-party utilities.
The best way to delete or change a photo is Google Contacts. It is enough to simply erase the desired image. Sometimes, of all the above, only this method works, for example, you can only replace a photo, and not erase it completely.
It's easier to change a contact's photo; you can do this using all the same methods as for adding it. In any of the services, you just need to select “Edit” instead of the “Add photo” line. Sometimes you just need to click on a photo to bring up the context menu. In this case, you will be able not only to select an image from the “Gallery”, but also to take a photo from the camera at the moment.
There are several ways to edit a contact sheet, each of them is simple and understandable, because the Android operating system was initially positioned as intelligent. Some of the selected methods may not work, since there are many versions of Android OS; in addition to the basic ones, there are branded assemblies from phone manufacturers. Their design and set of functions are somewhat different from the standard ones. Now you know how to take a photo on an Android contact. Discuss the information in the comments and share it with friends.
Standard Android tools
To work with this method, it is required that the contacts be in the device’s memory or in your Google account. If all the necessary contacts are located in the SIM card’s memory, then transfer them to your smartphone.
Read Where are contacts stored in Android?
Method 1
We follow the instructions:
- Click on the “Contacts” application.
- We indicate the required contact. Click on the place for the picture on the page of this contact.
- A drop-down tab will appear, in which we click on the required option, for example, “Select from gallery”.
Enlarge
Android will show the "What to use" prompt. Here you need to specify the storage location, here it is “Gallery”.
Help is needed?
Don’t know how to solve a problem with your gadget and need expert advice? Alexey, a smartphone and tablet repairman at the service center, answers your questions. Write to me »
In the “Gallery”, select a suitable photo, and then click on the “Crop” function. A frame will be shown that you can move with your finger.
This indicates the required fragment for displaying the contact. When the selection is ready, click “Done”. After this, when making phone calls, the desired user will be shown on the screen.
Increase
Please note that the entrance to Drug Around is detailed on the website drugvokrug-s.com
Method 2
Open the gallery, find a suitable picture and open it. Then go to the action menu by clicking on the 3 dots on the right or the 3 lines on the left at the bottom of the screen window. A list will open in which we click “Set image as”. Then a window will appear where we indicate “Contact photo”.
Increase
The telephone directory will open. We find a contact to install the previously selected photo. A frame will appear that you can move with your finger to select the appropriate fragment. Click save “OK”.
Increase
Read Android does not save photos from applications