Author of the article
Maxim aka WisH
Higher education with a degree in Information Systems. Experience as a system administrator - 5 years.
An increasing number of companies prefer to install optical cables into users’ apartments. This costs more and takes longer than twisted pair, but has several important advantages. The optics take up less space and can be positioned more accurately and safely. It provides high speed, the main thing is that the rest of the infrastructure can withstand it. Modems are also appearing that support transmission over optical fiber - the GPON standard. They are not cheap, so most providers provide them for free or for a small rental fee. Today we’ll talk about setting up the Huawei hg8245 router under Rostelecom and other providers. This is an optical terminal. Rostelecom provides it free of charge for the duration of the contract.
Features and Specifications
The device is an optical terminal capable of creating a wireless network. Specifications of Huawei hg8245h:
- works at least 60 thousand hours;
- operating temperature from 0 to 40 degrees;
- supports H.248, SIP;
- supports 802.11 b/g/n;
- can provide speeds of 900 Mbit/s;
- supports IPTV and VoIP technologies;
- works as a Wi-Fi access point;
- can work as a virtual server;
- remote diagnostics of problems.
Rostelecom uses a Huawei router as one of its standard ones. It was Rostelecom that began connecting its subscribers via a fiber optic cable run directly into the apartment. To do this, you need a router that can process such a signal. They did not put the burden on people to buy equipment that is several times more expensive than the equivalent for twisted pair. So Huawei hg8245 was chosen as the main router of Rostelecom. Although the operator may use other models, as well as newer versions, this router remains the most common.
Indicators and connectors
This router from Huawei does not have any special external differences from ordinary routers. Only a couple of connectors may be unfamiliar, otherwise it looks the same.
There are several ports and connectors on the back:
- OPTICAL – input for fiber optic cable; you cannot insert it anywhere else.
- LAN1, LAN2, LAN3, LAN4 are used for regular twisted pair cable; you can connect computers, TVs or other devices to them.
- TEL1, just like TEL2 - phones are connected here. They must support IP telephony.
- POWER - the power supply is inserted here.
- An additional battery is connected to the BBU for power supply.
- USB port for flash drives and disks.
The router also has keys:
- ON/OFF. Power, used to turn the device on and off.
- WLAN. Enables or disables the wireless network.
- WPS. To connect devices, if this authorization method is selected.
- RESET. Complete reset of settings.
The indicators are labeled similarly to the ports, it is clear what they are responsible for. If it lights up or flashes green, it means everything is in order. If it doesn't light up, it means it's not in use. If the color is orange, then malfunctions are possible.
Connecting a router
Before entering the router menu, the user should connect the gadget and synchronize it with a PC or laptop. You need to insert the plug into the socket and turn on the gadget. The work can be monitored by the lit indicators on the router body. Next, you should take a short cable and insert it into the router socket, and connect the other end to the computer unit. A notification may light up in the icon bar indicating that a new device has been found.
Connection
To connect the Huawei hg8245h router to a computer or laptop, use a patch cord, it is supplied with the device. Insert it into any LAN connector, and the other end into the system unit connector. Next, connect the optical fiber to the OPTICAL connector.
Now go to the adapter settings on your computer. You can get into them by right-clicking on the computer icon in the tray. In the drop-down menu, click on the line “Network Center”. The same can be done using the control panel or through “Start”, there you need to find the network settings. After that, select the connection, right-click and go to “Properties”.
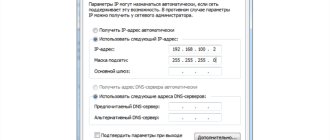
Here select the line with IP version 4, all computers use it. The name must contain "IPv4". Enter the address 192.168.100.2. The final look should be like this:
- IP address – 192.168.100.2
- Subnet mask – 255.255.255.0
- Gateway – 192.168.100.1
- Preferred DNS server – 192.168.100.1
All that remains is to configure the Huawei router to exchange signals with the provider and the Internet.
Connection to the terminal, standard logins and passwords
You can configure the HG8245H router using:
- HTTP (Web interface)
- TELNET (console)
- SSH (console, secure access)
- OMCI (on-chip optical control link)
- TTL (serial port)
By default, network access is open only from the local network and only via HTTP, TELNET.
Default IP address 192.168.100.1
root/admin
(version V300R016C10 and earlier) – incomplete access, cannot configure WAN
root/adminHW
(version V300R017C00 and older) - incomplete access, cannot configure WAN
telecomadmin/admintelecom
– full access, the so-called “superadmin”.
To reset the password, you can restore the factory settings by long pressing (10 seconds) the recessed Reset button on the case.
If you need to save the current configuration, there are options for non-standard login/password combinations for the full web interface:
- telecomadmin\NWTF5x%RaK8mVbD
- telecomadmin\NWTF5x%
- telecomadmin\nE7jA%5m
- telecomadmin\xyz
- admin \ *6P0N4dm1nP4SS*
- telecomadmin\s2Mu5LrUYXvoRGxWT0By8D1QCmOpdKgAqjIcE7i6w94VtzJnbH
- superadmin\haPie9goHf
Login to router settings
Login is carried out as standard, open any browser and in the line at the top enter the router address - 192.168.100.1. You will be redirected to the login page. Usually the manufacturer sets the login to “root”, and the password is “admin”, but differences are possible here, the information is written on the bottom of the router, you can look it up there.
If the router belongs to Rostelecom, then it will be reflashed to the combination telecomadmin\admintelecom.
On the first page you need to enter the login and password for the router, after which you will be sent to the router settings. Next you will directly enter parameters for working on the Internet, as well as setting up various useful functions.
Problem with speed or access via WI-FI
If one of your devices does not provide the required speed or cannot connect to the Wi-Fi access point of the optical terminal, then you should do the following:
Enable WWM mode
To do this, go to the terminal settings at 192.168.100.1 (username - root, password - admin). Next, go to the WLAN and select WLAN Basic Configuration on the left:
Next, look for the Enable WMM item; if it is not checked, check it. Click Apply
Set the channel width to 40Mhz
To do this, go to the terminal settings at 192.168.100.1 (username - root, password - admin). Next, go to the WLAN and select WLAN Advanced Configuration on the left:
Find the Channel Width and set the item to 40Mhz:
Set the radio channel manually + select a region.
To do this, go to the terminal settings at 192.168.100.1 (username - root, password - admin). Next, go to the WLAN and select WLAN Advanced Configuration on the left. In the Channel select the number 6, in the Regulatory Domain menu - Russia. Click Apply
Disable encryption.
Optical terminals tend to “mope”, for no specific reason, on specific devices (laptops, phones). Therefore, if your device stubbornly cannot connect (or connects without access to the Internet), then you should try disabling encryption.
To do this, go to the terminal settings at 192.168.100.1 (username - root, password - admin). Next, go to the WLAN and select WLAN Basic Configuration on the left. In the Authentication mode , select Open . Click Apply
If this method helped, then you still need to think about protection. Another method of protection involves filtering by mac address. For this there is a menu item Secutiry -> Mac Filter Configuration . There in the Filter Mode we select Whitelist . And we enter the MAC addresses of devices that will be allowed to access the Internet from this access point.
Automatic setup
The hg8245 can be configured by the provider itself. If the provider has provided a branded router, then all the data and settings are embedded in the firmware and there is no need to change anything. This is not done for all routers and not always. In addition, this router has the ability to remotely access, so Rostelecom itself will be able to connect, but this will happen rarely.
You will need to go to the WAN section and enter the information from the contract there, which includes your login and password. If the automatic connection does not work, then you need to configure the router manually.
Setting up IPTV
In order to be able to watch interactive TV, you will need to configure the IPTV item. After authorization and going to the router menu, the user should open the “LAN” section. In a small window, check all 4 values.
Next, the Rostelecom user needs to go to the “Network Application” menu item, then hover the mouse cursor over “IGMP Configuration”. On the page that opens, the user needs to set the “Enable” parameter in the “IGMP Enable” line. It is necessary to confirm the completed operations by clicking on the “Apply” button, otherwise the settings will not be saved.
Then the user will need to go to the “WAN” section and make settings for IPTV. In the line “Enable WAN” (as in “Enable VLAN”) you should check the box, and in the line below called “Encapsulation Mode”, use the mouse cursor to mark the “IPoE” parameter. In the “Protocol Type” line, click on the drop-down menu and select the “Ipv4” value. In “WAN Mode” specify “Bridge WAN”. Next, pay attention to the “Service Type” line and make sure that the “IPTV” parameter is set there.
You need to change the VLAN ID value; this item indicates the digital parameter corresponding to the user’s region. You can find it out by going to the WAN > WAN Configuration section, where you need to copy the address of one of the circled lines. This is only relevant if the settings have not been reset before and the parameters have not been cancelled. Otherwise, you will have to call 8-800-1000-800, waiting for recommendations from specialists.
Manual setting
In the very first window that opens immediately, select WAN, then go to the WAN Configuration section and click on it.
For a router from Rostelecom, you should set the following settings:
- In the first line - PPPoE;
- Switch WAN mode to Route;
- Service type set the value to INTERNET terms;
- We turn on the Enable vlan mode and write the VLAN ID, it is in your contract;
- MRU –1492;
- Username – connection login;
- Password – connection password;
- Binding options – mark the ports through which the Internet will go;
- IP acquisition mode – set PPPOE;
- Enable NAT – can be set to automatic mode, used for networks with internal addressing;
- DNS Override - if you want to install your own addressing servers instead of those of the provider.
Some fields may be filled in automatically when you select a connection type; usually you don’t need to change anything there.
Setting up the HG8245H
Before you start! IMPORTANT! To configure services yourself, you need to know the VLAN ID of each of them! If you have not yet reset the terminal settings to factory reset, they are available in the WAN -> WAN Configuration menu item. It is also worth considering that the settings are available only in super-user mode (how to log in through such an account is described in the “Firmware” ). If you still cannot set up the terminal yourself, then simply call 8 and report the need to reactivate your services (this is done by level 2 technical support). After this is completed (usually done on the same day), all settings will again be on the terminal.
Internet settings
In the WAN -> WAN Configuration , click the New button:
Next, set the parameters as in the picture:
Explanation:
1. VLAN ID, as mentioned above, you most likely have your own. With the fact that the Internet will not work for you in the picture.
2. 802.1p - priority. For the Internet service, by default it should be 0
3. Login and password for authorization on the Internet - rtk/rtk.
4. A check mark on the SSID1 item means that the Internet will work via Wi-Fi. Accordingly, if you do not need Internet via a wireless network, you don’t have to check the box
Setting up for IP-TV
In the WAN -> WAN Configuration , click the New button. Next, set the parameters as in the picture below:
Explanation:
1. VLAN ID, as mentioned above, you most likely have your own. With the fact that the Internet will not work for you in the picture.
2. 802.1p - priority. For the IP-TV service, the default should be maximum, i.e. 7
3. If you have not one, but several receivers, check the boxes in the Binding Options item according to the number of consoles, i.e. if there is one, then only LAN4, if there are two, then check the boxes for LAN3 and LAN4, if there are three – LAN2, LAN3, LAN4
Setting up for telephony
Telephony settings cannot be made without a special password that is registered by the SIP protocol. It fits into the Voice -> Voice Basic Configuration and no one, especially the provider’s technical support, will tell you. Therefore, it is not possible to set up telephony yourself.
How can I make it possible to use all ports for the Internet?
To do this, go to the menu item LAN -> LAN Port Work Mode and check all the boxes. Then, when editing or creating a WAN connection for the Internet service, in the Binding Options , also check the boxes for those ports that are needed for the Internet, respectively.
How to do port forwarding?
You need to go to Forward Rules -> Port Mapping Configuration . Click NEW . WAN Name - select the Internet service, External Start Port - [port no.], Internal Start Port [port no.], Internal Host - internal host IP address, Protocol - TCP , External end port - [port no.], Internal end port - [no. port], Enable Port Mapping - check the box. Click Apply .
Wi-Fi connection and settings
To connect Wi-Fi, open the WLAN page, then go to WLAN Configuration.
Next are the parameters themselves:
- “SSID Name” – the future name of the Wi-Fi network;
- “Associated Device Number” – indicates the maximum number of simultaneously connected devices;
- “Authentication Mode” – the most secure is WPA2 Pre-Shared Key;
- “Encryption Mode” – usually AES is installed here;
- “WPA Pre-Shared Key” – password;
- “Channel” – select “Auto”;
- “Channel Width” – channel width, you can leave it at 20/40.
Setting up wi-fi on a Huawei hg8245h router
When the initial configuration for the Rostelecom network is completed, you can change the wireless channel parameters on the configured router. First of all, you need to change your WI-FI password. To do this, go to the WLAN tab, put a tick in the checkbox that activates wireless data transfer and fill in the fields below:
- Network name (SSID-Name) – any Latin alphabet and numbers (optional).
- Authentication – WPA/WPA2.
- Encryption type – TKIP/AES.
- You can change the password on the Huawei Rostelecom wifi router by entering it in the “WPA PreSharedKey” field; it must be at least eight characters using numbers.
- Save the changes by clicking Apply.
After you have changed the configuration of the wireless network, you can connect to it using the new authorization data. That is, you need to select from the list the network with the name that was specified in the SSID-Name field and connect to it using a new password.
Setting up IP TV
This function is also configured here, but it only works if the operator provides the option and you have it connected. Otherwise, the setting will be meaningless. Click on “WAN”, select “Create new connection”. In the “Service type” section, find IPTV, and the lines under the names “VLAN ID” and “Multicast VLAN ID” are filled in according to the data that the provider wrote down for you in the contract. Click “Apply” and check the connection.
You need to check that the IGMP function is active, otherwise it may not work. Go to the page called “Network Application”, find “IGMP Configuration” there, enter the value “Enable”.
Setting up an Internet connection with Rostelecom
For correct synchronization, you must do the following:
- Once in the modem interface, the user needs to go to the “LAN” tab. Sections are switched from the top and are indicated in gray and red. In this section, you need to hover over the line “Lan Port Work Model”. Next, you should mark all 4 ports and click “Apply”;
- The user will need to open the “WAN” section to continue setting up the router. The data for setting the parameters is in the contract; this document was filled out when connecting the device. You need to check the information and enter it in the correct lines;
- You will need o, then select “IPoE” and check the box there too. In the “WAN Mode” block you should specify the value “Route”. Then go to the next item “Service Type” and select “INTERNET” from the menu. After this point Fr. You can check all the parameters with the picture.
To complete the setup, you need to stay on the same page and find the necessary data in the contract to fill out the “VLAN ID”, “Encapsulation mode” and “IP acquisition Mode” fields. If you have questions or if you lose the contract, you should contact a Rostelecom technician and explain the situation. The specialist will set a time for the master to come or give recommendations.
Change Password
You have the opportunity to change the preset administrator login and password, then your router will be protected and will be more difficult to access. But the provider will not be able to connect for automatic configuration. To change the default password you will need to do the following.
Go to the settings page using your usual login. Next, go to System Tools and click on Modify Login Password. Here you can change the password, which will then be your main one.
The remaining steps are of interest only to those who want to change the super administrator password. For regular users this is not necessary:
- First of all, you need to download the file with the current config: System Tools then in Configuration File, then click Download configuration file.
- Change the telecomadmin password. Open the downloaded file in Notepad ++, you can also use Notepad, but it’s much more difficult to understand.
- Find the line indicated in the picture. Copy the Password line for root and paste it instead of the same line for telecomadmin. Now save everything in xml format.
- Now go to System Tools > Configuration File > Update Configuration file. Specify the edited file. Password has been changed.
There’s no point in doing this just like that; these are actions for those who use super-administrator options.
Popular” problems and errors
Let's now look at the main problems that a person may encounter when setting up a router:
- The device's IP address is different from 192.168.100.1. In this case, you need to do the following. Click the "Start" button, select "Network and Internet Settings" - "Ethernet" - "Related Settings". You need to go into the network adapter settings. Then select your adapter and right-click. In the menu that appears, select “Status”. In the table that opens, find the “Gateway” item. There you will see the real IP address of the router. Copy it and paste it into your browser's address bar.
- The router is not compatible with your computer's settings. This problem can be solved like this. Open the adapter settings according to the instructions above, select version 4 protocol and click the “Properties” button. Click "Use the following IP". Complete the appropriate blocks as follows:
- IP – 192.168.100.5,
- mask – 255.255.255.0,
- Gateway and DNS – 192.168.100.1.
Problem starting LAN2 and LAN3
Update from Botan. I received the following interesting question from Oleg in the chat:
How to run the remaining two LAN2 and LAN3 on a Rostelecom router? I bought a Samsung TV, the built-in WiFi adapter is crooked, the signal always drops. Rostelecom has LAN4 installed on their set-top box, linked to the MAC address, and only LAN1 distributes the Internet (it goes to the computer). I want to plug the cord from LAN4 into LAN2 or LAN3, but they are locked. Huawei hg8245 router. How to make sure that the Internet is distributed from all LANs? Is it possible to open a port for a TV, and how do I find out what the range of ports is for them? Can this be done using Simple Port Forwarding, UPnP Wizard or other similar programs? Or do you definitely need to go into the router settings?
The problem arose that we did not have to deal with such blockings, because... modems arrived without preliminary “cutting off”. And when you enter the configurator, these settings are simply not there - everything is cleared. As a result, a solution was found - you need to log into the router not as a regular user, but with a super administrator password. The owner of this matter himself personally guessed this. I am attaching his comment almost verbatim below. For the benefit of everyone, maybe it will be useful:
I solved the problem: I just needed to get to the superadmin password. After the usual authorization 192.168.100.1 and entering the locked settings, in the address bar we put:
192.168.100.1/html/network/set.cgi?RequestFile=../../mnt/jffs2/hw_ctree.xml
– and download the terminal config. And there we are already looking:
The hash, however, can be encrypted with MD5, then decryption is a bit of a hash (but at least it’s something). This is the super password. We go under it again, and everything is unlocked. I unsubscribed, just in case you suddenly have to face such a problem. Anyway, thanks for your participation...:)
Firmware update
Firmware updates are periodically released for the Huawei hg8245h router. They usually fix glitches and bugs that may have been present in previous versions. The firmware can only be installed on a clean router, so you will have to reset all settings. Usually, an update is not required if the router is new enough and works well. But updates can optimize performance.
To get started, go to Status > Device info.
Find the line indicated and write down the version. Now go to the manufacturer’s website and find the model of your router there. Check the firmware version. If it is newer than yours, then you can update. Download it. Further actions are available only to those users who are logged in as telecomadmin. Open System Tools and select Firmware Upgrade. Specify the downloaded file and click on Upgrade. After this, you will have to reconfigure the router.
Firmware
The firmware of your HUAWEI device can be updated to the latest version, this will allow the router to work as efficiently as possible. The firmware is regularly posted on the manufacturer’s website, so first go there and download the file to your PC.
Next, experts recommend saving the current router configuration to the hard drive (save the settings in the “Configuration File”).
After completing these steps, find the “Firmware Upgrade” item in the system interface tools. The instructions here are simple - you need to specify the path to the firmware file and start the update process.
When the firmware is installed, the terminal will perform a reboot on its own.
Reviews
In general, reviews from users are positive, and there is no choice yet. It is this router that is provided when connecting via optical fiber. For most users everything works fine. There are only a few shortcomings:
- Heating of the case under heavy loads.
- There are interruptions in speed, but it is not clear whose fault it is - the provider or the router.
- The router can automatically switch ports, the problem is resolved through technical support.
Perhaps, when competition in the provision of fiber optic communication services increases in the market, the choice of devices will become larger. Now we have to use what we have. You can buy and connect your own router, but they are more expensive than usual. And in this case, you are unlikely to achieve anything from technical support other than the words “Your equipment has not been tested for compatibility with our network, use the recommended one.” You will have to deal with the problems yourself.