Establishing a connection with the router
The first step is to establish a physical connection with the router. In the case of wireless devices, this can be done in two ways - by connecting to its Wi-Fi network or via a network cable. Routers that do not support Wi-Fi are configured via a wired connection only.
To access the router settings via a wireless network, you will need a password for the Wi-Fi network (if you are setting up the router for the first time, most likely the Wi-Fi network will be open, that is, not protected by a password). If there are no problems with this, you can move on to the next part of the article. If there is no password, there are two ways out of the situation:
- Connect to the router using a network cable and a computer. To do this, you must have access to the equipment, i.e. it should not be located indoors. The cable should be connected to one of the LAN ports (not to be confused with WAN) of the router.
- Reset the router settings. In this case, not only the password will be reset, but also all settings of the network device. After this, the router will have to be reconfigured again so that it can provide Internet access.
How to change the password on a Huawei router
If for some reason it is impossible to connect to the router via Wi-Fi, for example? The password for the standard wireless network has been lost; you can connect using a LAN-LAN cord (not always supplied with the router). To connect, do the following:
- In the user interface, in the menu located on the left side, open the “Basic” item and the “WLAN” sub-item.
- In the “WLAN” settings menu that opens, enter your preferred Wi-Fi network name (SSID field).
- In the “WPA pre-shared key” field, enter your preferred password of at least eight characters (use only the English alphabet and numbers).
- To save your changes, click the “Submit” button.
- Connect the router to the power supply.
- Press the reset button and hold it for a few seconds (usually located at the back of the router). To press the button, use a paper clip or something thin.
- Wait for the router to reboot and restore factory settings.
On any Huawei router that you received from an Internet service provider or purchased separately, you need to change the default password. It is important to do this for security purposes so that strangers cannot access your home network. In addition, when too many devices are connected to a Wi-Fi router, the Internet speed decreases, which leads to slowdowns while watching videos or playing online games. Login to the user interface is carried out through any Internet browser, such as Google Chrome. To open the router settings page, do the following:
SupportIf you have any questions or complaints, please let the operator know
Preparing the operating system on the PC for setup
In order for the network to work as expected, you need to install automatic updating and obtaining IP addresses and DNS. To do this you should:
- Go to the “Control Panel” and find the “Network and Sharing Center” section there. The same can be done in the Start menu by entering the appropriate line;
- In the window, select the “Change adapter settings” link on the left;
- A list of all networks will be displayed, among which you need to select the active one and right-click on it, selecting “Properties”;
- In the list, select IPv4 - Internet Protocol version 4 and click on it;
- There will be several settings in the window: you need to check the boxes next to “Obtain an IP address and DNS automatically.”
Important! After this, you need to click the “Accept” - “Ok” button and restart the computer. This will set the settings to the desired parameters, and the router will receive data automatically.
Equipment setup
In general, you are wrong, nothing is sewn in, it would be stupid to hard-wire something, I found a solution, if you want I can tell you, write to me by email How to download it now, if there is no option to download in the System tools - Configuration File tab anything, only 2 buttons: save and save and reboot))) Although, by and large, everything works as it is, and there is no longer the ability to log in as telecomadmin (which was what bothered me the most), now only the root login works with a new password) ) In my example, access via root login. Next, you need to go to the “System Tools => “Modify Login Password” section. Here you need to enter the new admin password in the “New Password” field, and enter it a second time in the “Confirm Password” to confirm. Click the “Apply” button to apply the terminal configuration changes. On any access device - be it a managed switch or a WiFi router - it is necessary to change the password for access under the administrator login, and not leave the one that is used by default. This is one of the key elements of home network security. GPON ONT terminals are no exception to this. In this post I will tell you how to change the password on the Huawei HG8245 terminal, which is issued to Rostelecom and MGTS subscribers. As a small digression, I will say that many providers close access to the optical modem so that the subscriber does not have the opportunity to change the device settings. The subscriber is either not given access at all, or his rights are limited. Accordingly, if you log in with user rights (User), then you will not be able to change the admin password on the HG8245. What should I do if my Wi-Fi is open, but it asks me to enter the old password? I leave this field empty, it says that it is required.
Logging into the router settings web interface
A web interface is a small program that provides user interaction with a communication device. This program is essentially a website stored in the router’s memory. As with any website, to log into the router’s web interface you need to know its network address. When setting up a router for the first time, the manufacturer sets standard network parameters for its entire line of products. The default network address of the web interface in the case of Huawei routers is “192.168.100.1”.
It is possible that new models (released after the publication of this article) of Huawei routers have a different network address. In any case, the manufacturer provides it in the documentation for its equipment or even puts the relevant information directly on the device case (usually on the back of the case).
To enter the settings, simply enter this IP address into the search bar of any browser and click on the go button. If the address has not previously been changed by the user independently, the initial page of the web interface will open, and you can proceed to the next part of the article. If the browser gives an error, the default IP address may have been changed or there are other problems, many of which can be easily fixed.
How to access 192.168.8.1?
Connect your Huawei modem via cable or Wi-Fi. Open any browser. It is advisable to use a browser that you do not use every day. There are usually no add-ons that can prevent us from opening the modem settings page. In the address bar of your browser, type the address https://192.168.8.1 and go to it.
Please note that on some modems/mobile routers the factory address may be 192.168.1.1
The modem settings page should load. If this does not happen, you can reset your Huawei modem.
The main page displays information about your Internet connection, 3G/4G network signal strength, and access to other modem settings and functions.
Depending on the device (modem without/with Wi-Fi), model, mobile operator (Beeline, MTS, Megafon, etc.), your personal account (settings page) may differ slightly. Some menu items and settings may be missing.
If you have a Huawei modem without Wi-Fi, then you can easily go to any section: Statistics, SMS, USSD, Settings, etc. But if you have a modem with the ability to distribute Wi-Fi, then without entering your login and password, only the main page will be displayed. And if you try to go into settings, or another section, a “Login” window will appear asking for a username and password. Typically, the factory username and password on Huawei Wi-Fi modems are admin and admin .
Error when logging into the web interface
If the router's IP address has been previously changed, it is easy to determine. To do this you need (using Windows 10 as an example):
- Click on the icon with the image of a computer monitor in the tray (near the clock/date in the lower right part of the screen).
- In the window that appears, select “Network and Internet settings.”
- A new window will open with the section names on the right side. Here you need to find and go to the “Ethernet” section.
- In the newly opened section, in the list of “Related parameters”, find the item “Configuring adapter parameters” and go to it.
- A window will open with icons (or one single icon) of communication devices installed on the computer. Here you need to select the device that is currently used to connect to the router
- Next, you need to call up the context menu on the selected device (right-click on the icon), and then click on the “Status” item.
- A small window will open in which you need to find the “Details...” button and click on it.
- A small table will be displayed in the new “Network connection information” window that opens. We are interested in the “Default Gateway” item and the IP address indicated opposite it.
- This IP is the network address of the router. You just need to rewrite it into the browser search bar and try to open its web interface again.
An error when trying to open the web interface may be associated not only with a previously changed router IP address. This may also occur due to incompatible settings of the computer’s network communication device with the network parameters of the router. This can also be corrected manually by:
- Open the section “Configuring adapter settings” according to the instructions given above.
- Call up the context menu on the selected communication device and click on “Properties”.
- In the list that opens, select the “IP version 4” item and click the “Properties” button a little lower.
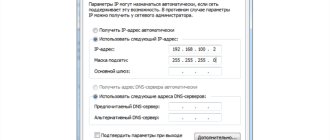
- It is possible that in this window the fields “IP address”, “Subnet mask” and other network parameters of the selected connection will be filled in. If this is the case, it is recommended to rewrite the entered parameters just in case so that they can be restored later. If not, then you need to set the switch to “Use the following IP address”. Now all that remains is to enter the network parameters in each of the fields.
- In the “IP address” field, enter “192.168.100.10” (the first three digits must match those of the IP address of the router being configured, the last one must be different).
- In the “Subnet mask” field, enter “255.255.255.0” (it is possible that the computer will automatically enter this value).
- In the “Default gateway” and “Preferred DNS” fields, enter “192.168.100.1” (or the IP address that is indicated on the router body).
- Click “OK” and then try to connect to the device again through the browser.
If no software or hardware malfunctions are observed with either the computer or the router, then after all that has been done, it is more likely that you will be able to access the device’s web interface.
Changing the password to enter settings
Immediately after successful login, it is recommended to change the password and other authorization data. Some models themselves strongly suggest changing the password if you have entered the router settings for the first time. You should not ignore this and agree to change your password. If there is no message about the change, you need to go to the “Maintenance” tab and find the “Change Password” item.
Setting up HG8245
In order to configure the equipment, you must perform the following operations.
Gaining access to the settings menu
- connect the router to your computer or laptop using a network cable (patch cord);
- in the address bar of any browser (for example, Opera) type 192.168.100.1;
- in the Account field you must enter the name “root”, and in the Password field - “admin”;
- After completing the operations, click the “Login” button.
After checking that all entered information is correct, the browser will open a window indicating the status of your device.
If the factory login and password of Huawei HG8245 have not been verified, then you need to contact MGTS support service, where they will provide you with advice on accessing the settings menu of your terminal.
PS How to Change Password on Wifi Router MGTS Gpon Huawei, wifi? Make sure that when you enter the router settings, the fiber optic patch cord is disconnected from the device.
Setting up Wi-Fi: change the name of the network and set the password
The network itself is easy to set up: its name is changed, and the password is set to be more secure than the standard one:
- Open the “Home Network” section and select Wi-Fi configuration;
- Check the box next to “Enable Wi-Fi”;
- Select the encryption method WPA/WPA2. Other methods may not be reliable;
- Enter a new network name SSID and a strong password that cannot be hacked by brute force;
- The birds opposite the last two points are removed;
- Click “Save” and restart the router to accept the change.
Working with a modem
After entering the data, the configuration panel will open. Let's now look at the basic settings of the Huawei HG8245H.
- Setting up the TP-Link TL-WR841N router. Connection, Internet and Wi-Fi settings
Internet activation (for Rostelecom)
- Open the “LAN” tab and select “Lan Port Work Model”. Make sure all ports have checkboxes. If there are no checkboxes, check them and click the “Apply” button.
- Now open the WAN tab and configure according to your agreement with the provider. Typically the setup looks like this:
- check the box next to Enable WAN,
- select IPoE,
- in the WAN Mode block, specify Route,
- in the Service Type block – INTERNET,
- check the box next to VLAN,
- then fill in the VLAN ID, Encapsulation mode and IP acquisition Mode blocks according to your agreement with the provider.
If you have any difficulties, contact your service provider's technical support by phone.
Activating a Wi-Fi network
Now open the “WLAN” tab and select “WLAN Configuration”. You have entered the wireless network settings block.
We configure the network like this:
- come up with a name for the network and indicate it in the SSID Name block,
- check the box next to Enable SSID,
- in the Device Number item we indicate the maximum number of connections (up to 32 pieces),
- in the Authentication Mode item, select WPA or WPA2,
- in the Encryption Mode block we set AES,
- come up with a password and indicate it in the WPA Key item (at least 10 characters),
- Click the “Apply” button.
We also fill in the additional items: Channel – Auto, Channel Width – Auto 20/40, Mode – 802.11b/n/g.
For fans of the video format, setup instructions are available here:
The most popular Huawei router models
If you go to Yandex.Market, you will find out that users love the following router models:
- HUAWEI B880.
- HUAWEI B525.
- HUAWEI E5776.
- HUAWEI E5172.
- HUAWEI B683.
They received ratings of 4 points and became the most popular when purchased. Almost all of the existing Huawei routers are designed to work with 3G and 4G LTE signals from USB modems.
Huawei WS319
After connecting, you can start setting up your Huawei router, which looks pretty standard, about the same as everyone else’s. First you should open any browser.
Then you need to enter the router address “192.168.3.1” into the search bar. An authorization window will open, where you need to enter “admin” in the login and password fields.
So, now you need to understand how to configure the Huawei WS319 router in the correct way. First, let's make the most popular PPPoE setup, which is used by major providers such as Rostelecom. To do this we need to do the following:
- Enable connection
- You must select Ethernet as the service type
- For the connection type we denote the IP router mode (PPP)
- Activate always-online mode
- Enter the login and password from the contract
- Save all changes
Various user configurations, for example the name of the network, can be chosen at your discretion or left as it was, this does not play any role.
Configuring the Huawei WS319 router in dynamic IP mode does not have significant changes, so it is worth noting only a few main differences: the connection type is not (PPP), but (IP); for IPv4 addressing you need to select DCHP; In the NAT item, enter the NAPT value.
To be able to use the Huawei Wi-Fi network on your phone without any problems, you need to go to the home network tab and select the Wi-Fi settings item there. In the SSID line, enter any name at your discretion, this is what your network will be called after all the actions. Next, be sure to activate the network by checking the box next to the corresponding function. Regarding security modes, you can choose whatever you want, depending on the location of the router. It is better to choose a longer password, with capital and small letters, and be sure to add a few numbers. This is all that is needed, after these steps the Wi-Fi should start. If you have any problems, use the screenshot:
To do a reset, you need to go to the “reset settings” section, which is located on the main page.
Huawei HG532E
The setup of Huawei HG532E is almost identical to other Huawei models. However, the web interface address is slightly different, namely “192.168.1.1”. After authorization, you need to go to the WAN through the Basic tab, there, after selecting the INERNET_B_ATM_0_33 network, you can begin to enter and designate the required configurations. To begin with, we will also consider PPPoE, so we select this type of connection, and then enter the login and password from the documents. Everything else on this router should be correct by default and correspond to the screenshot:
To configure the Huawei HG532 router in static IP mode, you can use the instructions for the previous model. The same applies to wi-fi, in order for it to work on the phone, you need to repeat the same steps as for the previous model.
Huawei Smartax MT880
We log in to the web interface in the same way, and in the window that opens, select WAN in basic.
Editing configurations in this model is quite different, so it may not be immediately clear. To start entering values, you need to click on the pencil shown in the screenshot. The settings themselves below should also match, they are about the same as before:
Huawei HG8245H: how to enter settings, modem login and password
If you have several computers at home and only one Ethernet cable, then it is recommended to purchase a wireless router. A good device of this type is the Huawei HG8245H router.
Router settings, as we know, are made through the control panel (web interface). But what is the password and IP address for the HG8245? After all, this data is necessary to access the admin panel. Below we will learn what to enter when logging in, how to install and configure this network switch according to the instructions.
Connect and configure
Let's now learn about how to set up a Huawei router. First, take the device out of the box and connect it to the mains. After connection, the green indicator light next to the PWR mark on the device should light up.
Now take an external Internet cord or telephone cable and insert it into one of the two connectors for the MGTS GPON network. The connectors are painted black and are located on the back of the device. Once connected, another green light on the router should light up next to the POS or LOS mark.
Once connected, you should activate the device. You can do this in two ways:
- Via Ethernet cable. To do this, you need to connect the router to the provider’s cable, and insert the patch cord into 1 of 4 connectors (the required sockets are colored yellow). Insert the other end into the Internet card slot on the computer.
- Via Wi-Fi. Using the Wi-Fi adapter on your computer, find your router and connect to it.
Now you need to go to the settings menu. Open any Internet browser, enter the address of your device into the search bar and press Enter.
Please note that HG8245H routers have an IP address of 192.168.100.1.
Now an authorization window will open in front of you in the HG8245H admin panel to enter your login and password. The default factory login is root, the default password is admin. They need to be entered into the fields to enter the modem settings.
If the device has already been in use, then it is quite possible that the previous owner changed the login and/or password. In this case, you need to reboot. To do this, click the “Default” button on the router. After the reboot, you should enter the standard login and password root/admin.
Setting up the Huawei B315S-22 router via the Admin control panel
Next, you need to open a browser on your PC and enter the address to enter Huawei settings. They may differ on different models, for example 192.168.3.1, 192.168.8.1 or mediarouter.home. Which one you need, you need to look at the sticker on the device body. If you have problems opening the page, check the Windows network adapter settings - you can read more about solving errors in the link above.
When you first log in, you will be greeted by the Huawei B315S-22 Quick Setup Wizard. If for other routers it could be limited to this, then in the case of Huawei routers it is more convenient to use the main menu of your personal account.
Setting up Wi-Fi and changing the password on the Huawei B315S-22 router
We have already configured the WiFi network through a step-by-step wizard. But what if you need to change the signal SSID or password to connect to the Huawei B315S-22 router. To do this, go to the “WiFi - Basic Settings” menu
In another version of the admin panel, adjustments to WiFi connection parameters occur in the “Home network - WiFi settings” section
- In order to activate the distribution of a wireless signal, here we check the boxes “Enable smart network coverage” and “Enable WiFi”
- Next, come up with a name for your network and indicate it in the “SSID” column
- Check the “Enable SSID” checkbox so that your signal is visible to connected gadgets.
- The next step is to change the WiFi password on Huawei. To do this, select “WPA-PSK/WPA2-PSK” in the encryption settings and set “TKIP+AES” as the mode. This is the most reliable combination to date. You can read more about all the possible options and what they mean in our separate publication.
- Finally, we set a password for connecting to wifi, consisting of at least 8 characters - these are the requirements of this encryption mode.
- If you want to hide your wireless network from prying eyes so that the signal is not visible in the list for connection, you can
Using 3G/4G modem Huawei e3372.
First of all, insert the SIM card into the device as in the photo. If you look at the modem from above, the cropped corner of the SIM card will be at the top, on the left side, with the operator’s logo facing you. Also under the cover you can see a slot for MicroSD cards. It is not necessary to use a memory card, only if you want the modem to act as a USB flash drive. When you connect to a computer or laptop for the first time, a window will appear prompting you to install drivers, click “Ok”. After installing the drivers, you can use the Huawei e3372 modem.
Connecting a modem to a Wi-Fi router.
Before using a modem in a router, you need to make sure that the two devices are compatible with each other. We recommend going to the official website of the router and finding a list of supported 3G/4G modems. If there is a Huawei e3372 modem in the list, then it can be used in this Wi-Fi router. If Huawei 3372 is in the list of supported modems, but your router “does not see” the modem, then we recommend updating the router firmware.
Key Features of GPON Huawei HG8245
User interface:
front panel of the device:
- 8 router status indicators;
side panel:
- "RESET" button;
- "WPS" button;
- "WLAN" button;
- USB interface (2.0 standard support);
- BBU interface (designed to connect a backup battery);
back panel:
- interface for connecting to an optical line;
- 4 Ethernet ports (connecting desktop computers or other equipment using a connecting cable with an RJ-45 connector and data transfer speeds up to 1 Gbit/s);
- 2 POTS ports (designed for connecting telephones);
- Power On/Off button;
- socket for connecting a power adapter.
Functions:
WiFi:
- standards 802.11b, 802.11g, 802.11n.
It is believed that the 802.11n standard is capable of several times increasing the data transfer speed, literally quadrupling when compared with devices that operate according to the 802.11g standard, provided that the router is operated in the 802.11n mode with other devices of this type.
- operating frequency 2.4 GHz;
- maximum connection speed 900 Mbit/s;
- NAT support – yes;
- dynamic DNS – yes;
- support for dynamic protocols - IGMPv1 and IGMPv2;
Built-in VoIP adapter – yes;
Routing:
Antenna - non-removable 2 pcs;
There is a function for remote configuration, diagnostics and error correction.
Technical data:
- operating voltage of power adapter 110 - 240 V;
- power consumption 14 W;
- overall dimensions: 195x174x34 mm;
- weight with power adapter 550g;
- operating temperature range 0 - 40°C;
- room humidity 5 - 95% non-condensing.
Contents of delivery:
- ONT HG8245 router;
- power unit;
- Huawei HG8245 manual (Quick start);
- network cable (patch cord).
Firmware update for new Huawei routers
In the completely new admin panel, which I saw on the Huawei WS5200 router, the section with firmware is located in the “Additional functions - Update management” menu. Here you can immediately activate automatic updating of the router software and no longer bother with keeping track of the release of new versions.
But for those who like to control everything on their own, you can use the old-fashioned method and first download the firmware to your computer from the official website from the description page of this model. Then click on the “Local update” button, select the firmware file from the Windows downloads folder and update the software manually.
Where can I download firmware for Huawei?
Next, you need to download the latest version of the software. Surprisingly, there is not a single page on the official website cunsumer.huawei.com that supports any of the routers. And it is impossible to download the firmware for any of the routers - very strange. But nevertheless, you can find the firmware on the same w3bsit3-dns.com - I provide links to the firmware for
Next, go to the admin panel of the router and open the “Maintenance - Device Management” menu and look at the “Software Update” block.
In another version of the Huawei admin panel web interface, the software update section looks a little different. But the essence does not change.
Here we click on “Browse” and select the file of the newly unpacked Huawei firmware from the folder. Then click on the “Update” button. Next, the router will download it and begin the update, after which it will reboot and you can connect to it again.
Internet and connection types
On the page you find yourself on, you will need to set all the ports that will be active. Immediately after this we do the following:
- Setting up Huawei HG8245 Router. [Detailed instructions]
- On the WAN tab we find the “Modifications” column and in it - the Route subsection. There is a servicelist item, opposite it we indicate INTERNET.
- Select the connection type. To do this, find the IP Acquisition mode field and select PPPoE there.
- When completing the Huawei setup, we confirm that the previously specified LAN ports will be active for connecting via the Internet and that we need to save this data (click on the Apply button).
How to restore factory settings
If the router was purchased secondhand or incorrect settings were made, then you will need to return the factory settings and make everything your own. The reset can be done in the web interface, but not all configurators provide this. You can do this much faster by pressing the “Reset” button, which is located on the side or back panel of the router. It looks like a black dot, protruding or deepened.
Important! You can reset by pressing the button for 15 seconds. The router will perform all reset steps and reboot with factory settings. You will have to configure it from the very beginning.
Popular problems and errors
Let's now look at the main problems that a person may encounter when setting up a router:
- The device's IP address is different from 192.168.100.1. In this case, you need to do the following. Click the "Start" button, select "Network and Internet Settings" - "Ethernet" - "Related Settings". You need to go into the network adapter settings. Then select your adapter and right-click. In the menu that appears, select “Status”. In the table that opens, find the “Gateway” item. There you will see the real IP address of the router. Copy it and paste it into your browser's address bar.
- The router is not compatible with your computer's settings. This problem can be solved like this. Open the adapter settings according to the instructions above, select version 4 protocol and click the “Properties” button. Click "Use the following IP". Complete the appropriate blocks as follows:
- IP – 192.168.100.5,
- mask – 255.255.255.0,
- Gateway and DNS – 192.168.100.1.
Click OK, open your browser, and try connecting to your device again.
- How to reset your Huawei account
What to do if you encounter errors when logging in
Errors may occur due to entering an incorrect device IP address that does not match the value 192.168.100.1. In order to find out the address, the user will need to click the “Start” button. Next, you need to select “Network and Internet settings”, then the “Ethernet” line. In it you should go to “Related parameters”.
You need to go to the network adapter settings, select the one you need, and right-click on it. In the window that appears, select the “Status” line. The network characteristics will open, where you need to pay attention to the “Default gateway…” item. The numeric value opposite is the IP address of the router. You need to copy it and paste it into the address bar of your web browser.
The second error that the device may produce is the incompatibility of the router with the existing PC settings. In this case, you need to open the adapter settings using the above instructions. You need to select “IP version 4” and click on the “Properties” button. The user needs to click on the “Use the following IP” option and enter new digital values. In the “IP address” line you should enter 192.168.100.5, in the “Subnet mask” line - 255.255.255.0. In the “gateway and DNS” parameter, the user enters 192.168.100.1. After completing the actions, click OK. If the problem is not solved, then you need to reset the settings.