Modern smartphones are very large. This, of course, is wonderful: you don’t have to strain your eyes to see what’s written on the screen. But large sizes also bring inconvenience. Reaching the icon of the desired application with the thumb of the hand in which you are holding the gadget while the other is busy with something is still a task. But there are a few tricks that will make your life easier.
The Lifehacker Telegram channel contains only the best texts about technology, relationships, sports, cinema and much more. Subscribe!
Our Pinterest contains only the best texts about relationships, sports, cinema, health and much more. Subscribe!
Enable one-handed mode
Many smartphones have a built-in mode that makes them easier to use with one hand.
iPhone
On an iPhone, to do this, click “Settings” → “General” → “Accessibility” and activate the “Easy Access” option. Then swipe down from the bottom of the display (iPhone X and above) or double-tap the Home button (iPhone 8 and above).
The screen content will shift so that it will be convenient to press with the thumb of the hand in which you are holding the smartphone. To exit this mode, swipe up from the top of the display.
Android
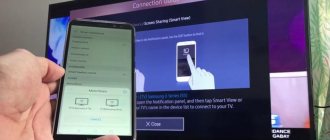
In Android smartphones, this function may be called differently. Dig into the settings and you will find it. For example, on Samsung smartphones you need to go to “Settings” → “Additional features” and enable the “One-handed control” option. Depending on your choice, you can activate this mode by swiping diagonally across the screen or by pressing the Home button three times. To exit the “one-handed” mode, simply tap on an empty space on the display.
For Xiaomi smartphones, the parameters are similar: go to “Settings” → “Advanced” → “One-handed control”. To activate the mode, swipe to the bottom right corner: from the Home button to the Back button. Or to the left corner if you are left-handed.
A little bit of history
3.5 inches is the ideal screen size for using a smartphone with one hand, and it was for this reason that it was chosen for the first iPhone models. Other manufacturers followed Apple. Between 2007 and 2009, the most popular screen sizes were 3.2, 3.5 and 3.7 inches; all of them were focused on one-handed operation and had a bunch of other advantages of compact smartphones.
Today, the average smartphone screen size is 5 inches (five, Karl!), so it’s no longer possible to talk about ease of use with one hand or carrying a smartphone in the front pocket of jeans. You either poke the screen with one hand while holding it in the other (essentially the same as in the days of hated styluses), or you drop it, trying to reach the edges of the screen with your thumb.
Famous images of finger coverage areas in different iPhone models
Other articles in the issue:
Xakep #203. Lumberjacks Windows
- Contents of the issue
- Subscription to "Hacker"
Realizing this problem, manufacturers come up with all sorts of tricks. iOS has a Reachability mode, when activated, the screen seems to move downwards; in Samsung firmware there is a mode for minimizing the entire screen content into a floating window; other manufacturers have their own analogues of these functions. In this article we will talk about these functions, as well as how to expand their functionality or replace it with a more convenient analogue. Separately, I will also show how to get one-handed mode functionality on stock Android firmware and in any custom one.
Install special applications
For those whose smartphone does not have the above-mentioned mode, third-party applications can help.
One of them is Reachability Cursor. Once installed, swipe your finger along the right or left edge of the screen and a round cursor will appear. It will allow you to reach the buttons and icons at the top without placing your finger near them. You move and tap your finger at the bottom of the display, and the cursor clicks at the top. Quite convenient.
Reachability Cursor: one-handed mode mouse pointer
NiftyUI
Price: Free
Download
Price: Free
You will also find Bottom Quick Settings useful. This program creates a curtain with settings at the bottom, thanks to which you don’t have to reach up to put your smartphone in silent mode or change the brightness.
Bottom Quick Settings - Setting up notifications
Tom Bayley
Price: Free
Download
Price: Free
Finally, if you have root access or can type a couple of commands into the terminal, try the One-Handed Mode app. It adds support for one-handed mode to smartphones that do not have it. When starting, give it root access or follow these instructions from the developers. You will need a USB cable and a computer. The app costs 99 cents.
appbox fallback https://play.google.com/store/apps/details?id=com.xda.onehandedmode&hl=ru&gl=ru
iPhone
Let's start with the iPhone. Everything is simple here: the standard Reachability function works without problems and is available by default on iPhone 6/6S and iPhone 6/6S Plus. All you have to do is double-tap the Touch ID sensor and the screen will slide down. You can return it back either in the same way, or simply by not pressing anything for a few seconds.
Everything seems simple... but there are several problems. Firstly, Reachability is not configurable in any way: if you need to expand the size of the “window” or change it in any other way, nothing will work. Eat what they give you. Secondly, the implementation of this mode itself is far from ideal: the window of the running application has non-standard and inconvenient sizes, and the right side of the screen still ends up in a difficult-to-reach area.
These problems can be solved with jailbreak and tweaks. The SimpleReach tweak adds settings that allow you to create several “window height” options, accessible by swiping up, up-left, or up-right from the Touch ID sensor—a total of three different height settings. It should be quite enough.
SimpleReach Settings
To solve other problems, the OneHandWizard tweak is best suited: it replaces the standard implementation of Reachability with a more adequate and convenient solution. After installing it, the screen content will no longer slide down when you double-tap - instead, the screen will scale to a small window on the right or left side of the screen. In other words, the screen content will simply become smaller.
By default, the window size will be approximately the size of the iPhone 5 screen, but by dragging the edge you can enlarge or reduce it to certain sizes. The tweak allows you to solve the problem of “reaching” physical buttons. On the side of the window there is a button to display the interface for managing sound settings, locking the screen, and taking a screenshot. By the way, the price of the tweak is $3.99.
This is what the interface will look like after installing and activating OneHandWizard
Place your home screen icons correctly
Arrange the icons on your home screen so that they can be easily pressed with the thumb of the hand with which you are holding the smartphone. Naturally, you can move icons on both Android and iPhone.
But iOS forces the user to arrange apps in a grid, so there is no empty space. This is not very convenient: you have to figure out how to fill the far corners. However, there is a way out: use the Makeovr tool. We have already described the principle of its operation.
Open Makeovr in Safari and use it to create some “blank” icons. Then arrange them at the top and left of the screen. And place the necessary icons closer to the lower right corner.
Android users have no such restrictions - you can put icons wherever you want. True, some shells, such as MIUI, do not tolerate empty space on the screen, just like iOS. But nothing prevents you from downloading a third-party launcher.
INFO
To activate one-handed mode in MIUI, just swipe left or right from the Home button; To turn it off, do the reverse operation. You can enable/disable the function completely in the additional settings, item “Use with one hand”.
Standard Features
The easiest way is to use standard functions. Android has the wm , which allows you to work with the window manager that controls everything you see on the screen. Its capabilities are different, but in the light of this article we are interested in only one function - overscan. It allows you to move the image visible on the screen a specified number of points from the edge.
If you have root permissions and Android 4.3 or higher, you can use this command to shrink the screen similar to the Reachibility feature in iOS or other transformations. The command format is:
wm overscan LEFT, UP, RIGHT, BOTTOM
To check, just launch any terminal emulator and run two commands:
su wm overscan 0,500,0,0
The screen content should slide down just like in iOS. To get everything back, run the following command:
wm overscan reset
After running the wm overscan command
But how can you use this functionality comfortably? To do this, you can either install the Overscan application or use Tasker. Install it, run it, click the plus button on the Profiles tab and select “Event -> Sensor -> Shake”. When the settings window appears, click back, Tasker will offer to create a task for this profile. Enter her name, click the plus button and select “Code -> Run Shell”. In the Command line, enter wm overscan 0,500,0,0, check the Use Root box and press the back button.
Create a Tasker profile to enable one-handed mode
Now, after shaking the smartphone left and right, the overscan mode will turn on. But how to get back? To do this you will need another Tasker profile. Let's make sure that the overscan mode is turned off after the screen is blanked. Again, go to the Profiles tab, click plus, then “Status -> Screen -> Display State -> Off” and follow the same procedure as in the first case, but this time we specify a different command: wm overscan reset. That's it, now we have a mode for one-handed operation, which turns on after shaking the smartphone and turns off after turning off the screen.
But you, of course, don’t have to do everything exactly this way: you can configure everything as you like. Tasker allows you to, for example, run commands in response to application launch, time, and many other events.
Xposed
If you don’t want to mess around with Tasker settings, there is a ready-made solution to this problem: the Niwatory Xposed module. To install it, you need root rights, as well as (of course) Xposed installed. Android 4.0-4.4 users can easily install Xposed using it. Those who have already upgraded to 5.0-6.0 must flash Xposed themselves using a custom recovery console. The file for the firmware can be obtained from a topic on the XDA forum. Users 5.0 download the file xposed-v78-sdk21-arm.zip, 5.1 - xposed-v78-sdk22-arm.zip, 6.0 - xposed-v78-sdk23-arm.zip. From there you need to get and install XposedInstaller_3.0_alpha4.apk.
After installation, launch XposedInstaller, go to the “Downloads” section, find and install Niwatory through the search, go to the “Modules” section, activate the module and reboot.
Installed and activated Xposed module Niwatory
Niwatory has a rather interesting operating principle. First, it is activated using shortcuts (or a widget on the desktop) that can be called through other applications. Niwatory shortcuts can be called via LMT Launcher or attached to on-screen navigation buttons (custom firmware allows this to be done).
Secondly, the function we need to reduce the application window here works in relation to the contents of this particular window, and not the entire screen. Moreover, it works even in relation to such entities as an elongated curtain. Thirdly, Niwatory allows you not only to reduce the content of the application window, but also to make it floating. That is, in the literal sense: if you can’t reach any element, you can simply move it closer.
Squeeze your keyboard
Typing with one finger on a smartphone is a thankless task, but sometimes it is the only option. For example, if you are riding on a bus and want to write something like “I’ll be there soon.”
Many Android and iOS keyboards have a one-handed mode. In the standard iPhone keyboard, to switch to it, tap the language icon and choose whether to move the keyboard to the right or left.
The settings vary on different Android smartphone models. In standard Gboard, one-handed typing mode is activated by long pressing the comma key. You can also tap the ellipsis in the keyboard header and select floating mode, which allows you to move Gboard to any corner of the screen, which is especially useful on very large smartphones or tablets.
Method 2: Touch Assistant
If in the “Settings” of MIYUAI you have selected to control your smartphone using gestures, the method proposed above for switching to the mode in question will not be feasible due to the absence of the “Menu”, “Home” and “Back” buttons on the screen. The solution to the problem of enabling the “One-Hand Control” mode in such a situation is to use a specially configured module called “Touch Assistant”.
- Follow steps 1-2 from the previous instructions in this article, that is, activate in the OS “Settings” the very possibility of switching the device to the “One-handed control” mode.
- Go to the “Touch Assistant” configuration section located along the path “Settings” - “Advanced settings”. Activate the display of the module on the device screen using the corresponding switch.
- Open “Shortcuts Options”, click on the name of one of the elements that the touch assistant currently provides access to.
- Scroll up the screen that opens and in the “QUICK SETTINGS” list, click on the last item – “One-handed control”. This completes the configuration, exit MIUI “Settings”.
- Now you can call up a special device control mode at any time by opening “Touch Assistant” and tapping on the “One-Handed Control” shortcut that appears among its functions. To exit the mode, repeat the manipulation or touch the area that is free from the block demonstrating the mobile OS interface on the device screen.
We are glad that we were able to help you solve the problem. In addition to this article, there are 12,286 more instructions on the site. Add the Lumpics.ru website to your bookmarks (CTRL+D) and we will definitely be useful to you. Thank the author and share the article on social networks.
Describe what didn't work for you. Our specialists will try to answer as quickly as possible.
What problems may arise and what to do if the control does not work
Using this option, users sometimes encounter some types of problems, which we will discuss now.
What to do, if:
- The screen does not return to its usual size. You need to open “Settings”, then go to “Accessibility” and disable the “Switch Access” and “Zoom Gestures” fields.
- If the phone does not enter this mode. First, check in Settings to see if you have this feature enabled. Also, the reason for the lack of work may arise due to insufficiently fast swiping (movement) on the keys.
- The option is not enabled. It is possible that your gadget has unofficial software installed, which should definitely be changed - this may be the reason for the incorrect operation of other functions, too.