Main sections
Let's go over each section of the existing firmware.
Let's start with the Main: As you understand, the main purpose of this section is to show general information. Connection type (4G), operator (Megafon), signal level, transmitted traffic, Wi-Fi clients, access to flash drive files (perversion). As a convenience, I have marked with an arrow the disabling of mobile data transmission - if you need to save money, you can safely turn it off periodically.
Go to the “Statistics” page. Here awaits us... statistics. Transmitted data (pay attention to the “mileage” of my modem - especially for you from the factory), connected clients and the black list (more to come).
On the “SMS” tab, you can read incoming messages (remember that when they arrive, the light comes on) or send them. Unfortunately, there are no USSD requests in the stock firmware (for example, to view the balance), but this is available in alternative firmwares.
On the “Update” tab, you can check for the latest official firmware and, if necessary, download them.
Attention! If you still want to switch to alternative firmware, I recommend putting this section aside, because... Periodically, new versions do not allow third-party firmware to be installed on themselves and we have to wait for our geniuses until they come up with a new way.
Introduction
For simplicity, I did not divide everything into separate articles, but brought it together. The result is a kind of big manual for the owners of this miracle. Personally, I am very pleased with this toy, and for you here is a plan for further horror:
- Review. Nothing special - from appearance and characteristics to personal impression.
- Setup. With initial connection and full setup, and also a connection to the router.
- Firmware. Especially for those for whom the basic functionality was not enough. Here you can read about repeaters, IMEI, TTL and other demonic things for the very tasks you are thinking about.
Huawei e8372 e8372h 153 on aliexpress - buy online at a good price
Before purchasing, compare prices for Huawei e8372 e8372h 153, read real customer reviews, and read the technical specifications.
Order Huawei e8372 e8372h 153 online with delivery throughout Russia: products marked Plus are available with expedited delivery and improved return conditions.
On Aliexpress, Huawei e8372 e8372h 153 is always available in a large assortment: both reliable global brands and promising young ones are presented on the site.
Detailed settings
Now let’s go to the missed “Settings” tab. Here you can do everything that most users need. But for those for whom this is not enough, I recommend looking below at our special section about Firmware.
Let's start with the main page of this tab - “Quick setup”. Here you can change the name of your Wi-Fi network and its password:
“Dial-up connection” – “Mobile connection”. One important thing to note here is that roaming is turned off by default - for some SIM cards it is simply necessary to turn it on (if it doesn’t work without it). And the second point is that it automatically turns off after 10 minutes of inactivity, so that you don’t wonder why it constantly turns off.
“Dial-up connection” – “Profile management”. This is where your SIM card's mobile data connection profiles are stored. By default, everything is detected automatically (in my case, “Megafon Internet”). For some (like Beeline), several working profiles may be indicated here - home and internet - if something does not work, try switching.
But if your operator is very strange, then the profile can be set manually the old-fashioned way (the “New Profile” button in the screenshot above):
A little decoding: Profile name - as you understand better, name and password - check with the operator, Access point - check with the operator, also known as APN. A small selection of known values from me:
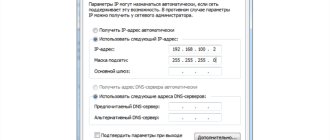
“Dial-up connection” – “Network settings”. Among the interesting things in this section, you can choose your preferred connection mode - for example, if you have poor 4G reception, then why bother with the modem?! Just switch to 3G mode and everything works perfectly.
I remember at the dawn of the advent of 4G in our city, we had to resort to such sophistication on new phones with LTE support for everything to work perfectly. Another important point in this section is the ability to search for a network manually. One of the good scenarios is that you can look at all the available networks around and select an operator for them, and not, on the contrary, struggle with the signal level of the current one.
More about Huawei: Buy Battery for Huawei P10 | Honor 9 | Honor 9 Premium (VTR-L09 | VTR-L29) HB386280ECW priced at RUB 350. in Moscow
"Wi-Fi". There are several subsections, but you can’t think of anything particularly interesting here. Changing the network name (SSID) and password, visibility, channel and width, filtering by MAC addresses (white and black list modes), activating the WPS button (yes, there is no physical one, only from the configurator), DHCP. We were not given a repeater mode out of the box - so look towards alternative firmware.
"Safety". I’ll also briefly go through each point without pictures:
- PIN code protection. If your SIM card is protected by a PIN code, you need to enter it here. Otherwise, the Internet will not rise.
- Firewall. If you want to block devices by IP on your network, you need to activate this feature here. It’s very strange that they put the functionality in a separate section!
- LAN IP address filter. Block devices on the network by IP and ports.
- Virtual server. This is the point for port forwarding. You specify the local IP and the required port for forwarding, and your local device is accessible via this port from the Internet - you can play with friends over the network.
- Other items – trigger ports are available, DMZ, SIP, UPnP (disabled by default!!!), NAT – few people will need it, but it’s here.
"System". And again very briefly on each point:
- Device Information. There is little useful in the stock firmware - perhaps only IMEI, external IP and firmware numbers. In the expanded version, the noise-signal level (RSSI and SINR) appears here - it is very convenient to rotate the external antenna for a better signal (for reference: we make RSSI closer to zero, and SINR, on the contrary, is higher).
- Change Password. This is not about the Wi-Fi password, but about access to this configurator (changed at the very beginning during quick setup).
- Reset. You can do it programmatically, but usually you still come across it when there is no way to get here. Therefore, we remember about the reset button method (described at the beginning of the article).
- Reboot. Simple reboot without any resets. Sometimes it helps improve work.
- Update settings. Allow or prohibit automatic downloading and updating of firmware. If you don’t mind the Internet and don’t want unofficial firmware, leave it as is.
Huawei E8372h-153 3G-4G modem settings menu
After you have logged into your Huawei modem administrator’s personal account, the first thing you do is go to the “Statistics” page. This displays current information about the Internet traffic used
The next menu item is SMS, from where you can send a message from the number assigned to the SIM card in this Huawei modem
In the USSD section, you can send a request to a short number, for example, to find out the status of the current account balance or change the tariff.
But the largest and most necessary section of Huawei’s personal account is the “Settings” of the modem. First of all, here you can disable the use of the device in roaming.
But the “Profile Management” subsection will be especially needed if your modem is not locked to a specific operator, and all data to connect to it must be entered manually.
By the way, if you bought a modem at a cellular store, but want to change your provider, you don’t need to purchase anything - our article describes in detail how to reflash the modem for use with all SIM cards.
If the device is locked to any operator, then it is impossible to change anything here. If this section is empty, then enter the server and login for authorization on the network - which one for which operator is described in detail in another of our articles about 4G routers, read.
In Network Settings, the default mode is “auto”. This means that the modem itself chooses which frequency to connect to - 2G, 3G or 4G. It would seem that everything is OK, but there is one nuance here: in case of poor reception, it will constantly catch the network and switch, which is why the signal will be unstable. In this case, it is advisable to force it to work in the mode that best catches at your location.
Settings
Attention! The steps below for the initial setup of the modem are performed using the official firmware. For those who are not satisfied with this functionality, go to the next section on upgrading to improved options.
Almost all operators produce this modem under “their” brand - the logo on the cover is different. What they came up with this time and how to unlock it for another operator is not the topic of this section. Here we consider exclusively the official clean version.
First of all, I’ll mention that for well-known operators you don’t have to do the setup at all - just insert a SIM card and connect to the access point. Everything is very simple here, the modem understands everything itself. This section is more for something non-standard or advanced.
Initial setup can be done in two ways - either via USB or via a Wi-Fi network. I won’t particularly consider the second method - just take the data from the sticker under the cover and connect to the existing network, and from there follow the instructions.
Review – external view
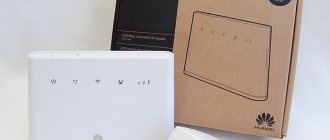
After the purchase, we are happily greeted by a bluish-green package with the name of the modem-router. Personally, I was not impressed with this box:
And rightly so - after extraction everything changes dramatically. A nice plump sample in matte white color is very pleasing to the eye - you can immediately see who the main modem is here. It’s a little thicker than the popular 3372, but the extra weight suits it.
One of the main advantages of the modem is support for its own Wi-Fi access point (up to 10 connected devices). And even the initial setup can be done through it without any restrictions. But no one canceled the functions of the usual “whistle” - they opened the lid and a USB appeared for insertion:
Via USB, according to my tests, everything works fine with separate routers. On my devices, the modem was recognized successfully, and the Internet crawled at a confident speed. I put one of the examples in the settings section, I recommend you pay attention.
More about Huawei: touch screen for Huawei p30 on AliExpress - buy online at a good price
Another important element of the panel is indicators. There are only three of them here, but there is more than enough information (from left to right):
- Network connection. Flashes when connected, lights up if successful. There are three colors: green (2G), blue (3G), cyan (3G and 4G LTE).
- SMS. If there is SMS, it will light up. To read, you can use either the standard customizer or the mobile application (see the settings section).
- Wi-Fi. Lights up when the access point is activated. Enabled by default.
Another interesting, and for some, very important element is two TS9 connectors for connecting external antennas. Such connectors use 3G/4G signal amplifiers, but it is also possible to connect external television antennas through adapters (pigtails) or even car antennas. Moreover, if you have two connectors, connect both, and if you have one, connect the first and don’t worry.
No antennas included! If necessary, you need to purchase it yourself.
Huawei frp unlock with official code
Huawei FRP unlock is an account reset with an official unlock code. FRP lock (Factory Reset Protection) is an anti-theft system on Android phones that works after a Hard Reset (factory reset). After rebooting and connecting to the Internet, the device will request a login and password - the “Google account confirmation” window. If this data is forgotten/lost, it will be impossible to use the device. Below you will find a guide to officially remove Google ByPass FRP account on any Huawei Android devices. ATTENTION!!! We can handle absolutely any Huawei model, regardless of the year of manufacture, any firmware version, any Android version, any bootloader version. Everything is official.
With this service you will receive an original, factory-made Google account reset key (FRP key) for any Huawei model using its IMEI. The factory Google account lock reset key (FRP key) is guaranteed to be suitable for absolutely any factory version of the device software, any version of Android and any security version of the phone, the software of which is not damaged.
The factory lock reset key is suitable for a device with a specific IMEI and can be used repeatedly, throughout the entire period of operation of this Huawei device with original software, to reset Google account locks.
ATTENTION! FRP key is not a password for a Google account, which requests a device locked to FPR.
Important!!! The FRP key is not intended for devices released for the Chinese market, and may not be suitable if the device is reprogrammed into a model for any other region.
PLEASE NOTE: Order verification/cancellation is not available for this service. Take this into account!
So, you forgot your Google account credentials or maybe you just purchased a used Huawei Android device and reset your phone. Be that as it may, the point is that you want to bypass Google FRP on your Huawei Android device and you want to do it quickly. Today in this we will talk about how to bypass Google account FRP on any Huawei devices.
More about Huawei: Huawei flexible smartphone announced
What is needed to unlock a Huawei phone/tablet from a Google account:
a) Your Huawei tablet/phone that you want to unlock. b) USB cable from your gadget. c) A computer with Windows (if you have Windows 10, disable driver digital signature verification, turn off programs that scan the USB port). d) Internet connection on your PC.
1. Turn off the phone, press the sound button down - while holding the “Volume minus” (VOL-) button and without releasing the button, connect the usb cable to the computer. The phone will start into fastboot mode.
2. First, we need to find out the first IMEI or Serial number of the smartphone, if you know it, then go straight to point 3 and skip everything that is written below. If you DO NOT know the IMEI or Serial number, you do not have the phone box and it is not indicated on the case itself, then we need to do this programmatically.
3. Download the latest version of the DC-unlocker program and driver
4. Unzip the archive and run the dc-unlocker2client.exe(1) file from it. Next, in the “Select manufacturer” window, select Huawei phone(2), then press the button with the lens icon. If the phone drivers are installed and your smartphone is in the device manager, then your program will detect the phone, where its model, firmware version, IMEI and Serial number will be indicated. ATTENTION!!! If the program does not display IMEI, then you can also look at it on the SIM card tray.(3).
If the phone is not detected in the DC-unlocker program, then you can use the Multi-Tool for HUAWEI and HONOR program. After connecting, click Fill in and we will see the necessary data. or try this option: Download and install HCU Client. Then we put the device into Fastboot (with the device turned off, hold the volume down and go to the PC) and in the HCU click Read phone info. On the right in the logs, copy SN (Serial Number) 5) Download the program to enter the FRP lock reset code - Erase_Tool_FASTBOOTET01Ver1006. Unzip it to your desktop. And run the file FastbootET01.exe from the folder (1 in the photo below), the program will open – Fastboot Erase Tool. In the Information field the message Device is connected! If this does not happen, then disconnect the USB cable from the phone and connect it again. We double-check if drivers for the device are installed. Download the drivers and install the driver for Huawei and reconnect the device.
6) After receiving the code, enter it into the FRP PWD window of the Fastboot Erase Tool program as shown in step 5 in the photo above. Next, press the FRP Unlock button (4). A couple of seconds and your smartphone will be permanently unlocked from your Google account. After unlocking, you can enter your Google account and fully use your smartphone.
PS It happens that the Fastboot Erase Tool program does not see the phone, or an error occurs when entering the code, in this case you need to use two other methods, which are indicated below.
Important!!! The service provider does not accept complaints about those purchased that turned out to be useless (it is not possible to enter the key, etc.) or for non-working keys. Please consider this before ordering.
Important!!! For phones with 2 SIMs (2 IMEIs), please indicate IMEI 1 (first IMEI) or serial number in the order form.
The code can also be written using other methods. For example:
Input method using FastBoot Unlock program
1. Download the program and unpack it. (If the drivers have not been installed previously, install them)
2. With the phone turned off, press SOUND DOWN and connect the cable, it will boot into FASTBOOT mode (White screen with Android).
3. Enter the received code into the program in the appropriate line and press the “FRP Unlock” button
4. The phone will ask you to confirm unlocking by pressing the sound button.
5. After that, the phone will automatically reboot, wait 1-5 minutes and the unlocking process is over.
Command line input method
1. Launch the command line (Start - Windows Utilities)
2. Run the command fastboot oem frp-unlock the received code
fastboot oem frp-unlock SAR4C19726007135
FRP key purchasing process
1. Write to us the IMEI number of the first slot of your device, or Serial number.
2. Fill out the form carefully and without errors. Pay for the goods (if you pay through an external payment system (marketplace) and after completing the payment you will see a “Return to the seller’s website” button - do not forget to click it), after making the payment, click the “Submit” button.
3. After processing the order, you will receive a code by email, which you must enter using the instructions above.
For those who want to buy an unlock code through the marketplace.
Overview - under the hood
Now let's move on to the interior. Carefully move the lid:
One of the uninteresting things here is the SD card tray (up to 32 GB). You can install a telephone flash drive and use the modem as a card reader. On the darkest day, in peacetime, I personally have not seen anyone using this opportunity.
Just below is the tray for the SIM card. I’ll immediately point out a minus - the tray is exclusively for a standard size SIM card, and in the world of all these “nano” ones, you won’t be able to stuff it there directly from the phone. And there are no adapters included! Fortunately, I had a whole set of these adapters lying around (the manufacturer does not recommend using them), apparently I was waiting for this modem to appear. Immediately pay attention to the correct position, otherwise nothing will work:
Note. A huge advantage of this model is that it accepts SIM cards from absolutely any operator. And most of our operators understand it automatically. The same modem is available in locked versions from specific operators, but it is better to buy from HUAWEI - there will be less hassle if you need to change the SIM card.
Another important element is the RESET hole. It is useful for resetting the modem to factory settings (to cancel all default settings in case of problems with the setup or operation of the modem). To reset, turn on the modem (via USB or an adapter from your phone), press something thin into the hole and hold it until the lights blink.
In continuation of the information on the reset, I will mention that after it all data is overwritten to the factory settings, and the name of the Wi-Fi network and the password for connecting to it correspond to the data on the sticker under the same cover. The same network is available when you turn it on for the first time - you don’t have to worry about settings at all with a known operator, but simply insert a SIM card, turn on the modem and connect directly to the network.
Full name – HUAWEI E8372h-153
And it seems that everything is here. The device is very simple, but functional to the point of indecency. For any application where it is necessary to use the Internet from mobile networks (at home, in the country, in the garage, car or office), this is one of the best solutions. Finally, let me remind you about the connection methods - it works from anything where there is the necessary power (5 V, 1 A) - I don’t recommend anything less, in my experience there were misunderstandings due to this with constant reboots of the Iota modem, so I recommend being a little more responsible with the adapter . Possible application scenarios:
- Via the USB port of a computer or laptop (it will also distribute the Internet via USB).
- Via USB phone charging.
- Through powerbank.
- Through the car radio.
- And a lot more that is not obvious (I saw how they use a TV set-top box just for power supply).
During operation, the modem was slightly heated. And even with complete downtime. But nothing critical - that’s how they should work.
High-speed 4G modem Tele2
If a user needs really fast Internet access, the best choice would be 4G tariffs from Tele2 and the appropriate equipment for connection. The cost of such network access is slightly higher than in the previous case, the equipment is more expensive, but the speeds are completely different. In the basic kit, users are offered a modem model MF823D from ZTE, as well as a SIM card on which the “Internet for devices” tariff plan and the Suitcase option are already connected.
The price for the set is just under 900 rubles, which is not much more than the cost of a similar set for 3G. The connection follows the same scheme - the device is inserted into the USB connector, after which it automatically installs the necessary software and is configured for operating mode. There are no problems with connecting the modem; there is no need to download additional software - everything that is required is already in the device.
The technical characteristics and capabilities of the modem are of greatest interest, such as:
- use of standard SIM cards;
- download data at speeds up to 100 Mbit/s;
- data transfer at speeds up to 50 Mbit/s;
- interaction with all Tele2 networks, starting from 2G.
- Supports all popular PC operating systems.
The reviews left by users highly appreciate the capabilities of this 4G device - using it is much more profitable and technically feasible than 3G. The device can also operate in networks with lower data transfer speeds, and if high-speed Internet is available, it automatically connects to it. The device is adapted to work only with SIM cards from the operator - service provider.
Connection and drivers
Don't forget to insert the SIM card into the modem before setting up!
The connection is simple - we insert our modem into any free USB port. An alert about the connected device and actions on it immediately pops up. But I’ll go the universal route - a “disk” appears on my computer, which I need to “run” (or log into it and run the AutoRun.exe program):
Surprisingly, the driver installation occurs automatically somewhere in the background, and after successful installation, a configuration window immediately opens in the browser. If nothing opens, I recommend entering the modem settings forcibly by clicking on the following link or opening it in the browser yourself:
192.168.8.1
The same address must be opened when connecting and setting up via Wi-Fi - nothing will open there automatically.
Setting up a WiFi network on the Huawei E8372H-153 modem
Unlike the E3372, the Huawei E8372h-153 modem has a separate block of configurations related to setting up a wireless network for distributing the Internet via wifi to other computers, laptops or smartphones.
- In “Basic WiFi settings” you can change the network name (SSID), assign a new password and make the network invisible to other users.
- In “Advanced” you can also change the region and select the optimal WiFi channel.
- “MAC Address Filter” allows you to cut off unwanted clients from the Internet using a unique device identifier.
- In the “WPS” section, the function of automatically connecting to a signal or using a PIN code from other devices is activated.
- Finally, in DHCP, the IP address of the modem is specified, the range of available values for distribution to other computers and the lease time for these addresses.
Control of the “wifi repeater” mode has been placed in a separate section of the menu. If you turn it on, the Huawei modem will be able to choose where to get the Internet from - from another router or from a SIM card. This is convenient if you have connected a modem to your laptop. In order not to waste mobile traffic, if you are in the area of a known Wi-Fi signal, preference will be given to it.
SD card access
And another interesting feature of the Huawei E8372h modem is its support for working with micro SD cards. It, like the SIM card, is installed inside the case. Based on it, you can create a network FTP server and open access to it for all gadgets connected to its WiFi network. This setting is located in the “Sharing” section.
By default, the “USB Only” mode is activated, that is, it is used as a regular flash drive connected to a computer. But if you move the checkbox to “FTP access”, the options described above open up.
You can give permissions only to read files or also to write. Plus select the directory to which you will open access - to the entire memory card or to a separate folder.
These are the basic modem settings, which can be found at https://192.168.8.1 or 192.168.3.1 in your Huawei account. Now you know how to enter and change them.
- How to find out the password for Wi-Fi Iota. We connect and correctly configure the modem from Yota
Firmware
The modem is very popular among the people and has not escaped the attention of the creators of custom firmware. What are they generally used for:
- Remove the binding of an individual operator. But our version is universal for any SIM card.
- Add additional modes - the same repeater, USSD requests and noise signal level.
- Fixing and changing TTL - some mobile operators do not allow you to distribute the Internet from their UNLIMITED tariffs, even for home use. And the main protection here is TTL. We have already written about this in detail on the pages of our website, and you are probably already aware of the problem.
- Change IMEI. Not for any criminal purposes, but even vice versa - after all, by IMEI you can determine the type of current device. The operator sees that a modem is being used and does not allow the use of smartphone tariffs. But if you fake the IMEI on a smartphone, then everything falls into place. Exclusively for good purposes.
More about Huawei: Review of the Huawei Watch GT2 Pro smartwatch. Comparison with Honor Watch GS Pro
And all this is being corrected relatively calmly. The main thing is to act with your head and read everything carefully. Personally, I will not post detailed instructions here - after all, the topic of our portal is slightly broader, so we will simply refer to our colleagues.
The main topic on w3bsit3-dns.com is TYTS
The forum contains up-to-date instructions and firmware even for the latest versions. I don't see the point in duplicating. Let's go and read. For video lovers, I also picked out this:
Advantages of the Huawei E8372 mobile modem
You can use a mobile modem to access the Internet. Among the advantages of the Huawei E8372 USB modem are the following:
- no dependence on your own battery;
- multitasking;
- the ability to connect an external antenna to improve mobile communications;
- no need to install drivers and software;
- a wide choice of operators, since Huawei cooperates with many different operators;
- maximum convenience when traveling, hiking and traveling.
The main purpose of the Huawei E8372 mobile modem is to receive a signal, as well as distribute the Internet. The login and password are located under the cover of the device.
The Huawei E8372 modem is very convenient to use, but not all users know how to set up and connect the modem to a laptop. As a rule, USB modems independently connect to the network after the mobile modem and laptop are connected. In the case of the Huawei E8372 modem, there is no need to install drivers or software, which greatly simplifies the process. It is worth noting that if you buy a mobile modem from any telecom operator, it will not be possible to change the SIM card. In this case, you will have to change the firmware on the device, after which the modem will become available for use by any operator.
Connector for external antenna.
When choosing a modem for a country house, you need to take into account the fact that operator coverage is not good everywhere, and you may need to use an antenna to boost the signal. To be prepared for this, when choosing, it is better to immediately take a modem with a factory connector.
When choosing a modem, please note that the same modem may have a different firmware version. Not all firmware provides complete information about the device, such as signal level, signal / noise, etc. These indicators are very convenient to use when connecting and configuring an external antenna.
Tele2 Internet on a computer via a USB modem
Before you start setting up your personal computer, make sure that your phone:
1. supports GPRS/EDGE technologies. This information can be found in the user manual or on the website of the mobile device manufacturer;
2. configured to work with WAP/MMS/Internet services. For details, see the WAP/MMS/Internet Settings section.
Using the TELE2 USB modem
If you intend to use the TELE2 USB modem to access the Internet, you will not need any additional computer settings. Just install the included software and go online! You can order a USB modem on the website modem.tele2.ru. We recommend that you start getting acquainted with the device by reading the review of the TELE2 USB modem.
Necessary equipment
In addition to a phone that supports one of the GPRS/EDGE technologies and is configured to work with WAP/MMS/Internet services, you will need a personal computer, laptop or PDA. In addition, you may need a cable to connect your phone to your computer.
Step 1. Connect your phone to your computer.
There are three ways to connect a mobile device to a PC:
Method 1. Using a cable for a COM or USB port.
If such a cable was not included with your mobile phone, you can purchase it at a mobile phone and accessories store. When choosing a cable, make sure that it is suitable for connecting your phone model to a computer, and that the cable supports data transfer (some cables are intended only for data synchronization, that is, editing the phone book, downloading and editing pictures and ringtones, and etc.).
Method 2: Connect via infrared port
(IR port).
In this case, your mobile phone and computer must be equipped with infrared ports.
Method 3: Connect via Bluetooth
.
In this case, your mobile phone and computer must be equipped with a Bluetooth receiver and transmitter.
Step 2: Set up your phone as a modem.
After connecting the phone to the computer, you will need to set the phone as a modem. To do this, you will need drivers, which in most cases can be found on the CD included with the phone. If there is no such CD, the necessary programs may be on the website of your phone manufacturer.
Step 3. Setting up a modem phone.
After installing and configuring the software, find the modem installed by the operating system (the name of the phone connected to the PC) and, by right-clicking on its image, select “Properties” from the pop-up menu. Or open the “Control Panel”, select “Phone and Modem”, and in the window that opens, select the “Modems” tab, indicate the installed modem and click “Properties”.
In the modem properties window, select the “Advanced communication parameters” tab and enter an additional initialization command with the name of the access point (Access Point Name, or APN). To access the Internet via the TELE2 network, you must use the initializations: AT+CGDCONT=1,"IP","internet.TELE2.ru".
Step 4: Create a remote telephone connection.
There are 2 options for creating a remote connection:
Option 1. Automatic creation of a remote telephone connection.
Characteristics
Especially for lovers of dry numbers - traditional tabular technical characteristics of the product:
| Type | LTE |
| Standards | GSM, GPRS, EDGE, 3G, HSPA, LTE band 3/7/20 |
| Interface | USB |
| Antenna connectors | TS9 |
| Dimensions | 30-14-94 mm |
| Weight | 40 g |
| Connectable devices | Up to 10 pcs. |
| WiFi | 802.11n |