Build from source
One of the most correct ways is to use the source code published by the Google or Cyanogenmod development teams. But at the same time, this method is the most difficult, because in order to assemble Android firmware from source code, optimize it and make it work on a specific device, you need to have fairly deep programming skills and understand all the intricacies of the mobile operating system and device hardware. This knowledge is not acquired in a day, so in this article we will not describe this method in detail.
Changing an existing file
If you are not too versed in all the intricacies of the OS, but want to change something in your firmware, the best solution would be to tweak a ready-made solution. You can change both the native, built-in firmware, and already changed by someone else. There are a lot of customized firmware on the Internet, and you are unlikely to lack their quantity. So, we present step-by-step instructions for assembling your own firmware based on an existing product.
Editing using a computer
Required Software
We will need a computer, a device, a firmware file and a special program called Android Kitchen (also known as kitchen). The firmware file can be found on specialized forums, the most famous are the English-language XDA Developers and the Russian-language w3bsit3-dns.com. In the section for your device model, you can find links to the most popular and proven firmware, both official stock and unofficial custom ones.
Next you need to install the kitchen on your computer. It is best to work under Linux, but the necessary libraries can also be installed on Windows. In this case, you can get out of the situation by installing Cygwin. Download the archive and follow the step-by-step instructions included in the archive. Before this, you will also need to install the Java Platform (JDK) from the official website (https://www.oracle.com/technetwork/java/javase/downloads/index.html for Windows) or find and download OpenJDK Java 6 in the Ubuntu Application Center Runtime or similar (for Linux). The second use case is to install Linux on a virtual machine and manage the process through it.
Firmware modification
Firmware is most often distributed as a file with the .img extension, less often as a ZIP archive. In both cases, you will need to move the firmware file to the installed kitchen folder so that it can import it and start working with it. Kitchen should be installed to the path c:/cygwin/home/user/ (when installing via Cygwin) or Filesystem/home/user/ (when installing via Linux).
- Start the kitchen via Cygwin or Linux terminal using the command cd kitchen, then ./menu.
- Unpack the archive into the kitchen, as described above.
- After the program menu appears, go to section 0. Advanced Options.
- After this, a list of commands for modifying the firmware will be presented. Choose exactly the one you need. You can add Busy Box, Root, Apps2SD, replace stock applications, various animations, free up device memory and much more.
- After completing the manipulations, run command 99. Build ROM from working folder in the main menu and take the ZIP archive from OUTPUT_ZIP.
Device firmware
You can flash the device either through a computer or without it. In the first case, you need to download the firmware program, usually Flash Tool or Odin, drivers for your device model and prepare an already corrected archive.
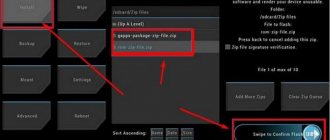
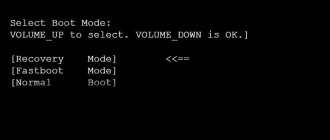
When flashing firmware via Recovery, you will need to copy the file to the root of the memory card, boot the device in Recovery mode, format the device and cache, and then install the firmware from the archive. After the reboot, you will have the firmware that you personally modified.
Toolkit for working with firmware - Creating and editing Android firmware
Is it worth unpacking the firmware?
Unpacking the firmware is a complex process that requires time and appropriate skills, but is very relevant and useful.
By unpacking, the user can make adjustments to the operation of various elements of the installed software, thereby eliminating the possibility of errors, freezes and many other unpleasant moments without flashing or replacing the software.
When you think about the question of whether you need to unpack the Android firmware, you will probably find a couple of additional advantages. You can extract apk files from the unpacked firmware or integrate installers for other programs.
Preparing for firmware
Without a backup copy - nowhere! It will be useful to us in case of unsuccessful firmware to restore the device’s functionality. Let's go: So, the backup has been created. To restore it, go to the installed CWM recovery application, tap on the “Backups” item and select the recently created one there.
You should also save as a backup copy all data that may be erased during the firmware update of the device - contacts, photos, etc.:
To restore data from a backup copy, use the nearby “Restore” button - that is, “Recovery”. You will only need to indicate the path to the previously created backup and confirm its installation. As you can see, absolutely nothing complicated.
Unpacking Android firmware in ZIP format
Any ZIP folders are unpacked with a familiar archiver, such as WinZip. Moreover, the unpacking process takes only a few minutes, since the volume of compressed files does not exceed 500 MB. You can download and install the program on any computer.
To unpack Android firmware, you need to find the archive on your PC, right-click on it, select unpack and specify the directory to transfer all files. When deciding how to unpack Android ZIP firmware or any other archive in this format, you can use archivers such as WinRAR, 7-Zip, PeaZip or IZArc.
Finding and installing the software required for firmware
It's no secret that different device manufacturers require different drivers. Fortunately, they can also be downloaded on the Internet. For example, you have a smartphone from Samsung - drivers for its subsequent firmware can be found on the official website.
There is an alternative option without searching for drivers - simply connect the phone to the computer, after which the operating system will independently select and download them (applies to owners of Windows 7 and newer versions of window operating systems). The next task is to download the firmware itself. The most popular Russian-language resource with official and custom firmware is 4pda.ru.
Go to the forum, look for your device and firmware there. Choose the one that is most interesting to you and download it to your computer.
Then you need to assign Superuser rights to the program, that is, give Root access. How exactly to provide it, see our previously written article.
Now we return to the already familiar website 4pda.ru, or more precisely, to its forum and download the CWM-recovery file for your gadget (it is important that it is specifically for your device, otherwise you risk turning it into a “brick”).
We write a zip archive with the firmware and Recovery downloaded earlier into the device’s memory, or better yet, onto an SD card.
We return again to the installed Mobileuncle MTK Tools program, launch it and it will automatically find CWM-recovery on the smartphone. You will only need to confirm the update process by pressing the “OK” button.
Unpacking IMG firmware
A popular extension for archives with installation files and other firmware data is .img. This is a special subtype of archives that cannot be disassembled into its components using conventional methods.
If you don’t know how to open Android IMG firmware on Huawei, you will need to perform a number of specific steps and download additional software. To work with this type of firmware, you will need the EXT4 Unpacker and EXT2 Explore utilities. After downloading them, you can begin the process of extracting files, which follows this scheme:
Editing on device
The simplest way of all. No additional devices or manipulations are needed. All you need is a rooted device, an application for creating backup copies (Nandroid backup is best) and a file manager with the function of changing the system partition.
Changing your own firmware
- If your device is not yet rooted, get it. You can read how to do this on specialized forums in the section dedicated specifically to your device. The fact is that universal methods are supported by a small number of devices and most of them have an individual procedure.
- Install Nandro >
- Install a file manager that works with the system partition to remove unnecessary software and add your own applications. The gold standard is Titanium Backup.
- Select the apps you want to remove and remove them through the file manager.
- Install the applications you want to replace the deleted ones with, and use Titanium Backup to make them system applications.
- Reboot your device and enjoy your progress.
Changing third-party firmware in a ZIP archive
- Download the firmware file you are interested in in .zip format.
- Install a file manager that can work with archives, for example, ES Explorer or Total Commander, and unpack the contents of the archive.
- Remove unnecessary or add missing applications, then pack the archive back and move it to the root of the flash card.
- With help from Nandro >
Structure of a ZIP file with firmware
After downloading, unpack the archive using any archiver. Inside there will be the following set of files and folders:
- META-INF - a folder with meta-information about the firmware (author's certificate, manifest with a list of files, their checksums), an update script (updater-script) and an installer (update-binary), which executes script commands for mounting partitions, copying files and others actions with NAND memory;
- boot.img - an image with a kernel and a RAM disk (it is flashed into the boot partition);
- system.new.dat - this, roughly speaking, is the firmware itself, or rather an image of the system partition containing the Andro operating system >
Contents of LineageOS Firmware ZIP File for Nexus 5
Xakep #246. Study, study, study!
Preparation. Disabling advertising
Theory is, of course, good, but why is it needed if we don’t know what to do with the unpacked package? Let's try to apply the theory to our benefit, namely, modify some software so that it does not show us advertising. For example, let it be Virtual Torch - a virtual torch. This software is ideal for us, because it is filled to capacity with annoying advertising and, moreover, is simple enough not to get lost in the jungle of code.
So, using one of the above methods, download the application from the market. If you decide to use Virtuous Ten Studio, simply open the APK file in the application and unzip it, create a project (File -> New project), then select Import File in the project context menu. If your choice fell on apktool, then just run one command:
$ apktool d com.kauf.particle.virtualtorch.apk
After this, a file tree similar to that described in the previous section will appear in the com.kauf.particle.virtualtorch directory, but with an additional smali directory instead of dex files and an apktool.yml file. The first contains disassembled code of the application's executable dex file, the second contains service information necessary for apktool to assemble the package back.
The first place we should look is, of course, AndroidManifest.xml. And here we immediately encounter the following line:
It is not difficult to guess that it is responsible for granting the application permissions to use the Internet connection. In fact, if we just want to get rid of advertising, we will most likely just need to block the application from the Internet. Let's try to do this. We delete the specified line and try to build the software using apktool:
$ apktool b com.kauf.particle.virtualtorch
The resulting APK file will appear in the com.kauf.particle.virtualtorch/build/ directory. However, it will not be possible to install it, since it does not have a digital signature and file checksums (it simply does not have a META-INF/ directory). We must sign the package using the apk-signer utility. Launched. The interface consists of two tabs - on the first (Key Generator) we create keys, on the second (APK Signer) we sign. To create our private key, fill in the following fields:
- Target File
- keystore output file; it usually stores one pair of keys; - Password
and
Confirm
- password for the storage; - Alias
— name of the key in the storage; - Alias password
and
Confirm
- secret key password; - Validity
—validity period (in years). The default value is optimal.
The remaining fields are, in general, optional - but you must fill in at least one.
Unpack system.new.dat
The files system.new.dat and system.transfer.list are of greatest interest to us. More precisely, not they, but the system contained in them. But getting to it is not so easy.
Script
The laziest can disassemble the firmware using the System_Extractor-Linux script.
- Unpack the archive with the firmware into any folder.
- Download the script from the link and unzip it into any folder.
- We launch the ext file (if it complains about the lack of Java, just skip by pressing y; Java is only needed for packaging).
- Now select unpacking by pressing button 1 and then Enter.
- A new folder named extract_* will appear next to the ext file and the tools folder. Copy the files system.new.dat and system.transfer.list into it.
- After copying the files, press Enter and wait. After a while, you will need to press Enter again, enter the administrator password and press Enter again.
- Ready. The contents of system are in the extract_*/output folder.
Script for unpacking system.new.dat in Linux
Manual method
Unpack the archive with the firmware into any folder (for example, rom):
Download the tools we need into this folder:
It converts the system.new.dat file into a raw image called system.img . Mount the image to the mnt subfolder:
System image contents
Patching Android firmware in 5 minutes
Task
It all started with the fact that I wanted to install the GTA San Andreas game on the Digma Optima 7.61 tablet. Unfortunately, the tablet's virtual SD card has a capacity of less than 1 GB, and the game cache weighs about 2-3 GB. The tablet has Android 4.4.2 installed and there is no option to simply change the memory by default. It also lacks the /etc/vold.fstab file (it is present on older versions of Android, and by changing this file with root rights, you can swap the virtual and real memory cards).
Required Tools
1. Computer or laptop with Linux OS. 2. Adb and fastboot utilities (part of the Android SDK, and, as tmnhy noted, are included in the repositories as separate packages). 3. A set of utilities bootimg_tools (found here).
Solution
Extracting the boot image from the device
— We connect the device to the computer via a USB cable and go to the shell of the device: adb shell — Somewhere in the /dev/block
on the device you need to find a file called
boot
.
For me it was located on the path /dev/block/by-name/boot
, but this path may vary on different devices.
— Extract the boot image: dd if=/dev/block/path/to/boot of=/mnt/sdcard/boot-from-device.img — Exit the shell (exit) and extract the image: adb pull /mnt/ sdcard/boot-from-device.img
Then the boot image needs to be disassembled
— Download and unpack bootimg_tools.
— Add bootimg_tools to PATH:
export PATH=$PATH:/path/to/bootimg_tools — Unpack the image: unpack boot-from-device.img — If all the previous steps are done correctly, then the
boot-from-device
.
Inside it should be the files zImage
and
ramdisk.cpio.gz
, as well as the
ramdisk
. Just inside the latter lies the contents of the boot image, which we will patch.
Let's patch
To solve my problem, I found the line that needs to be replaced in the init.sun8i.rc file. I simply replaced export EXTERNAL_STORAGE /mnt/sdcard
with
export EXTERNAL_STORAGE /mnt/extsd
.
As I understand it, this is exactly the value that the Environment method returns.
getExternalStorageDirectory() in Android API. This assumption is supported by the fact that after applying the patch, applications began to use a hardware memory card instead of a virtual one to store their data.
Replacing the boot image on the device
I wrote a small script for these purposes: repack_ramdisk boot-from-device/ramdisk mkbootimg —kernel boot-from-device/zImage —ramdisk boot-from-device/new-ramdisk.cpio.gz —base 0x40000000 —cmdline 'console=ttyS0 ,115200 rw init=/init loglevel=4' -o new_boot.img sudo adb reboot-bootloader sudo fastboot flash boot new_boot.img sudo fastboot reboot
Results
After these manipulations, the game started working successfully on the tablet.
PS
You do all of the above with your device only at your own peril and risk. The author is not responsible for turning your device into a brick.
Android Directory Structure
After unpacking system, the following directory structure will appear:
- app - pre-installed applications with standard privileges;
- priv-app - pre-installed applications with elevated privileges, including some system components;
- bin - ELF binary files, analogous to the /bin and /usr/bin directories in Linux. Contains various system components used by higher-level system components;
- etc - settings files. A complete analogue of /etc in Linux, used, however, only by those same system components. Android applications store individual settings in the /data/data/ directories;
- fonts - fonts. By default, it contains only Roboto branded fonts;
- framework - libraries of Java classes used by the system and applications. There is also a file framework-res.apk containing a complete description of the operating system interface, including all graphic files;
- lib and lib64 are Linux libraries used by low-level system components. An analogue of the /lib and /usr/lib directories in Linux, including standard libraries such as libc, libz, libssl. On devices with ARMv7 architecture and lower, the lib64 directory will be missing;
- media - media files: ringtones, notification sounds, interface sounds and OS boot animation;
- tts - files needed by the speech synthesizer;
- usr is a directory that typically contains files needed to run applications from the bin directory. Essentially an analogue of /usr/share ;
- vendor - files supplied by the device manufacturer. Usually contains binary firmware for various hardware components, for example a Wi-Fi module;
- xbin - optional directory; custom firmwares use it to store things like the bash interpreter, SSH, PowerTOP, BusyBox, and other useful tools;
- build.prop - a file containing information about the assembly, as well as various low-level settings;
- addon.d - contains scripts that are launched after installing the firmware. GApps also write their script here, thanks to which they are revived after reinstalling the firmware.
Now that we're familiar with the basic structure of Android, let's start making changes.
Arrangement of APK packages and receiving them
An Android app package is essentially a regular ZIP file that doesn't require any special tools to view its contents or extract it. It is enough to have an archiver - 7zip for Windows or console unzip on Linux. But that's about the wrapper. What's inside? In general, we have the following structure inside:
- META-INF/
- contains the digital certificate of the application, identifying its creator, and checksums of the package files; - res/ - various resources that the application uses in its work, such as images, declarative description of the interface, as well as other data;
- AndroidManifest.xml
- description of the application. This includes, for example, a list of required permissions, the required Android version and the required screen resolution; - classes.dex
- compiled application bytecode for the Dalvik virtual machine; - resources.arsc
are also resources, but of a different kind - in particular, strings (yes, this file can be used for Russification!).
The listed files and directories are, if not in all, then, perhaps, in the vast majority of APKs. However, there are a few more not so common files/directories worth mentioning:
- assets
are an analogue of resources. The main difference is that to access a resource you need to know its identifier, but the list of assets can be obtained dynamically using the AssetManager.list() method in the application code; - lib
- native Linux libraries written using NDK (Native Development Kit).
This directory is used by game producers who place their game engines written in C/C++ there, as well as by creators of high-performance applications (for example, Google Chrome). We figured out the device. But how do you get the package file of the application you are interested in? Since it is not possible to pick up APK files from the device without root (they are located in the /data/app directory), and rooting is not always advisable, there are at least three ways to get the application file to your computer:
- APK Downloader extension for Chrome;
- Real APK Leecher app;
- various file hosting and Varezniks.
Which one to use is a matter of taste; we prefer to use separate applications, so we will describe the use of Real APK Leecher, especially since it is written in Java and, accordingly, will work in either Windows or Nix.
After starting the program, you need to fill in three fields: Email, Password and Device ID - and select a language. The first two are the email and password of your Google account that you use on the device. The third is the device identifier, and can be obtained by typing the code on the dialer #
#8255#
#
and then finding the Device ID line. When filling out, you only need to enter the ID without the android- prefix.
After filling out and saving, the message “Error while connecting to server” often pops up. It has nothing to do with Google Play, so feel free to ignore it and look for packages that interest you.
Removing and adding applications
All pre-installed programs can be found in two folders:
They differ from each other in access privileges. If programs from the app have the same permissions as third-party programs (for example, installed from the Play Store), then applications from the priv-app can use privileged APIs (privileged rights). You can learn more about this from our article.
To preinstall an application into the firmware, simply drop its APK file into /system/app/ . You can, of course, create a separate folder, but in our case this makes no sense, because the folder is used to store libraries and odex files, which we simply do not have. To remove it, simply delete the folder with it.
You can go further and replace stock applications with analogues. For example, to replace the calendar, delete the Calendar folder and copy our favorite com.rpagyc.simplecalendar.apk to /system/app. And you don’t have to copy it. Then the firmware will be without a calendar.
The main thing to remember is that stock programs can be related to each other. Therefore, deleting one program may well lead to the complete inoperability of another (for example, CalendarProvider and Calendar: by deleting the first, you will make not only the stock calendar inoperable, but also any other calendar). Fortunately, in pure AOSP firmware there are not many interconnections.
Modification of stock firmware for Android. Part 1
Hello Habr! Several years ago, when I was first introduced to Android, I heard from a work colleague that Android provides the ability to install modified or homemade firmware. Frankly, I was far from it then. And even half a year ago I was barely interested in such things. Deep in my heart, I was sure that what the manufacturer was doing was already intended for normal use.
Imagine my disappointment when I purchased a phone from China, where the factory settings prohibited the use of Google, Skype, Facebook and other applications. In principle, it was possible to turn a blind eye to some things, but when my phone did not require the use of a Google account, I made promises to definitely figure it out no matter what happened to me.
Half a year has passed and my custom firmware is being successfully used all over the world.
This series of articles will discuss how to do reverse programming for Android, implement patches, tweaks and mods.
Preamble
So!
Let's first define the concepts that will be used in this article. Your usual understanding, however, may be very different. Patch
— changing or replacing existing program code in order to modify the program algorithm.
A mod
is usually the addition of additional functionality to existing program code without changing the algorithm.
Tweak
is an improvement in the functionality of a program to make it easier to access system parameters.
I also want to note that all examples will be taken for an HTC phone, but this does not mean that this information cannot be used on other phones.
Please note that I, as the author, am not responsible for any possible loss of data on your phone as a result of using the information below.
Preparing the environment
I can do without detailed instructions on how to use this or that software. If you are interested in this article and have read this far, then I hope that you are already an experienced user and have experience using, or at least experimenting in, this area. There are plenty of instructions, articles and test results in the public domain, just like on Habré. I will also do without describing some terms, otherwise the article will turn out to be very long and tedious. We will write only to the point. I'm sure you've been on Wednesday for a long time. If not, then I suggest downloading and installing it.
1
.
Android SDK
.
This is an application development environment for Android. In order to make modifications, we will definitely have to check our program code. The development environment is the best we can use. 2
.
Android Kitchen
.
This utility will allow you to work with images of system partitions of official or unofficial firmware. 3
.
JD-GUI
.
Java code decompiler. I would like to note right away that this is the best decompiler in terms of ease of use. 4
.
DJ Java Decompiler
.
Another decompiler, or disassembler, as some like to call it, of Java language program code. It is not convenient to use, but it parses code that JD-GUI sometimes does not understand. 5
.
smali
.
Another disassembler, but this time dalvik code. smali is needed for disassembling, and backsmali is needed for assembling code. 6
.
dex2jar
. A utility for converting Dalvik code executable files.
Firmware conversion
Of course, the firmware that you have on your phone from the manufacturer is optimized to reduce power consumption.
In order for the firmware to be modified, it must be converted into a format that allows the code to be modified. Android Kitchen is used for this. Of course, you can do it with your hands, as I did before until I found this very “kitchen”. You can read on the Internet how to remove the system area from the phone, install the environment, and make DEODEX firmware. If you don't understand anything already, I think it's worth holding off on reading this article until you gain enough experience. After the firmware has changed from an optimized version (ODEX - optimized dalvik executable code, if my memory serves me correctly) to DEODEX (that is, NOT optimized), all executable files are ready for modification.
Direct modifications
Creating patches
As I already said, my phone was initially banned from using Google. Well, no matter what, you can’t go to the Playstore, you can’t set up an account, the phone book doesn’t really sync. Why do you need such an Android? After digging for a long time into the logcat of the device itself, I found entries that said that the use of Google is prohibited. The most inconvenient thing about Android is that you see the log, but you don’t know which system application is producing it. To find where my legs were coming from, I had to gut all system applications to disassembled Java code. It took a lot of time, but I still use the work I did when analyzing and finding the right code. The stages of obtaining such tools are as follows: 1
.
Make DEODEX of all firmware 2
.
Your new DEODEX firmware will need to be assembled and flashed onto your phone. How this is done is the topic of another article. 3
.
From each file located in /system/framework, extract the classes.dex file and convert it to JAR using dex2jar. 4
.
Open each resulting JAR in JD-GUI and re-save it into source code 5
. Unpack the source code from the archive.
In the end, I ended up with as many folders as there were JAR files in /system/framework, and each folder had a Java source code structure. Through simple manipulations, I quickly found the place that generated entries in logcat.
We will not consider the entire logic of the ban, since each case is a separate story. I had to spend a couple of hours before I found where the checks were made, built a block diagram of the algorithm in my head and understood where to go in order to perform the algorithm.
It turned out to be simple. There is a subroutine that, based on pre-established constants, when contacted, answered whether the phone belongs to China or not.
The code was in the HTCExtension.jar
, and the class that contained this routine was located in
\com\htc\util\contacts\BuildUtils$Customization.java
Unpacking and analysis of the original file
1
.
First, we need to take the original DEODEX JAR file, which is responsible for the part of the code we need. In our case HTCExtension.jar
.
2
.
3
from there .
Use the dex2jar converter to convert it to a JAR file. Command: dex2jar.bat classes.dex 4
.
Open the resulting classes_dex2jar.jar file in JD-GUI. 5
.
Yes, most often JD-GUI decompiles the code not as it looks in the original, it is understandable, but it is quite readable. In the source code we see that the subroutine checks the project parameters and the firmware language flag. In our unfortunate case, TRUE is returned. public static boolean isChina() { if ((HtcBuildFlag.Htc_PROJECT_flag == 216) || (HtcBuildFlag.Htc_PROJECT_flag == 218) || (HtcBuildFlag.Htc_PROJECT_flag == 23)); while (((HtcBuildFlag.Htc_PROJECT_flag == 1) && (2 == HtcBuildFlag.Htc_LANGUAGE_flag)) || (HtcBuildFlag.Htc_PROJECT_flag == 27)) return true; return false; } 6
.
To make a patch, we need to disassemble the Dalvik code itself. For this we use baksmali. The most convenient way is to create a separate folder and put three files there together: HTCExtension.jar
,
smali.jar
and
baksmali.jar
. Give the command java -Xmx512m -jar baksmali.jar -a -d -o HTCExtension -x HTCExtension.jar
is the API for your version of Android. For JB - this is 16 - the folder where all the firmware frameworks are located.
In my case it was the command java -Xmx512m -jar baksmali.jar -a 16 -d S:\dev\Android\Android-Kitchen\WORKING_JB_15\system\framework -o HTCExtension -x HTCExtension.jar
7
.
In our newly created folder, the HTCExtension folder appeared, and in it our files with Dalvik code. 8
.
Find the file along the path \com\htc\util\contacts\BuildUtils$Customization.java
and look at the code: .method public static isChina()Z .registers 3 .prologue const/4 v0, 0x1 .line 276 sget-short v1, Lcom /htc/htcjavaflag/HtcBuildFlag;->Htc_PROJECT_flag:S const/16 v2, 0xd8 if-eq v1, v2, :cond_13 sget-short v1, Lcom/htc/htcjavaflag/HtcBuildFlag;->Htc_PROJECT_flag:S const/16 v2, 0xda if-eq v1, v2, :cond_13 sget-short v1, Lcom/htc/htcjavaflag/HtcBuildFlag;->Htc_PROJECT_flag:S const/16 v2, 0x17 if-ne v1, v2, :cond_14 .line 297 :cond_13 :goto_13 return v0 .line 283 :cond_14 sget-short v1, Lcom/htc/htcjavaflag/HtcBuildFlag;->Htc_PROJECT_flag:S if-ne v1, v0, :cond_1d .line 285 const/4 v1, 0x2 sget-short v2, Lcom/ htc/htcjavaflag/HtcBuildFlag;->Htc_LANGUAGE_flag:S if-eq v1, v2, :cond_13 .line 291 :cond_1d sget-short v1, Lcom/htc/htcjavaflag/HtcBuildFlag;->Htc_PROJECT_flag:S const/16 v2, 0x1b if -eq v1, v2, :cond_13 .line 297 const/4 v0, 0x0 goto :goto_13 .end method
9
.
Scary, isn't it? Nothing is clear. But this is a fixable issue. Having created a few of your own patches and thus gained experience, you can easily modify the code without third-party tools. In our case, in this code .prologue const/4 v0, 0x1 the variable v0 is assigned the value 1, that is, TRUE. Then there are all sorts of checks, and if the phone is not Chinese, then the value of the variable changes: .line 297 const/4 v0, 0x0 goto :goto_13 10
.
The easiest way to save the father of Russian democracy is to change the code to the following: .prologue const/4 v0, 0x0 , that is, change the value of the variable from 1 to 0. That is, no matter what, the value FALSE would always be returned in JD-GUI the code would look like public static boolean isChina() { if ((HtcBuildFlag.Htc_PROJECT_flag == 216) || (HtcBuildFlag.Htc_PROJECT_flag == 218) || (HtcBuildFlag.Htc_PROJECT_flag == 23)); while (((HtcBuildFlag.Htc_PROJECT_flag == 1) && (2 == HtcBuildFlag.Htc_LANGUAGE_flag)) || (HtcBuildFlag.Htc_PROJECT_flag == 27)) return false; return false; } eleven
.
Yes, the method will work. But we are not looking for easy ways - this is it. Secondly, it’s not exactly beautiful. I would like code something like public static boolean isChina() { return false; } 12
. How can we get the Dalvik code for this source code? For beginners we will do a little trick.
Creating Dalvik code
1
.
Open Android SDK. 2
.
We create a new project, and in our only test class we write the following code package ru.habrahabr.test; public class test { public static boolean isChina() { return false; } } 3
.
We compile our project and then take the assembled application from the workspace. 4
.
We put the assembled application in the folder where we gutted the JAR file. 5
.
Give the command java -Xmx512m -jar baksmali.jar -a -d -o test -x test .apk 6
.
We disassembled the newly built application into Dalvik code. 7
.
We open our file test.smali and see the code there .method public static isChina()Z .registers 1 .prologue .line 7 const/4 v0, 0x0 return v0 .end method 8
. That's it, the patching code is ready.
Rolling a patch
1
.
Dalvik code is littered with markers indicating a line of code in the original source file. This is necessary when displaying errors, if any, in your program. The code also works fine without specifying lines. 2
.
We delete the lines with line numbering, copy and replace the method (subroutine) in our \com\htc\util\contacts\BuildUtils$Customization.java
file.
.method public static isChina()Z .registers 1 .prologue const/4 v0, 0x0 return v0 .end method 3
. Save the file. Yes, I forgot to say, you need a normal editor, for example Notepad++ or EditPlus. Who likes which one?
Compiling and building a patched JAR file
1
.
Using backsmali, we gutted our JAR file, and now we need to put it back together. 2
.
Give the command java -Xmx512m -jar smali.jar -a 16 HTCExtension -o classes.dex 3
.
4
appears in our folder .
Open the HTCExtension.jar
file again with the archiver and replace the existing
classes.dex
with our newly created one.
5
.
That's it, our HTCExtension.jar
contains modified program code.
Replacing the original file with a patched one
Usually, special scripts are created for ordinary users, which are replaced via recovery. But we are not interested in this. Firstly, it’s long and tedious, and secondly, we are experienced users and can afford some subtleties.
1
.
You can replace the current working file with the following commands if you already have DEODEX firmware and have root access: adb push HTCExtension.jar /sdcard/HTCExtension.jar adb shell su mount -o remount -rw /system dd if=/system/framework/ HTCExtension.jar of=/system/framework/HTCExtension.jar.back dd if=/sdcard/HTCExtension.jar of=/system/framework/HTCExtension.jar chmod 644 /system/framework/HTCExtension.jar rm /data/dalvik- cache/ [email protected] @ [email protected] reboot
1st command uploads the patched file to the flash drive 2nd command opens the shell 3rd command gives root access 4th command mounts the system in read/write mode 5th command does backup file The 6th command overwrites the existing file with the new patched one. The 7th command configures permissions. The 8th command deletes the cache. The 9th command reboots the device.
2
.
Thank you for reading to this point, there is little left. 3
.
After a reboot, your new patched code will take effect. 4
.
If the code does not work or an error occurs, then using simple combinations you can return the backup copy. adb shell su mount -o remount -rw /system dd if=/system/framework/HTCExtension.jar.back of=/system/framework/HTCExtension.jar rm /data/dalvik-cache/ [ email protected] @ [email protected ] reboot
Epilogue
Yes, some thought this article was too specific, some found it difficult to understand, and some found it useless.
I deliberately avoided in-depth detail and illustrations of how it all looks live and in practice. Firstly, this work will be thankless and will only give rise to even more questions. Secondly, I don’t want to see an army of users on forums complaining that they killed their phone. For the next article I will tell you how to make Tweeks. There will be an example of using automatic recording of phone calls using native phone tools. Thank you for your attention.
PS If something is not clear or confusing, ask questions - I will always be happy to answer and explain.
Changing the loading animation
The animation is stored as PNG images, packed into the archive /system/media/bootanimation.zip without compression. Inside the archive there are:
- desc.txt - file describing the animation;
- part0 - folder with animation files that are played first;
- part1 - folder with animation files that are played second;
- .
- part? — the outermost folder, the images from which are played back at the end.
The desc.txt file might contain something like
The purpose of these lines is intuitive: 1920 × 1080 is the image resolution, 60 is the number of frames per second. Part0 and part1 indicate the folders from which the animation will be played and the playback sequence. In general, there can be either one part or several (three or more).
Images located in the part folders are numbered with five numbers in playback order: 00000.png, 00001.png, 00002.png. These images can be replaced with your own, thereby creating an original animation. Or you can simply delete the bootanimation.zip file. Then the device will show animation from standard Android. Or use a ready-made collection of animations on w3bsit3-dns.com.
Four parts in bootanimation.zip for LineageOS
Changing the sound design
In fact, all the sounds that the system plays are stored in the /system/media/audio folder. Inside it you will find the following folders:
- alarms — alarm ringtones;
- notifications - notification sounds;
- ringtones - ringtones;
- ui - system sounds, for example, low battery, camera focusing, selection of interface elements.
In alarms, notifications, ringtones you can add as many melodies as you like. You can take them, for example, here:
And a little life hack: deleting files from the ui folder will not lead to crashes and errors, but to the disappearance of system sounds. Therefore, you can easily turn off the sound of taking a picture from the camera, taking a screenshot, simply by erasing the files containing these sounds (their names are intuitive).
Changing system settings (build.prop)
The system image contains an interesting build.prop file containing a lot of useful information about the device hardware and default settings for various stock applications. To be fair, I note that this is not always the case. For example, in Gigaset ME and ME Pro build.prop is divided into two parts. One part contains settings for Gigaset ME, and for ME Pro some lines are duplicated, but the keys (smartphone name, etc.) are different. This was done to ensure more or less correct operation of the same firmware on different devices.
Additional file for Gigaset ME and ME Pro
Build.prop contains (or can contain) a huge number of settings. Some of them do not change anything, some improve one thing at the expense of another, but there are those that are really useful:
- ro.product.model and ro.product.manufacturer - smartphone model and manufacturer name. By replacing these lines, you can make the Play Store think that you have a different smartphone, which will open access to more software. For any little-known Chinese smartphones, these lines can be life-saving;
- hw.qemu.mainkeys - accepts only two values: 0 - show on-screen navigation keys, 1 - do not show buttons. The absence of a line corresponds to 0;
- debug.sf.nobootanimation - value 1 disables the boot animation, which slightly increases its speed. Setting it to 0 or deleting the line returns the animation to its place;
- ro.telephony.default_network - tells the system what mode the mobile network should be switched to upon boot;
- ro.sf.lcd_density - display DPI, the most accurate value for the display can be calculated through a convenient website. But no one forbids you to set a higher or lower value to your liking: higher values make the interface elements larger, lower values make the interface elements smaller;
- ro.config.vc_call_vol_steps — number of volume steps during a call (default 8);
- ro.config.media_vol_steps - number of media volume steps (default 15).
We implement Google Apps in the firmware
Almost always, custom firmware is delivered without Google services and the application store. The developers suggest that we install them separately using the GApps package. However, it can be integrated directly into the firmware.
First you need to download the GApps package. I recommend taking the Open GApps archives. You select the Android version, processor architecture and configuration option (Pico, Nano, Stock.), which determines how many different Google applications the archive contains. I recommend downloading the Pico version. It contains only the Play Store and a set of libraries necessary for its operation.
Integrating GApps into the firmware is done like this:
- Unpack the GApps ZIP archive using any archiver.
- Go to the Core folder.
- We see many archives with the extension .tar.lz. Extract using lzip.
- After unpacking, copy the files from the folders to the corresponding folders in the system. It’s easy to guess what to throw where from the directory structure in the archive. For example, configupdater (from the screenshot) needs to be placed in the priv-app folder.
- Go to the GApps folder (located next to Core) and follow steps 3 and 4 for the files in it.
- That's it, we have integrated GApps into our firmware!
Directory structure configupdater-all.tar.lz
How to open Android firmware to change it later
Frequent system freezes and other errors are the result of incorrect software operation. Problematic programs can be easily removed. But what to do with installed software that is not removed from the system? In such cases, the device must be flashed to a more stable version or you need to make changes to the OS yourself. In this post, you will learn how to open Android firmware so that you can change it later.
What is firmware
Firmware is an operating system that connects the entire technical potential of a gadget into a single chain and provides the user with optimal operational capabilities. This software is the basis of all modern multifunctional devices.
On the vastness of the global network you can find an impressive number of official and custom firmware that open up additional opportunities.
Is it worth unpacking the firmware?
Unpacking the firmware is a complex process that requires time and appropriate skills, but is very relevant and useful.
By unpacking, the user can make adjustments to the operation of various elements of the installed software, thereby eliminating the possibility of errors, freezes and many other unpleasant moments without flashing or replacing the software.
When you think about the question of whether you need to unpack the Android firmware, you will probably find a couple of additional advantages. You can extract apk files from the unpacked firmware or integrate installers for other programs.
Unpacking QSB and INB firmware
Firmware with the extension .qsb and .inb are the prerogative of Lenovo devices. Unpacking them does not take much time and is carried out using just one LenovoWinTools utility.
This program has intuitive controls and provides a lot of additional features. In addition to unpacking the firmware, it allows you to quickly reassemble the firmware with already modified files, promote comfortable work with the context menu, and assemble several parts of files into one.
To work with firmware through the LenovoWinTools editor, just install the Russified program, go to the “File” item and use the available tools to select your firmware. Next, you will need to wait, and then you will be able to operate the firmware files directly from the program.
Free place
It is necessary to understand that the space for installing firmware is limited. You cannot install firmware whose size exceeds the size of the system partition of the device. You can view its value using ADB:
Information about the system partition
Second option: put a terminal on the device and type the command
You can find out the partition size in bytes by installing BusyBox on your smartphone and running the command in the terminal
Or the same with ADB:
The space occupied by the firmware will be approximately equal to the size of the system when unpacked. In general, when creating firmware, it is necessary to take into account that the user can also flash various modifications on top of it (SuperSU, Xposed) or transfer applications to the system section. For example, Google's minimum application package (Pico) requires a minimum of 150 MB of additional installation space.
If necessary, the size of the firmware file can be reduced by removing not only unnecessary programs from /system/app ( /system/priv-app ) and call sounds from system/media/audio and bootanimation.zip , but also:
- /system/tts/lang_pico - languages of the primitive voice engine Pico TTS, Google voice engine will not be affected;
- /system/usr/srec/config/ - offline languages. You can download it online later if needed.
Installing Android IMG Repack Tools on your computer
Since the Android OS is based on the Linux kernel, it would still be more correct to work with the Android IMG Repack Tools utility from an operating system based on Linux.
Recommended OS for installation:
OS pre-configuration for Android IMG Repack Tools
If you have Ubuntu version 14.04 and older (and Mint based on it), then you will need to install GCC 5 from the repository (open a terminal and type the following commands):
sudo add-apt-repository ppa:ubuntu-toolchain-r/test
sudo apt-get update
sudo apt-get install gcc-5 g++-5
sudo update-alternatives –install /usr/bin/gcc gcc /usr/bin/gcc-5 60 –slave /usr/bin/g++ g++ /usr/bin/g++-5
For users of Ubuntu 16.04 (and Mint based on it), then you need to install first:
1. GNU Automake 1.14 (download and unpack)
2. Go to the folder with Gnu Automake, open a terminal and execute the commands one by one: ./configure make sudo make install
3. Install packages: sudo apt-get install git-core gnupg flex bison gperf libsdl-dev libesd0-dev build-essential zip curl libncurses5-dev zlib1g-dev valgrind libreadline6-dev gcc-multilib g++-multilib libc6-dev x11proto-core -dev libx11-dev libz-dev gawk texinfo automake libtool cvs libsdl-dev
Setting up Android IMG Repack Tools
1. After downloading Android IMG Repack Tools, unpack, go, open terminal
2. Type the command to launch the utility ./main_menu
If you have Mint installed, then click on the main_menu file
3. Go to the utility section “0 – Configure & clean tools menu”
4. Select “1 - Build android_img_repack_tools“ in order to download and configure the tools that work with Android images.
Assembly
After making changes, you need to put everything back together. First, let's pack the system section into system.new.dat . Download the tools we need:
Let's convert our folder back to a RAW image. Let's call it system_new.img :
1073741824 is changed to the size of the system partition in bytes. It would be advisable to even make it a little smaller. We make a sparse image from the RAW image:
Let's convert our image into system.transfer.list and system.new.dat, which should be thrown into the archive with the firmware, but first we'll delete the old files:
Let's separate the firmware files from the excess husk (files that we downloaded for work. For this it is convenient to use the archive with the firmware). Deleted? Now you need to pack the firmware into a ZIP archive (with any archiver).
All that remains is to sign the archive. This can be done both on Android itself using ZipSigner, and on a PC (you will need Java installed):
Underwater rocks
While building system.new.dat, you may encounter several problems caused by constant changes in the mechanisms for generating Android firmware. The method described above should work well in the case of firmware based on Android 5.1; newer ones may have difficulties, so you will need to use other versions of the build tools. Unfortunately, we cannot describe all the nuances of the assembly, so you may have to Google it.
conclusions
This article describes only the tip of a huge iceberg called “firmware modification”. “Serious” firmware not only complements the kernel and the firmware itself with stock applications with many functions (which are often taken from other kernels and firmware), organizing or even changing the principles of their interaction, but can also radically change the operating principles of the OS. True, such a hack is no longer Android, but a separate OS, even if Play services can be installed there (by the way, such actions, to put it mildly, are not encouraged by Google). Well, don’t forget: all shells from manufacturers - TouchWiz, ZenUI, HTC Sense and so on - are just ordinary custom ones, maximally tied to the hardware of the device and to each other.