Mi account login error on Android - how to fix it and what to do
Mi account login error often occurs among Xiaomi owners. The fact is that the manufacturer often introduces updates to improve the security of gadgets. Most often, the problem occurs when changing Chinese software to a global firmware version.
What to do
The error is not the developer's fault. If the owner of Xiaomi wants to reflash the mobile. gadget or roll back to a previous version, then you need to understand that responsibility for the procedure in this case lies entirely with him.
Also, many users encounter a problem because they do not know whether the Mi profile is registered or not.
So, what should you do to fix the error on a=Android? Use the instructions:
- Install the Xiaomi Flash Tool utility.
- Open the Mi folder on your computer. Here we find the exe utility. We launch it with administrator rights.
- The OS will ask for permission to open the utility. Click “Yes”.
- In the window that opens, change the language. This is done in the right corner, at the very top of the page.
- The application will close and should be restarted with the same rights.
- The program now opens in English. Authorization into the mi-account is carried out using an identifier (xiaomi id number), e-mail or mobile number.
- After the data is entered, the utility will begin checking.
- If the profile is authorized, a confirmation code will be sent to your cell phone number or e-mail address. If an error like “Unauthorized xiaomi account” appears, it means that the profile is not registered.
- Click on the inscription in the lower right corner.
- Profile authorization will take some time. It is recommended to be patient and wait quietly.
When an RPC error appears
In most cases, the error occurs on the server side, but users of client machines often encounter it as well. You can determine the cause of the problem by analyzing the contents of the Windows Event Log. Often the error is caused by an abnormal termination of the connection procedure, software incompatibility, differences in data structures, installation or updating of various programs and drivers, encryption, or disabling a number of services.
The source of the problem can also be traffic blocking by a firewall or antivirus, and infection of the computer with a virus cannot be ruled out. But let's talk about everything in order, let's look at the most common causes of the error in a little more detail.
Main types of Mi account login errors
There are several types of mi-profile login errors:
- "Account login error 4001."
- “Your session has expired, please log in again.”
- There are no "OK" and "cancel" buttons.
- "Unable to connect to the network."
Session expired please login again
If an error like “session has expired, please log in again” occurs, the problem is blocked by Roskomnadzor. This happens by accident: Telegram servers are blocked, and Xiaomi uses the same servers to authorize accounts.
This problem can be easily resolved by using a VPN app. With its help it is easy to change your country of location. Step-by-step instruction:
- Install the free utility from Google Play. For example, VPN Master.
- Let's launch the program. We connect to. From the list of countries, select the one you like.
- Click “Ok”.
- We try again to log in to the mi-profile.
- After successful login, you can disable the utility.
If authorization does not work the first time, repeat step No. 2 until the message “Login successful” appears. After changing the country of location, it is also recommended to reboot the mobile. device After successful manipulation, the program can be deleted.
How to remove
Mi account login error on Android, how to fix it? To carry out the procedure, you should perform the following steps:
- wait for the mob to discharge. device or simply turn it off;
- enter Fastboot mode: press the volume up button and turn on the device at the same time until the Xiaomi bunny appears;
- Then select “clean start”.
To find out how to remove the inscription, restart the device in normal mode. The bug should be fixed.
Session expired please login again
Try to fix the problem by resetting the settings to factory defaults. Let's use the usual method:
- In the gadget settings we find “Advanced”;
- Then “Restore and reset”;
- Here we find and click the “Reset settings” sub-item.
- In the drop-down menu, click “Clear data from memory card and Mi account.” Click “Reset settings”.
- If a graphic key is installed as a security measure, you should draw it. After this point, the settings will be reset.
If the simple method does not help, follow these steps:
- Turn off your device.
- Hold down the volume up and power keys.
- Enter Recovery mode. Select English here.
- Click "Wipe&Reset".
- Go to the "Wipe User Data" section.
- Confirm the deletion by clicking “Yes”.
- Reboot your gadget.
Via WiFi
If you get an issue like "Authentication failed, can't connect to the network," you're most likely connected to a wifi network. The bug often occurs when the mobile is turned on at the same time. Internet and wireless network.
Clear your internet browser cache, disconnect from Wi-Fi and try logging into your account via mobile. Internet.
If the problem persists, try changing the language to English. The last method that works is changing the country via VPN. For this:
- Install the free program from Google Play. For example, VPN Master.
- Let's launch the utility. We connect to From the list of countries, select the one you like (for example, the USA).
- Click “Ok”.
- We try again to log in to the mi-profile.
- After successful login, you can disable the utility.
How to check and apply for Mi account authorization
Hello Xiaomi fans! Currently, Xiaomi is focused on the security of its devices and therefore is introducing quite a lot of new tools to improve it. An example could be a locked bootloader, protection against rollback to the previous firmware, etc. But these security measures have led to the fact that many owners of Xiaomi smartphones receive a brick when flashing the device’s firmware. Most often this happens when switching from Chinese firmware (China ROM) to global (Global ROM), as well as when changing stable firmware to a beta version and vice versa.
Contacting support
If you purchased the phone secondhand and you do not have information to recover the password or the SIM card has long been lost and the email has been deleted, then there is only one way to somehow get out of the situation: contact Xiaomi support.
To do this, you need to write a letter to one of the addresses: [email protected] , or (or better yet, to all three at once). Please note that you will have to write in English, so Yandex or Google translator may be useful.
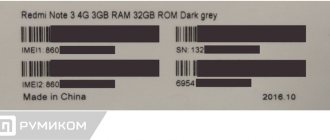
When contacting support, you must provide a scan of the receipt confirming the purchase of the phone or a screenshot with the order number (if purchased online). You will also need a photo of the back of the smartphone box.
You also need to include the IMEI of the device in the letter. If the phone was purchased secondhand, then you need to note this in the letter, and also send a photo of the box and documents. Without this data, Xiaomi will not be able to help you in any way.
Unlocking a Mi account through technical support can take from several days to several weeks and may be accompanied by additional questions. It all depends on how quickly the support service processes the received data and how complete it is. However, this is one of the official ways to remove the block.
Mi account login error: reasons, what to do, how to remove the notification
Did the screen display “Error logging in to Xiaomi account”? Our article will help you understand the reasons and troubleshoot problems. First, let's figure out what a Mi account is and what is it for? Mi account is a useful option for owners of Xiomi devices. The registered profile is linked to a smartphone and synchronizes information to the “cloud” on the Internet. Essentially, this is a profile where personal data, photos, files or documents are stored. We suggest you understand the causes of the failure and find solutions. You can fix the problem yourself using additional devices.
Assign a static IP address
- Open Settings .
- Select Network and Internet .
- Select Wi-Fi .
- Touch and hold a network you can't connect to.
- Select Change network .
- Click Show advanced options .
- Find IP Address Settings and select the Static .
- In the IP address, change the last number to any number from one to 225.
- Try connecting.
What to do if there is an error logging into your Xiaomi account: session has expired, log in again
Each user needs to create a Xiaomi account. An account is created directly after purchasing a smartphone of the same name. After registration, a personal account is registered on the mobile phone. If your smartphone is stolen or lost, attackers will not be able to use your personal data. Login to your account using your login and password. Some smartphone models require a fingerprint. It will not be possible to hack a page with personal data, because the developers have created a high degree of protection for clients. Quite rarely, when a smartphone is stolen, criminals use user accounts or block them.
Most likely the main reason for the failure is that the session for logging into your profile has expired. This means that Roskomnadzor has blocked access to some servers. Xiaomi became a “hostage to the situation” because he also used server data. The blocking happened by accident. You can bypass the restriction.
- Download a special VPN application from any electronic store. Next, install the program. From the list, select any country except Russia and click “Ok”. It is also recommended to restart your mobile phone.
- If the first method does not work, try resetting Settings completely. After the system reboots, log into your profile.
Clear Google Play Services cache
This method seems to be used in all Android bug fixing guides, and that's because Google Play Services is the bulk of your device's software. Restarting the application from scratch can solve many problems.
- Open Settings .
- Select Apps & notifications .
- Find and click Google Play Services .
- Select Storage .
- Select Clear cache .
- Try connecting to Wi-Fi again.
How to remove the Mi account login error notification on Android
You can remove the Mi account login error notification yourself. The user needs to use the brief instructions to avoid further problems.
- To do this, download the Xiaomi Flash Tool program and install it on your desktop computer.
- We find a separate “Mi” folder and launch it.
- After opening the page, change the language.
- Re-open the utility and activate the profile by entering a special ID number or email address.
- If Unauthorized Xiaomi account appears on the screen, then the profile is not in the list of registered ones.
- Click on the “Apply Blind” button and log in.
There is one way to remove the notification. Activate your personal account and the error notification will stop coming. If the situation cannot be corrected, contact the service center. There is no need to leave your phone for several days. The error is corrected in a couple of minutes.
Why am I getting the error "Failed to obtain an IP address"?
The “Failed to Obtain IP Address” error is usually displayed when accessing a Wi-Fi network, regardless of whether it is new or saved on your device. This error message means that the router is unable to assign an IP address to your device. While the problem is active, the user cannot access the Internet through this Wi-Fi network.
The contents of this error message may vary slightly for some users. It may say “IP address not obtained,” but the problem is nonetheless the same.
The most common RPC server failure situation
When a message appears that the RPC server is unavailable, in general, it does not mean the server itself. This is actually a remote procedure call service.
And, as a rule, most often this error appears when manipulating printers, for example, when trying to print a document or simply install (add) a new printer. And the point here is not even in the device itself, but in the service, which for some reason has stopped working or is simply in a disabled state.
Deleting an account
If all the methods given above do not help, and the Google Android account synchronization error appears again, you will have to take extreme measures - deleting the existing “account”.
- Recovering a deleted application on an Android smartphone
To do this, use the settings menu, where you select the accounts section. Here we are interested in the Google account. We enter it, enter the Gmail address and confirm the deletion with the button below or the menu command.
Now, as is probably already clear, you should restart the device, after which, if you have an Internet connection and try to log into Google services, the system will prompt you to either create a new entry or use existing registration data. Enter your username and password and confirm your choice. If this does not help (for example, on devices with installed firmware), you will have to create a new “account”, but in this case there can be no talk of any restoration of the contact list or previously installed applications.
"RPC Server Unavailable" Error: Problems with Dynamic Libraries
So, let's see what can be done to correct the situation. First, you need to make sure that the system has the dynamic library file Spoolss.dll and the executable component Spoolss.exe. They should be located in the System32 directory of the main directory in which the system is installed.
If such files are present, there can be at least two failure options: either they are damaged, or the service simply does not start.
Reasons for the error
The recent integration of the computer with a new device (printer, network connection) becomes obvious. Apparently, something went wrong when updating the drivers, resulting in an error when exchanging protocols. You should also make sure that all RPC service databases are available; they can sometimes spontaneously turn off or become damaged during PC overloads. Other drivers with incorrect installation may also become a separate problem, most often this applies to the video card. Dangerous virus programs very often disguise themselves as an RPC service, disabling the main service, which makes it impossible for it to work normally.
"RPC Server Unavailable" error is related to Network Protocol Exchange in Windows
Crash with "RPC Server Unavailable" message Windows 7: Starting a service from the command line
To begin with, the easiest method to correct the situation is to start the service from the command line. At this stage, we believe that everything is fine with the files themselves.
Call the command line (cmd) from the “Run” menu (Win + R) and then enter the command net start rpcss there. If everything is fine with the service itself, after rebooting the computer terminal (which, by the way, is mandatory), the problem will disappear, and the message that the RPC server is unavailable will no longer bother the user (to stop the service, select a similar command, only with the word stop) . If the above method for some reason did not activate the service, you will have to take, so to speak, a roundabout route.
Fixing the error using original libraries
Now let's look at a situation where the above files are damaged or missing. In principle, you can do it in the simplest way: copy them from a similar system (from another computer), and then paste them into the System32 system folder.
However, after this, so that the message that the RPC server is unavailable does not appear again, you will need to take a few more important steps and first go to the services section. This can be done from the Control Panel, but it is much easier to use the special command services.msc, which is written in the same “Run” menu.
In the editor itself, you should find the remote procedure call (RPC) service and click on startup, then select “Automatic” in the startup type. After saving the changed parameters, as in the first case, you will need to completely reboot the system for them to take effect.
Note: after rebooting, it is advisable to run the system update manually and install the latest update packages. This can play a key role in the correct activation of the service. Along the way, pay special attention to the system in which the original files will be copied, at least take into account its capacity.
Method 2: Check the firewall on your computer
Firewalls can block traffic requested by RPC and therefore cause an RPC server unavailability issue. You should check your firewall configuration to see if it is blocking network connections for RPC. If you are using a third-party firewall , read its instructions or study it to unblock RPC network connections.
If you are using Windows Firewall , here are the steps to configure it:
1) Press the Windows Logo key and R on your keyboard to open the Run Dialog. Then enter “ control ” and click Login .
2) In Control Panel, search for Windows Firewall . And then click Allow an app through Windows Firewall below Windows Firewall .
3) Scroll down to find Remote Assistance . Make sure its connection is turned on (All boxes of this item are ticked ).
Comprehensive solution using special utilities
In principle, if there is no way to copy or download original files, you can do it in a simpler way.
Utilities like DLL Suite will help correct the situation, which automatically scans the system for damaged or missing components, and then independently integrates the missing objects into it. However, we cannot limit ourselves to this alone. At the end of the process, you will still need to make sure that the service is in an active state (enabled) and running smoothly. This is done as was shown just above.
Forget the network
The first method you should try is to forget the network and log in again. The steps you need to take are simple, and sometimes that's all it takes to get rid of a pesky error.
- Open Settings .
- Select Network and Internet .
- Select Wi-Fi .
- Touch and hold a network you can't connect to.
- Select Forget network .
- Login to the Wi-Fi network again.
Mi account login error on Android - how to fix it and what to do
Mi account login error often occurs among Xiaomi owners. The fact is that the manufacturer often introduces updates to improve the security of gadgets. Most often, the problem occurs when changing Chinese software to a global firmware version.
What to do
The error is not the developer's fault. If the owner of Xiaomi wants to reflash the mobile. gadget or roll back to a previous version, then you need to understand that responsibility for the procedure in this case lies entirely with him.
Also, many users encounter a problem because they do not know whether the Mi profile is registered or not.
So, what should you do to fix the error on a=Android? Use the instructions:
- Install the Xiaomi Flash Tool utility.
- Open the Mi folder on your computer. Here we find the exe utility. We launch it with administrator rights.
- The OS will ask for permission to open the utility. Click “Yes”.
- In the window that opens, change the language. This is done in the right corner, at the very top of the page.
- The application will close and should be restarted with the same rights.
- The program now opens in English. Authorization into the mi-account is carried out using an identifier (xiaomi id number), e-mail or mobile number.
- After the data is entered, the utility will begin checking.
- If the profile is authorized, a confirmation code will be sent to your cell phone number or e-mail address. If an error like “Unauthorized xiaomi account” appears, it means that the profile is not registered.
- Click on the inscription in the lower right corner.
- Profile authorization will take some time. It is recommended to be patient and wait quietly.
Main types of Mi account login errors
There are several types of mi-profile login errors:
- "Account login error 4001."
- “Your session has expired, please log in again.”
- There are no "OK" and "cancel" buttons.
- "Unable to connect to the network."
Session expired please login again
If an error like “session has expired, please log in again” occurs, the problem is blocked by Roskomnadzor. This happens by accident: Telegram servers are blocked, and Xiaomi uses the same servers to authorize accounts.
This problem can be easily resolved by using a VPN app. With its help it is easy to change your country of location. Step-by-step instruction:
- Install the free utility from Google Play. For example, VPN Master.
- Let's launch the program. We connect to. From the list of countries, select the one you like.
- Click “Ok”.
- We try again to log in to the mi-profile.
- After successful login, you can disable the utility.
If authorization does not work the first time, repeat step No. 2 until the message “Login successful” appears. After changing the country of location, it is also recommended to reboot the mobile. device After successful manipulation, the program can be deleted.
How to remove
Mi account login error on Android, how to fix it? To carry out the procedure, you should perform the following steps:
- wait for the mob to discharge. device or simply turn it off;
- enter Fastboot mode: press the volume up button and turn on the device at the same time until the Xiaomi bunny appears;
- Then select “clean start”.
To find out how to remove the inscription, restart the device in normal mode. The bug should be fixed.
Session expired please login again
Try to fix the problem by resetting the settings to factory defaults. Let's use the usual method:
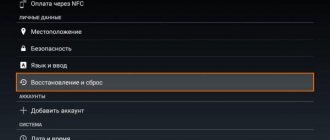
- In the gadget settings we find “Advanced”;
- Then “Restore and reset”;
- Here we find and click the “Reset settings” sub-item.
- In the drop-down menu, click “Clear data from memory card and Mi account.” Click “Reset settings”.
- If a graphic key is installed as a security measure, you should draw it. After this point, the settings will be reset.
If the simple method does not help, follow these steps:
- Turn off your device.
- Hold down the volume up and power keys.
- Enter Recovery mode. Select English here.
- Click "Wipe&Reset".
- Go to the "Wipe User Data" section.
- Confirm the deletion by clicking “Yes”.
- Reboot your gadget.
Via WiFi
If you get an issue like "Authentication failed, can't connect to the network," you're most likely connected to a wifi network. The bug often occurs when the mobile is turned on at the same time. Internet and wireless network.
Clear your internet browser cache, disconnect from Wi-Fi and try logging into your account via mobile. Internet.
If the problem persists, try changing the language to English. The last method that works is changing the country via VPN. For this:
- Install the free program from Google Play. For example, VPN Master.
- Let's launch the utility. We connect to From the list of countries, select the one you like (for example, the USA).
- Click “Ok”.
- We try again to log in to the mi-profile.
- After successful login, you can disable the utility.
Removing/adding an account
If the message “You need to sign in to your Google account” does not disappear, use a more effective method - deleting your Google account. Before starting the operation, back up your important data so that you can restore it from cloud storage later. Not all information is saved automatically.
Account deleting:
- How to delete a Google account from your phone - easy removal methods
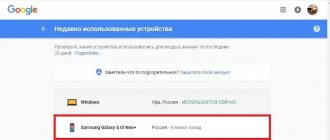
- Go to your phone's settings (the app looks like a gear) and select "Accounts" (in Samsung Galaxy - "Accounts and Backup");
- In the list of accounts that opens, find “Google”;
- Click on the “Trash” icon at the bottom of the screen and wait until your account is deleted.
- If necessary, provide your device password, PIN code, or pattern.
To add your account back, go to the “Accounts” section in “Settings” and click “Create an account” - Google. Wait for the data to be verified and automatically loaded from the backup. Make sure the Internet is turned on, otherwise an error will appear. After that, go back to the application and download again.
Account management is available in settings. Select “Google Services”, click on “Google Account”. A page will open in front of you from which you can go to the desired section. The main one regarding logging into your Google Play account is “Security”. Here you can change your password, set a security code, select a method for verifying your identity, view a list of devices, etc.