The power button is one of the most vulnerable places on almost any phone. This has nothing to do with the manufacturers or quality of the device; all the reasons lie in the active use of the button throughout the day. In addition, many users experience mechanical damage after the phone is hit or dropped. It is clear that the power button is responsible for turning the device on and off, so it is important that it works correctly. However, even with a broken button, you can start Android. Moreover, there are several ways to turn on your phone without the power button, which we will discuss in this article.
Sleep mode
- Double tap on the screen - turning on the phone in this way is not possible for all manufacturers, but this function may be available on your device.
- Press and hold the Home button, if your phone has one. You need to hold down Home for at least 10-15 seconds, and on some devices it may take about a minute.
- Calling a locked device from another phone. In this case, you need to pick up the handset and reset, as a result of which the screen should be unlocked without a button.
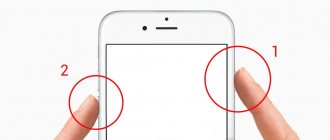
- The volume control is another way to turn on the device. To do this, just hold down the knob to increase the sound or decrease it. If the screen is still locked, try holding down the volume control at the same time as the device's power button or the Home button.
- Connecting a charger is one of the simplest methods of turning on a gadget. On some smartphones, developers provide the option to activate the screen when the charger is connected, but this function is not available to everyone. The good news is that even if the phone does not turn on, it will definitely not run out of power, which means that the problem can be solved in another way.
If, while performing any actions, the smartphone starts in Recovery mode, this indicates that the problem is not mechanical damage to the button. In this case, in the Recovery menu you need to select “Reboot system now” or simply “Reboot”. After this, the device will reboot and the problem should be resolved.
Note! If you managed to turn on your phone using one of the described methods, the solution to the problem does not end there. To avoid such difficulties in the future, you need to install a special program on Android that will replace the lock button and activate the screen if necessary.
How to hide navigation buttons on Android?
If necessary, the user can remove status indicators at a time. This will help get the software displayed on the display. To carry out this operation, you must enter the code SYSTEM_UI_FLAG_FULLSCREEN.
After activation, the strip located at the top will disappear. The name of the utility will disappear. It will move up. If you need to remove it, it's worth adding two additional lines of code - ActionBaractionBar = getActionBar() and actionBar.hide().
Users are given the option to combine flags. Due to this, it will be possible to hide the control panel and the operation bar of the smartphone at the same time. Despite the convenience and versatility of the method, it is important to remember that pressing the display will return the panel. The line will be reflected again. When the Home button is activated, the person will return to the utility. The status bar will be visible.
Programs and applications
Unfortunately, it is not possible to solve the problem of a non-working power button using a program at the time of a breakdown. However, there are several applications that can be installed in advance, for example, at the first sign that the button is acting up. The following applications and programs are currently available to users:
- Power button to Volume button. Already from the name it is clear that the main task of the program is to transfer the power function from the start button to the volume control.
- Gravity Screen – on/off. The application increases sensitivity to device movement. If the phone is left on a horizontal surface for a long time, the screen will automatically lock. However, as soon as you lift or move the device, it turns on.
- Shake Screen on/off. A simple and easy-to-use application that can turn on the phone even without touching the screen. Just shake the device lightly to activate the display.
- Proximity Actions. A program that allows you to control your smartphone using special motion sensors.
USB Debugging
Users who have this function enabled in their phone settings can turn on the device using a PC. To do this you need to do the following:
- Download and install Android Debug Bridge (ADB) on your computer, a program designed for flashing touchscreen phones.
- Connect the device to the computer using a USB cable.
- Run the program and enter the command “adb reboot” in the line.
In addition, the application allows you to configure root rights and reflash the phone if necessary. A simpler version of the program is ADB Run. With its help, you can also restart Android, even if the power button does not work.
How to swap navigation buttons on Android 9?
The owner of the device has the ability to swap the navigation buttons on Android 9. If you want to switch to full gesture control, you can hide them. There is a standard scheme for changing buttons:
- You need to go to the section with on-screen control settings;
- The System opens;
- Next, you need to click on the System navigation line;
- Goes to the line Three navigation buttons. Here you should click on Settings and change places;
- In this line, select the required combination of buttons.
If you cannot find the item you need, you will need to act differently. In the search, you should specify the key Button. Next, select a menu item. A similar scheme of actions is active on all touch phones.
Phone is turned off
If the lock button on your device does not work, and the battery has already run out, it will be a little more difficult to bring your phone back to life. Some devices turn on automatically after connecting the charger. If this does not happen, you can try holding the adjustment button on and off and hold it for a few seconds or a minute.
The second option is to connect the phone to the computer via a USB cable and repeat the same steps. If your device has USB debugging enabled, the ADB app will be able to reboot it even with minimal charge.
Thus, there are enough ways to turn on the phone if the button does not work. Have you tried all the suggested options, but none of them worked? Your device probably needs consultation from a professional technician with subsequent repair or replacement of the power button.
Please rate the article: 08/30/2019
Today, physical buttons on smartphones are becoming increasingly rare “guests”. Almost all main controls have been replaced with touch-sensitive analogues. However, manufacturers have not yet been able to completely abandon the good old buttons. Well, these same buttons, being essentially analog mechanisms, often fail. But the good news is that you can bring the button back to life on your own.
Even if the buttons stop working, there is always an alternative
How to turn on a smartphone if the power button does not work
It is the power button (KB) that experiences the most intense load on smartphones, since it is constantly used by the owners.
We click on it to go into applications, peek at notifications and check the time. Severe operating conditions lead to the fact that sometimes the HF is the first to fail. If the HF is broken, you need to contact a technician, and most of the methods below will allow you to clean your phone a little or stretch out the time until payday. There is another method that involves downloading special programs that change the functionality of the Galaxy buttons. They will help transfer the role of turning on the power to the sound control key, and will allow the owner to continue using the phone.
Applications
There are several products on the Playmarket designed for cases when the power button on a Samsung does not work. The programs allow you to dig a little deeper into the system and change the functionality of the keys. So, there is the “Mobile Uncle” application, which can be found on the Playmarket by searching for Mobile Uncle, and a similar program, Power Buttom to Volume. Tools moves the power function to the little-used volume down key. The changes are convenient because you can additionally adjust the speaker power through the device itself.
If you don’t want to lose the functionality of the volume key, download another application – Shake screen off. It turns the phone on and off, registering the shaking of the device. Yes, yes, “just shake and shake your smartphone,” and then it will turn off.
other methods
It is clear that to download programs you need to have access to the “live” Galaxy, but how to do this if the HF does not work? There are several ways to defrost it:
- call the phone from your home or other smartphone;
- We are waiting for the alarm clock to go off.
During Galaxy activation, quickly take advantage of the moment and go to the menu to download the application
It is important that the device is provided with sufficient charge, so after unlocking, connect it to a power outlet
Power on by charging
A disconnected device with a non-working HF can be revived by charging. Some models, after being completely discharged when connected to an outlet, start up on their own, take a moment and go to the menu to clean the phone, download life-saving software, or transfer important data to a SIM card and memory card for further use on another smartphone.
If this method does not work on your model, you will need to work hard. You need to catch the moment when the charge is just entering the battery and fully hold down the volume key. We wait for the boot menu to appear on the screen, and if this does not happen, we continue the manipulations until we achieve success. Select the Normal PowerUP mode and work with the phone turned on.
Check if the button is really broken
TestM - a program to check the functionality of the keys on your smartphone
Yes, this may sound strange, but it also happens that a software glitch or an incorrectly installed update causes the physical buttons to fail. That is, from the point of view of mechanics and response, there are no problems. Something is happening at the software level. In this case, you can do the following. First, reboot your phone. The advice is banal, but it can help you. Secondly, if the button stops working after installing an application or update, roll back these changes. Well, thirdly, use the diagnostic program. There is a program out there called TestM. Download it and follow the onscreen instructions. They are quite simple. The program will continue to test the physical buttons of the device and help you determine the cause of the failure.
Download: TestM
Clean the button from dirt
Your phone's hardware keys are regularly exposed to external influences. And dirt is no exception. Therefore, it is possible that the gaps around the buttons have accumulated dirt, which may interfere with their operation. Dirt can also get under the button, but here we wouldn’t recommend disassembling the phone without special knowledge. It is also possible for fat to get under the button, which in turn also causes deterioration in the operation of the contacts. In this case, you should turn off the phone, drop a drop (but not more!!!) of alcohol on the button, turn the phone over so that the alcohol flows out of the buttons and wait 30 minutes. This will clear the contacts. But under no circumstances use water or water-based solutions. Alcohol evaporates quite quickly, which cannot be said about water. If anything, we warned you.
Use virtual buttons
Android Accessibility Suite is a very convenient tool for replacing physical buttons with virtual ones
If the buttons are out of order, but you still need to use the device, then you should install special programs that simulate the actions of physical buttons. Although this still won’t save you from going to the nearest workshop. So, let's figure out how to emulate physical buttons.
The easiest way is to install the Android Accessibility Suite app. After installing it, you can enable the accessibility menu by going to “Settings” - “Accessibility”. The app adds a virtual pad for a number of important functions such as screen lock, volume, brightness adjustment, multitasking and more. On Android 9.0, the app comes bundled with the OS, but for earlier versions, you will have to download it from the Google store. Have you already updated to Android 9.0? Tell us about it in our Telegram chat.
Download: Android Accessibility Suite
How to save data when the display is not working
If the smartphone screen has completely stopped working and you want to save the files on the phone, you will have to use a regular PC and a special program.
Broken Android Data Extraction
iSkysoft have developed a program that allows you to save or restore necessary information from broken phones. To do this, install the Android Data Extraction application on your computer and follow the instructions.
Instructions
- Connect your smartphone to your computer using a wire.
- Open the program, section “Data extraction” (Damaged devices).
- Select the file type to recover.
- Indicate the current state of the smartphone: a) “Sensor does not work”; b) “Black/broken display.”
- Enter the smartphone name and model. Then click "Next" and "Confirm".
- Turn off your smartphone.
- Continue the process of saving data on your computer.
The touch screen of modern smartphones is quite fragile, so it can easily malfunction. You can always try to restore the touchscreen yourself or send it in for repair if the breakdown turns out to be complex.
Emulate physical buttons on Android
The previous method is universal and emulates all keys, but what if a specific button fails? For example, the power button. Gravity Screen allows you to unlock your phone without it. Gravity Screen is an app that tracks your phone's movements and can wake it up as soon as you pick it up. The app is also capable of locking your phone when you place it in your pocket or on a table. You can also wake up your smartphone from sleep mode by double tapping on the screen.
Download: Gravity Screen
Using the virtual button to adjust the volume is quite convenient
As for the volume buttons, you can use the Assistive Volume Button to emulate them. The application places two buttons “+” and “-” on the screen, respectively. They are designed to change the volume of applications and media, ringer and notifications, respectively. In addition, you have the opportunity to customize the appearance, size and other parameters of the virtual buttons.
Download: Assistive Volume Button
1111111111 Rating 0.00 [0 Votes]
Add a comment
If we talk about possible reasons why the touch buttons on an Android phone stopped working, the failure is more often on the physical side than the software side. If there are reasons from the first list, most likely you will have to take the device to a service center.
Physical reasons:
- A strong blow to a tablet or smartphone, a fall from a height.
- Prolonged exposure to moisture. Particularly serious damage occurs due to water getting into the area between the screen and the film or under the housing. Contacts are oxidized. After exposure to moisture, action must be taken immediately.
- Sudden temperature changes. Return the device to room temperature. Sensor performance may improve.
- Punching the screen. There are no scratches or cracks. The damage is noticeable when pressed - then glare is visible in the damaged parts of the sensor.
- Replacing the screen with an unsuitable model.
- Serious contamination. Wipe away dirt, dust, moisture, and fingerprints with special wet wipes from an electronics store or a microfiber cloth.
- Poorly applied film. In places where air accumulates under the film, parts of the screen will stop working. Remove the film and, if possible, replace it with a new one.
Software reasons:
- The OS is overloaded with applications or some of them are not working correctly.
- Changes device settings.
- Touchscreen problems are possible if the screen does not recognize touch correctly or poorly. Screen calibration will help here (you can actually do it at home).
- Inappropriate or unstable firmware version.
Why doesn't part of the sensor work on Android? Most likely, the contact has come loose or oxidized.
The sensor does not work on Samsung - Hardware problems
Samsung Galaxy is relatively new in the market, but there are still a lot of complaints regarding the Galaxy Touch Screen as many people are facing such problems. It is definitely very annoying if your touch gives you slow response time or doesn't work at all.
Below are some of the Samsung Galaxy touch screen problems faced by its users:
Problems:
- Click Stop Application
- Slow response
- The sensor does not work on some sections of the screen.
Causes of problems:
- The phone's cache is almost full.
- There has been some physical damage to your display screen that has partially or completely disrupted the phone's touchscreen function.
- Low battery sometimes also causes slow touch response.
Temporary solution:
1. Reset your phone.
2. Remove and reinsert the battery (after switching off). Be sure to allow a delay of at least 5 seconds before inserting the battery.
The hardware solution for Samsung Galaxy is divided into two sections:
- Touch screen problem
- Problem with Button Touch feature
Touch screen problem
1. Disconnect the connectors and check the display connectors.
2. Now clean the onboard connector and display connector. After cleaning.
3. Re-solder each pin of the on-board connector
4. Using the Multi Meter, check each connector component. Overheat faulty connectors. If they still don't work, replace them. Check again
5. If it still doesn't work then check any other good LCD screen as sometimes the problem is with the whole LCD screen not just touching your phone.
Problem with Button Touch feature
- Connector for connecting a function button and a connector for charging. Now check.
- If it still doesn't work, check the charging port if this is problematic. Change it as there is nothing you can do in this case.
The above-mentioned steps will surely help you solve the touch screen problem from your Samsung Galaxy in the most effective way. If your touch screen is giving you problems then your phone has completely become a crippler as you will not be able to do anything on your phone (not even unlock your phone in any way).
I replaced the display on my phone and now Samsung's sensor doesn't work!
1. If you have a white or all black display, start by performing a soft reset on your device. If your screen still won't work after resetting...
2. Try the repair again from the very beginning. In the step where you connect the shield to your main board, check the original shield to make sure it still works.
3. Blockage on your display is a sign of too much pressure on the screen caused by transportation or during installation. Open the device again and make sure that none of your internal components are causing pressure.
4. If you see lines down your display or only partially working touch functions, then you may have a faulty or broken part.
Samsung Galaxy screen not working is a problem that can be prevented. Here are some useful tips to protect your Samsung:
To properly protect your Samsung Galaxy display panel, use a really good protective case. This will prevent the screen from being damaged, cracked or scratched after a fall.
Sometimes your phone has manufacturing faults. So to keep your phone and you protected, make sure you maintain your warranty until it expires. This will ensure that you get the support you need from Samsung unless the problem is caused by your negligence.
Install reliable antivirus software to protect your system from malicious attacks.
Make sure you read the reviews before downloading any apps. This is a great way to know that an application is viral and will cause problems for your Samsung Galaxy. The best way to do this is to filter reviews according to reviewers who use the same device.
Try not to play games with too much graphics as this will expand the capabilities of your device. Either play one game at a time or play in a short period of time.
Do not overcharge the battery at the same time - this will increase the likelihood of your phone overheating, which can damage your phone's components.
Although a Samsung Galaxy screen problem can be caused by several reasons, there are an equal number of ways to counteract them. Therefore, there is no need to panic - this article is a great example for solutions to your problems.
If you have not solved the problem - Samsung sensor does not work, please let us know in the comments, we will help.
Everything always breaks unexpectedly. Dropping a phone on a tiled floor is an unfortunate accident; drowning it in a bathtub is a banality that occurs more often than it seems at first. Statistics of calls to service centers contain many complaints about accidents from the “it fell and broke” series, even more often than drownings. At the same time, you should not expect that the very first fall will take away the touch substrate or even the screen itself - in most cases, the consequences of unfortunate accidents do not look so destructive. Among other things, this is the sudden inability of the physical back, home and menu buttons. If this problem happened to your phone, but you don’t have money for repairs yet, don’t worry. There is a relatively simple solution to this common problem. Now we will teach you how to enable on-screen buttons on your smartphone if the physical ones no longer work.
For everything to work, you need to get Root rights. Administrator access to the depths of system files is sometimes difficult to obtain. But with the advent of apps that get the necessary access for you, you no longer need to read multi-page instructions. Just install the Kingo Root program on your computer and connect your phone. The only thing you need to do while the program is being installed is to enable “USB Debugging” in the phone settings, “Security” section. That's all. By clicking the big Root button in the Kingo Root
, activate administrator rights.
Step two looks a little more difficult. You will need to download the Root Explorer program from Google Play (or a few... alternative sources). Install it on your smartphone. Run this application, find the System directory, and in it - build.prop. If such a file is not visible in the system directory, it doesn’t matter. There is an ellipsis in the upper corner of the program - tap on it to open a submenu. In the program settings o. The loss will be discovered immediately.
In the left corner of Root Explorer
there is one more item we need - r/w. Tap it once and confirm your choice. This action activates the ability to edit system files. Now touch build.prop and keep your finger on it. The top menu will change and from the drop-down list (in the same ellipsis) you will find the sub-item “open in a text editor”.
Scroll to the very bottom of the open file - all these long lists of settings are not needed yet. At the very bottom, add the line qemu.hw.mainkeys=0. Save the file and restart your phone.
Done, three on-screen buttons have appeared at the very bottom of the screen - similar to what you can see on the screen of any tablet. And after repairing the physical buttons, it will be possible to hide the virtual ones back by replacing the line qemu.hw.mainkeys=0 with qemu.hw.mainkeys=1 and rebooting the device again.
Troubleshooting at home
A common cause of failure of all buttons is the smartphone being left in a damp place for a long time or a strong impact. In the first case, the contacts may have oxidized and the problem can be solved by cleaning them. In the second case, you will need to diagnose the device, which we recommend entrusting to the engineers of the HTC smartphone repair center. What to do if you want to fix the problem yourself, and the reasons for its occurrence, read below.
How to restart Android if the sensor does not work
Most often the problem is with the firmware version. To solve this, update the Android version and, if that doesn’t help, reset the settings. How to do this is in paragraphs 2 and 4 of the instructions in the next paragraph of the article. Why don't touch buttons work on an Android phone? Sometimes the problem is the film. If everything was fine before, try removing it. Sometimes it’s even a matter of new protective glass, which can also be detached yourself. Users say that the bottom touch buttons, which stopped working after calibrating the screen (3rd step of the following instructions), became sensitive again.
The touch buttons on the phone do not work
The most common reason for buttons not working on a touch phone (below) is a software failure (89% of cases) or a hardware failure (10%).
To begin with, you can try to determine the cause yourself by following our advice. Fixing a software glitch
- 1 Reset settings and clear data
Find Settings on your phone, look for “Backup and reset” there, select “Full reset with all data deleted”. Most often this helps, but in this case you will delete all photos, contacts, passwords, music, videos and other information (content) on your smartphone. In advance, before resetting the settings, connect the device to the computer and transfer all data.
2 Installing an application for cleaning data and adjusting work
This method is also quite effective and is based on solving functional problems of Android phones.
It is best to choose a simple but effective program with a small set of functions, Multi Cleaner or its equivalent. It is free and can be downloaded from Google Play or the Internet (installation file in .apk format).
After installation and launch, the program will scan, correct and correct possible errors. This is also a good way to get the touch buttons on your smartphone working again. At the same time, the overall performance (operating speed) of the device will increase.
“Flashing” or changing the software (software) of the device.
To reflash the device software, you need to have certain skills or study the information and try to solve the problem yourself. Flashing will also delete all files on your gadget, so do not forget about transferring them to another device. You can go to the manufacturer’s official website and try to download the utilities and the firmware itself (software) for your model and install it yourself. But this does not guarantee that the problem with the touch buttons will be solved and you will do everything correctly.
A high-quality flashing will be carried out at the MobiMas phone repair center - our technicians know exactly which version and how to install it.
A hardware failure means a malfunction of the hardware itself; perhaps something happened to the matrix and you cannot do without the help of a professional Service Center.
Call
From 7 am to 2 am - we are always with you, we are on the line.
Common repair options
These steps will help in many cases of malfunctioning of a phone or tablet running Android OS due to software, so you can apply these tips when you doubt the system is working correctly.
- Reboot your device. Perhaps it was under heavy software load or a minor error occurred. Maybe the application just froze, but the sensor is working?
- Update the firmware. To do this, go to the following items: “Settings” – “About device” – “System updates” – “Check now”. More often than not, the problem is solved.
- Reset settings to factory defaults. Save all important data to a memory card, computer or similar storage device. Click “Settings” – “Memory” – “Reset to factory settings” – “Reset settings” – “Erase everything”. If necessary, confirm your choice. Wait a few minutes and the reboot will happen automatically
- What to do if the screen is glitchy? If it works but is slow, just clean the phone as a whole. Remove unnecessary files and applications and the cache (Settings - Applications - any application from the list - Clear cache). To remove other junk and clean up RAM, use CCleaner, Cleaner Master or another application.
How to fix your device
It is unlikely that you can fix your phone yourself. You will succeed when the problem is in the software. In this case, read the methods below.
If you have any questions, please let us know Ask a Question
- Calibrate your screen. Depending on the manufacturer, there may be a built-in utility for this, or you may have to download the application yourself. There are several ways. For HTC models: “Settings” – “Language and keyboard” – “HTC Sense Input”. On other smartphones: “Settings” – “Display” – “Display” – “Screen calibration”. If desired, you can calibrate the screen through the engineering menu. It is used by developers to test and change system components. We do not recommend this method as it can cause problems and takes longer than other methods. A third-party screen calibration application from the Play Market can improve the display's response. For example, Touchscreen Calibration or SGS Touchscreen Booster (you can set parameters manually in it).
- The bottom touch buttons on an Android phone do not work, what should I do? You can install an application to create soft buttons with the same functions, but in a different location. We recommend Back Button - it does not require root rights.
- Contact the service center. There they will more accurately determine the cause and repair the device.
Welcome everyone to the blog! Today Master Sergey and I will tell you what to do if your phone does not respond to buttons. Yes, yes, exactly the buttons. Many of my friends still use push-button phones because, apart from making calls, they don’t need any more bells and whistles. Another great advantage of push-button phones is their long battery life. Remember, we used to walk around with such phones without charging for at least 5 days, and someone was proud that they hadn’t charged for more than a week!
What now? I went online from my smartphone to download a song or chat on VKontakte - a third of the battery was gone. We charge here and there at night . And if you have to hang on to your cell phone all day, then we often see smartphones with a power bank - a kind of building block for self-defense.
I'm not even talking about dropping a smartphone on tiles or asphalt - there is a very high probability of being left without a device. And if the old Nokia falls on the asphalt, then you still need to look where the scratches are left - on it or on the asphalt.
In general, I got distracted - let's move on to the topic of our meeting. Let's highlight 4 common reasons for non-working keyboards on our old cell phones.
How to remove the Home button from the Android screen
In Honor and Huawei smartphones, settings allow you to hide the interactive “Home” button, for which you need to do the following:
- We go along the path “Settings” - “System” - “System navigation”.
- Open the navigation button settings.
- Now you need to move the toggle switch to the inactive position, after which “Home” will no longer appear on the screen of your Android device. To return the interactive element, you need to follow the same path and move the slider to the on position.
The “Home” button can be deactivated from the quick settings panel by swiping from above to open the curtain, find the “Navigation Button” icon here and press it, after which the icon will change color.
The “Home” navigation element, located along with other interactive keys, can be hidden from the Android screen using the device’s system settings. One option for removing “Home” involves the following steps:
- Go to “Settings” – “Advanced settings”.
- On the “Buttons and Gestures” tab, opposite the “Hide on-screen buttons” item, move the toggle switch to the inactive position.
The menu differs depending on the shell; on some devices, in the settings you need to go to the “Navigation Panel” section and similarly move the slider in the corresponding item.
An alternative option that allows you to disable the “Home” button on Android and/or adjacent built-in navigation elements is to use the Xposed Framework.
Reason 1 - the most common - the contacts of the phone buttons are dirty
Phones often come in for repairs in which the keyboard backing has oxidized and turned black, although it should have shiny contact pads. This often happens if the phone has been in water or drowned in another liquid.
The keyboard contacts can be wiped with an eraser and then with alcohol. Most often, this method helps and the repair lasts a long time.
If the button contacts are in a very poor condition, then it is easier to replace the keyboard or individual button membranes using donors.
Watch a good video on how to replace a cell phone keyboard pad yourself.
Reason 2 – electrical – the phone keyboard varistors burned out
In sunken phones, a common malfunction is also common in the form of failure of varistors and zener diodes of the keyboard.
varistors are installed - semiconductor resistors, in which the ohmic resistance decreases as the voltage increases.
Varistors and zener diodes protect the phone from surge voltage and static charge. Their load capacity is small, so they often overheat and burn out. In this case, they have to be changed or soldered without replacement.
Our friend in the amateur radio business, Master Sergei, was once brought an Explay Blade cell phone, whose keyboard did not work 4 months after purchase. The owner decided not to take the phone to the service under warranty, asking for it to be repaired.
Of all the buttons, only 2 buttons worked - turn off and call.
To disassemble the Explay Blade phone, remove the back cover and take out the battery and SIM cards.
Unscrew the screws, remove the back panel and disconnect the speaker, camera and display.
The entire process of disassembling the Explay Blade is similar to the disassembly of the Explay MU220 shown in the video below.
Explay phone disassembly
Please note that if you are soldering a phone board, it is best to remove all plastic parts, tape and the backing with button membranes from the board.
If the membranes and button contacts on your phone are in good condition, then we proceed to replacing the varistors. Using the phone diagram, we find which varistors are connected to the non-working buttons and unsolder them or replace them with similar ones. If the phone does not respond to buttons, then unsoldering the varistors is not a complete repair, but a sufficient condition for the buttons to work.
To avoid damaging plastic parts when soldering, cover them with metal foil , which reflects and dissipates heat over its surface.
Then you can use a soldering iron with a thin tip, hot-air or infrared soldering station.
After removing the burnt varistors and reassembling them by Master Sergei, the phone's keyboard worked properly.
How to solve the problem yourself
Let's try to fix the problem with our own hands and basic tools that are found in every home. If it doesn’t work out, we’ll take the device to specialists who know a lot about fixing Android devices.
Using improvised means
If the POWER key is broken, then you can solve the question of how to turn on the device yourself. To do this, you will need to perform the following manipulations: To turn on your smartphone without a power button, you will need a metal stick that will fit into the hole where the key used to be.
The metal will close the contacts, acting as a button. Just don’t apply too much force, otherwise you can damage the board and ruin the conductive surface. You need to hold the wand for a couple of seconds until the smartphone starts to boot. If the phone does not respond to the “homemade” power button, you can try removing the battery, removing the SIM card from the slot and removing the memory card.
Using a soldering iron and straight hands
If you feel the “strength” of a repairman in yourself, then it’s worth trying to fix the annoying flaw in the form of a broken power button on your Android phone.
- First, try to solder the button in place, but be careful, the plastic is easy to melt, the key is easy to destroy and you will have to buy a new one. How to do this correctly, see the video instructions at the bottom of the article.
- Second, at the place where the contacts are closed by the button, solder the wires and bring them out of the case. To turn on the device, you just need to short-circuit them, simulating turning on an Android smartphone, with the POWER button. This method is not distinguished by design delights, but it works quite well for phones that you no longer mind.
As you can see, solving the problem when the phone does not respond to the power button is quite simple. A little time and straight hands can work wonders, try and everything will work out, especially after watching the video instructions and reading this article.
Reason 3 – contact – the contacts of the keyboard cable connector have oxidized or peeled off
The reasons for this malfunction are, as in the first point, liquid filling or aging of the contacts. Also, due to microvibrations, the surface contact layer of connectors can wear out over time or become dirty from dust. In this case, cleaning the contacts with an eraser (if the contacts are not graphite) and wiping with alcohol helps.
If the connector contacts have peeled off, it is extremely difficult to glue them back into place, so you should consider replacing the cable. As a last resort, you can try to solder the cable directly to the board by removing the connector. Sometimes you have to do this due to the inaccessibility of cables.
Reason 4 – BGA – bad soldering or defective filters and phone keyboard controllers
Sometimes a malfunction of the phone keypad can manifest itself as spontaneous pressing, pressing buttons together, or sticking buttons. And the most common malfunction is when the phone does not respond to buttons .
In more expensive and branded phones, multi-channel EMI filter chips are installed, which are low-pass filters or notch filters. Repairers often call them glass beads because they have a mirror-like surface. Essentially, several LC filters are installed inside these pieces of glass, which can be replaced with jumpers.
This is exactly what happens when it is impossible to get the right piece of glass. Using the phone diagram, we look at the pinout of the glass and solder jumpers between the corresponding inputs and outputs of the filters. It looks something like the photo below.
If you have a donor or a new EMI filter chip, you can fix the problem of a non-working keyboard yourself, as shown in the video.
Master Soldering and Master Sergei have prepared this material for you.
Sources used:
- https://softdroid.net/slomalas-knopka-vklyucheniya-kak-vklyuchit-telefon
- https://androidinsider.ru/polezno-znat/chto-delat-esli-knopki-na-android-smartfone-perestali-rabotat.html
- https://sovety.pp.ua/index.php/ru/stati/android/sistema/3423-ne-rabotayut-nizhnie-sensornye-knopki
- https://phone-insider.com/perestali-rabotat-sensornye-knopki-na-telefone-android.html
- https://masterpaiki.ru/chto-delat-esli-telefon-ne-reagiruet-na-knopki.html
SHARE Facebook
- tweet
Previous articleWhy the sensor does not work on Android: causes and troubleshooting
Next articleGoogle services do not work - solution to the problem