With a high degree of probability, we can assume that those lucky owners of smartphones who have at least once installed ROOT rights on their gadget know (even if only in general terms) what ADB (Android Debug Bridge) is and what can be done with it.
We will look at ADB in more detail in subsequent articles, but now I would like to dwell on a particular, but very annoying case - the computer does not see your device using ADB. In a situation where you need to install root or prepare the gadget for installing custom super firmware via CWM (ClockWorkMod) Recovery, this is extremely annoying)
“USB Debugging” mode on your smartphone (the “For Developers” menu), install the drivers for Android Composite ADB Interface (may have a slightly different name) and start performing the task. But sometimes it's not so simple)
The drivers are installed, the device manager sees the ADB interface of the device (Figure 1), but when you enter the adb devices command, the list of connected devices remains empty, and various service programs that use Android Debug Bridge hang on “Wait for device“ .
Picture 1
There may be several reasons, but the most likely is that the computer does not understand what kind of device is connected to it. Quite often observed when working with various Chinese brands and “no-name” devices. The solution to the problem, meanwhile, is simple and will save you from repeated and useless installations and reinstallations of different driver versions. You just need to “introduce” your gadget to the computer.
- You need to find out the Vendor ID (VID) of the device. In the device manager, double-click on Android Composite ADB Interface (may have a slightly different name) and go to the “Details” tab (Figure 2).
Figure 2
We are interested in what is underlined in red - between the signs “_” and “&”.
- Next, go along the path C:Documents and SettingsYour username.android (for Windows XP) and check whether there is a file in this folder named “adb_usb.ini” (without quotes, of course). If there is, open it with any text editor and insert a line with your VID in the format shown in Figure 3.
Figure 3If there is no adb_usb.ini file, create it in any text editor, enter the Vendor ID and save the file to the C: Documents and Settings folder. Your username.android.
We restart the computer, connect the device, launch ADB, get a list of devices using the adb devices - Voila - everything works! Below you can download the finished adb_usb.ini (for example):
adb_usb.ini
Fastboot is a condition that periodically occurs on Android devices. You can exit Fastboot, and there are several ways to do this. Before you start working in fastboot, make sure that the device is fully charged, and the necessary software is installed on the remote computer and the necessary files are downloaded.
Fastboot mode - what is it?
Fastboot is a tool included in the System Development Kit, an operating system development environment. Its purpose is to change the internal memory to remove information garbage. Among other well-known modes, fastboot most closely resembles recovery.
But Fastboot is also used to flash the Android OS if updating the device using the built-in function is not possible. Fastboot is not built into Android, but is located in the device's memory, which allows you to use it if the operating system is damaged. This is the main advantage of Fastboot over similar device states, since the effect is performed at the hardware level.
How to remove fastboot
Most users do not need Fastboot. To remove it, you need to:
- Go to device settings.
- Open System, then Accessibility.
- Uncheck the box next to fast boot.
- Reboot your smartphone.
If for any reason access to the specified settings item is unavailable, you will need to perform a factory reset. Remember that as a result, all data will be deleted, so make a backup or backup of your files first.
A factory reset will also be needed if there is no access to the smartphone at all. To do a reset, you need to:
- Turn off the phone, remove the SIM card and SD card.
- Hold down the volume key and power key. Look for a specific combination for a specific phone on the manufacturer’s website.
- After the Android logo appears, you must release the volume key.
- Wait for recovery to load.
- Find the clear or wipe data item in the menu.
- Confirm device cleaning.
When the file deletion process is completed, the phone will reboot.
How to remove fastboot
Not all Xiaomi users need the ADB Fastboot program. If you do not plan to reflash your smartphone or work with system files:
- Go to the "Settings" menu.
- Find the "Accessibility" item. In older versions of MIUI, Fastboot is enabled through the “Screen” section.
- Drag the Quick Start slider to off. Restart your phone so that the settings are saved.
If this method does not work, you will need a full reset. You can delete factory settings at your own risk. Before you start cleaning the system, you need to remove the SD card so that the data on it is not damaged. Transfer all the necessary information, including music and photos, to the cloud or to your computer. When formatted, they will be deleted from the smartphone. To do a hard reset:
- Turn off the gadget. Remove the SIM card from it.
- Hold the lower volume key and the lock button. After a few seconds, the Recovery Mode menu will launch and reboot into Fastboot reboot mode.
- In the menu, select “Clear” or “Wipe Data” (depending on the version of the smartphone). Select one of these options and confirm your choice with the power button.
- Complete cleaning will take up to 10 minutes. After this, the smartphone will turn on with the native MIUI shell.
To remove ADB Fastboot Xiaomi using the third method, you will need a Windows 10-based PC. To disable the utility in this way:
- Download the ADB Run program and install it.
- Connect your smartphone to your computer using a USB cable.
- Wait for the drivers to install. If the system does not detect them, download the current file from the manufacturer’s website.
- As soon as the PC detects the connected smartphone, enter the command “fastboot reboot” in the terminal.
How to exit fastboot
If the user accidentally switched to Fastboot and cannot exit it, it’s not a problem. By following the short instructions, you can leave this mode:
- Press the power key for half a minute. The device should turn off and show no signs. After 30 seconds, the smartphone should turn on independently outside of fastboot mode.
- The second option involves removing the battery for 20 seconds if it is removable. After the time has passed, insert the battery and turn on the phone by holding the Power key for half a minute.
- If the previous methods did not work, connect the device to the computer using a cable. Download the driver so that your PC can recognize your smartphone or tablet. Open a console on your computer and enter fastboot reboot/code>. The Android device should force reboot.
After exiting Fastboot, you need to open your phone settings and disable this mode. Fast loading is located in special features, which is described in more detail above.
If you have any questions, please let us know Ask a Question
How to exit Fastboot on Xiaomi
In this case, it is possible to try several methods to bring Xiaomi to its senses:
- After booting into Fastboot, hold down the power button for 20-25 seconds, this will force a reboot to normal mode. In most cases this helps;
- If it doesn’t help, then try holding down the power and volume up button, it will reboot into Recovery mode. Select “Wipe Data/Factory Reset” - this will return to factory settings.
Attention: clicking on Wipe Data/Factory Reset will delete all data from the phone’s memory, it will return to a completely clean state. This method should be used as the last possible method.
Return to content
How to install firmware via fastboot xiaomi
Sometimes the user needs to install new firmware, but it is impossible to get the update through the built-in system. In such a situation, use Fastboot. With its help you can install any version of the OS.
Before using this method, make sure that your smartphone allows the installation of third-party firmware. Download the desired version of Android and charge your device. For Xiaomi smartphones you will also need the MiFlash program, which is installed on your computer.
Flashing the phone via Fastboot
Install MiFlash:
- Unpack the archive with the program into a folder whose path contains only Latin letters and numbers.
- Unpack the archive with the firmware into the same folder.
- Launch the application.
Before starting the firmware, click Select in the program and select the path to the OS you want to install. Click on refresh and check the status of the id and device fields. If they are filled, then you can begin installation.
Smartphone firmware:
- Make sure that the box next to save user data is checked at the bottom of the program. This will save all the information stored on the phone. If you need to clear the internal memory, check the clean all box.
- Switch your smartphone to Fastboot by holding down the volume down key when turning it on.
- Connect your device to your computer using a cable.
- Click on Flash in the program and wait for the firmware installation to finish.
You can track the installation progress as you fill out the progress field. When the word success appears next to the word result, disconnect the phone from the PC. Check the functionality of the firmware. Remember that the first boot takes a long time because the system needs to be configured.
Step-by-step instructions on how to flash Xiaomi via Fastboot
Now let’s proceed directly to the firmware of the Xiaomi smartphone itself, which will take place via a computer. The phone should have at least 60-70% charge left.
Step 1: Install MiFlash and Drivers
Before installing the MIUI ROM Flashing Tool on your PC or laptop, you had to disable digital driver signature verification, but this requirement is no longer relevant.
MiFlashSetup_eng.msi
- Download the MiFlashSetup_eng.msi file.
- Run the file and begin installing the program. Select the installation path to system drive C (if you are prompted for an installation location), wait until it finishes.
- Now we activate the XiaoMiFlash.exe utility using the icon on the desktop.
- Check if all drivers are installed again. An example in the screenshot below.
- We reboot the computers so that all the actions taken have an effect.
Step 2: Unlock Bootloader
Recently, unlocking the bootloader has been significantly simplified. There is no need to submit an application to the official Xiaomi service and wait several days for a positive decision, which, otherwise, might not have happened. Now users can immediately begin activating the bootloader. Let's describe the brief instructions:
The first and most important thing to do is to link your phone to your Mi account. The screenshots below show everything in detail. Now we just have to wait until 360 hours have passed and then we can continue. After this, we will need another utility, namely Mi Flash Unlock. You can find it on w3bsit3-dns.com or on the official Xiaomi website. After that, open the program as administrator, put the device into Fastboot mode (turn off the phone, wait about a minute and hold down the volume minus button with the power button) and connect it to the computer
Reading of information will begin. At the end of the procedure, three green dots should appear - a sign that Bootloader has been successfully unlocked. Made. Don’t forget that on our website you can read detailed instructions.
Step 3: Selecting the correct firmware
Now I pay special attention to choosing the right archive with firmware for your Xiaomi model. To flash firmware in Fastboot mode, you need a special archive; it is suitable for both the method of installing new firmware via Mi Flash and ADB Platform-tools
Download the archive with the firmware from the MIUI forum. If your model is not on this page, then you need to go to 4PDA, and there, in the topic header of your model, find a link to download an archive with firmware for Fastboot mode from the official source.
Step 4: Put your phone in Fastboot mode and connect to your PC
When the preparation is complete, take the mobile device, turn it off and wait about a minute for all processes in the smartphone to completely stop. Now we launch Fastboot mode on the phone.
This is done as follows: hold down the power key and the volume down rocker. We hold it until a hare with earflaps appears, repairing the Android. Now the device can be connected to the PC.
Step 5: Launch Mi Flash program and flash Xiaomi firmware
Now a few important steps.
- Let's unzip the archive with the firmware using any available archiver. The archive will need to be unpacked 1-2 times! Then move the folder with all the firmware files to the “flash” folder so that the path is shorter.
- Transfer the files to the root of the system disk into the Flash folder (you need to create it). There should be no Russian letters along the path to the firmware files (example: C:\flash).
Next, launch the MiFlash shortcut from the desktop. Click on the “Select” button located in the upper left corner and indicate the path to the firmware. Confirm with “OK”. We update the list of connected devices using the “Refresh” button. We go down below, where we see the points:
- Clean all – deletes all files from the device without the possibility of recovery;
- Save user data – does not touch user data;
- Clean all and lock – completely cleans the smartphone and locks the bootloader.
Be extremely careful here! It is best to choose the first option so that nothing interferes with the process. Also, be sure to make a backup before starting the operation. Reset the backup files to your computer, as the SD card also has the risk of being suddenly cleared during an incorrect flashing process.
We carry out the final action - click Flash. Flashing begins. You cannot disconnect your smartphone from your computer until Success appears in the Result field.
The procedure may take some time, and during this period any actions with the phone are strictly prohibited. At the end of the operation, the mobile device will reboot and start on the new version itself.
Fastboot devices
Users often encounter problems when obtaining Root. In difficult cases, adb commands are used for this using the computer command line. However, the majority simply enter them without knowing the purpose.
The Fastboot devices command is used when getting root if the device is in bootloader mode. Entering this command allows you to obtain certain information about your phone or tablet. Fastboot devices allows you to understand whether the device is capable of receiving a signal from Fastboot and executing specified commands. This is a powerful tool that is often blocked for the average user.
In addition, the command displays the serial number of the device, the presence of the necessary drivers on the computer, and some confidential information about the device.
How to disable Fastboot
On most devices, to disable this function, just go to the settings and find the item responsible for fast loading. To turn off the latter, just uncheck the box and restart your smartphone.
How to install twrp via Fastboot
Let's consider the simplest installation option. Requires a computer and the Fastboot console application. It is not necessary to have root on the phone, but you must have access to the bootloader. Installing TWRP:
- Install ADB and Fastboot applications on your computer. Connect your smartphone to your PC using a cable and enable USB debugging on the device. It is located in the settings, section for developers.
- Launch a command prompt on your computer and enter cd [adb program folder location] without square brackets. To specify the path, you need to go to the appropriate folder and copy the value of the line from above.
- Enter adb devices and check the visibility of the smartphone. If it is displayed, proceed to the next step.
- Download the TWRP image for a specific device from the official website of the application.
- Open the download links and select primary.
- Save the image to the folder for adb and Fastboot.
- Open a command prompt and enter the adb reboot bootloader command. The device will reboot into fastboot.
- Enter the command Fastboot flash recovery [TWRP image name] without square brackets.
- Wait for the process to complete and reboot your smartphone by entering fastboot reboot.
Now, when you turn on the device, you can go to TWRP using the combination to enter the factory menu.
Debug mode settings
Debugging mode is a special service that provides more rights to those devices to which the smartphone is connected.
To activate the USB debugging function, you need to activate the “For Developer” mode in the settings of your mobile device. The following steps will help you make it visible:
- open the “About phone” item in Xiaomi settings;
- Tap the “MIUI Version” column seven times.
After this, developer mode will be activated. It contains the USB Debugging option. Directly to enable it you need to:
- Go to the “Settings” of your smartphone.
- Select the “Advanced Settings” section.
- Next, go to the “For Developers” item.
- Move the slider to the right to activate the USB Debugging mode.
Note: if after these steps the corresponding menu is not displayed, temporarily disable your smartphone’s antivirus program. It can block access for security reasons.
What does Fastboot mean?
Fastboot literally translates as fast boot and usually refers to the corresponding function of a smartphone or tablet. When turned off, the device will not show the Android and manufacturer logo when turned on, but will allow the user to use the system as quickly as possible.
The word Fastboot also refers to the factory menu if it is launched with the fast boot option enabled. With its help, the user can perform some commands that are not available to regular recovery, for example, reinstalling the firmware.
And there is also a Fastboot utility for smartphones. It is installed on a computer to work with the device using the command line. This allows you to bypass system restrictions and install unofficial firmware or custom recovery on your smartphone.
Fastboot Mode may automatically start after incorrect root configuration or when a crash occurs in the operating system. Loading the mode also depends on the user: when turning on the device, you cannot hold down the volume keys if this is not necessary to get into recovery.
If fastboot mode is on the screen and the phone does not work
There are only two options for getting out of the situation.
It all depends on your ability to handle equipment and work with special software. 1. The simplest thing is to take the phone to a service center. There is nothing special to describe here.
2. Enabling the “Recovery mode” followed by flashing the phone’s firmware. To do this, you will need several programs: MiUnlock, MiFlash and the firmware file for your phone. Also, the computer must have ADB drivers that match the bit depth of your operating system and the drivers for QD-Loader. These are additional programs for the correct interaction of Mi Unlock with your computer via a USB cable.
The Xiaomi firmware process involves uploading the firmware file (in .tgz format) to the phone via the Mi Flash program. This will take approximately 20-30 minutes of your time, depending on the phone model. It should be noted that Xiaomi service utilities do not understand the Cyrillic alphabet well and folder names should not contain Cyrillic characters. You can watch the detailed process of flashing your phone in this video. Also in the description there are all links to the necessary programs and instructions on where to find the firmware specifically for your phone model.
What commands are there in Fastboot?
While in Fastboot mode, the smartphone and tablet are able to perceive several commands that come from the connected computer. The command line must be running on the remote device, and the Android device must be in bootloader mode.
Fastboot devices provides the user with various information about the device, including the serial number. This program is blocked by some manufacturers due to the amount of data provided.
Fastboot OEM unlock is used to unlock the bootloader. It can be blocked by the manufacturer, and such protection can be removed by appropriate utilities. For example, HTC and Asus block the bootloader, and only applications released by the same companies can unlock it.
Removing the lock allows you to fully unlock the potential of ClockworkMod, TWRP and similar programs used to change firmware. But Fastboot can also remove protection. Boot your device into this mode, connect it to your computer and enter the command in the command line. Follow the instructions that appear on the screen of your smartphone or tablet. Please note that using this command will factory reset your device.
The computer does not see the phone in Fastboot mode
A similar phenomenon can be associated with both the phone and the computer. Let's consider two options for solving the problem.
The problem is with the phone:
- Reboot your device.
- Connect your phone to your PC using a cable.
- Open quick settings and make sure the debug or drive feature is running.
- Go to the full settings menu, open wireless networks.
- Switch the current status of the access point.
- Check if the USB debugging checkbox is checked in the developer section.
- View connected devices. If your computer recognizes your phone, you do not need to complete the following steps.
- If the PC still does not see the smartphone, disconnect it from the PC and reboot.
- Try clearing your cache. Check the display of your smartphone on your PC. If that doesn't help, uninstall the most recently installed applications. Especially if they are used to backup data.
- Use an antivirus.
The presented procedure should help solve the problem if the latter is associated with an Android device. And you can also perform a factory reset, but resort to this step if you are sure that the problem is with the phone.
The problem is related to the computer:
- Turn off the PC, unplug it and hold down the power button for half a minute. This will help remove static charge that may interfere with detection of the connected device.
- Boot the operating system, go to device manager and open the list of portable devices. If you have a phone but it is turned off, right-click on it and turn it on.
- Check the connection quality of the USB ports by looking under the cover of the system unit. Make sure a specific port is working by connecting another device.
- If the above processes do not help, go to Device Manager again. Review the list and note the location of unknown devices, if any. They are marked with a yellow triangle. Remove the smartphone from the connector and look at the list. If one of the devices is missing, then it was the phone. To solve the problem, download the driver for the device from the manufacturer’s official website and install it.
- Inspect the USB controllers and make sure they are not damaged: there should be no specific signs near each port.
- Scan your computer with an antivirus and then disable it and other security programs.
- Remove the latest software installed on your computer.
- Check device manager for all peripherals connected to your PC. If the computer does not recognize them, contact a service center to identify and fix the problem.
The presented solutions to the problem help get rid of the most common causes.
Waiting for device - Error in ADB or Fastboot (Android) . A fairly common problem in Android is the waiting for device error when working with ADB or Fastboot, in this article we will learn how to fix it!
What is this waiting for device?
This error “waiting for device” is not really an error; if we literally translate this phrase, it means waiting for the device to connect. That is, when you try to do something in adb or fastboot and you get the message waiting for device in the command line, this means that your Android smartphone or tablet is not visible!
Message waiting for device - adb or fastboot does not see the connected Android device!
To continue reading this article and to understand what we are talking about, it is advisable to read the following articles:
Although almost all the reasons for the message are solved in the same way, for convenience, the article will be divided into solutions for waiting for device in adb and waiting for device in fastboot.
Solution waiting for device in ADB
1. The first thing you should pay attention to is, do you have the driver installed? You can download the driver on this page, find out how to install it on this link. Certain devices require a special ADB driver.
Have you installed the driver? Restart your computer!
2. USB Debugging is not enabled! If you do not have USB debugging enabled, then working in ADB is not possible!
It is also worth noting that with Android 4.2 and higher, you must confirm trust in the connected computer on the device!
3. ADB only works when your Android is turned on!
4. Use an original and undamaged microUSB cable! Everything should be clear here, if the cable is damaged, hence the visibility problem, perhaps you can transfer or receive files from this cable, but ADB will no longer work!
5. Do not use a damaged USB port on your computer! The reasons are the same as with the cable.
6. Use only USB 2.0 port! Despite the fact that the USB 3.0 standard has already existed for several years, it is still too early to talk about large-scale implementation. Although ADB is possible if the device is connected to a USB 3.0 port, it is still not desirable!
7. Do not use USB hubs! Never, under any circumstances, use USB hubs; working with ADB becomes like luck - you'll be lucky or unlucky.
8. Try connecting Android to a different USB port.
9. If you have the Windows 8.1 operating system installed, then you need to make small changes, after which everything should work.
Solution waiting for device in Fastboot
Not all Androids have Fastboot mode (99% of all Samsung and Lenovo), therefore these models will not work in this mode and will always give the error waiting for device!
1. The first thing you should pay attention to is, do you have the driver installed? You can download the driver on this page, find out how to install it on this link. Certain devices require a special Fatboot driver (for example Sony).
Have you installed the driver? Restart your computer!
2. Make sure that the device is in bootloader mode, otherwise fastboot will not see your Android!
3. Use an original and undamaged microUSB cable! Everything should be clear here, if the cable is damaged, hence the visibility problem, perhaps you can transfer or receive files from this cable, but ADB will no longer work!
4. Do not use a damaged USB port on your computer! The reasons are the same as with the cable.
5. Use only USB 2.0 port! Despite the fact that the USB 3.0 standard has already existed for several years, it is still too early to talk about large-scale implementation. Fastboot works only with USB 2.0 ports!
6. Do not use USB hubs! Since Fastboot mode is necessary for flashing Android firmware, it’s good if Fastboot simply does not see your device, but if there is any failure in the USB hub, then it will cost you a lot.
7. Try connecting Android to a different USB port.
8. If you have the Windows 8.1 operating system installed, then you need to make small changes, after which everything should work.
We offer a general overview of possible options, and then discuss all solutions to problems.
Windows 10 does not see the phone in fastboot mode
Device drivers are usually hidden in the device manager as soon as the device is turned off or commanded to hide (despite the fact that they are still installed on the system). Very often, drivers of the same name conflict due to version mismatches, etc.
Method for clearing the list of unused devices: (Already tested by many and gives good results when nothing else helps to “see” a working “device”. 0. Disconnect all external USB devices from the computer. 1. Create an environment variable named DEVMGR_SHOW_NONPRESENT_DEVICES with a value equal to 1. To do this: 1.1. Right-click on the “My Computer” icon and select “Properties.” 1.2. In the dialog box that opens, go to the “Advanced” tab and click on the “ Environment Variables. 1.3. In the “Environment Variables” panel located at the top of the dialog box, click on the “New” button. 1.4. In the “Variable Name” field, type (better copy from here) DEVMGR_SHOW_NONPRESENT_DEVICES, and in in the “Variable value” field, enter 1. 1.5. Click the “OK” button twice in a row.)
The created environment variable will allow the device manager to show all device drivers installed on the system (both hidden ones and all those that have ever been connected to the computer).
2. Bring up Device Manager: 3. Right-click on the My Computer icon, select Properties, and go to the Manage tab. 4. Click on the “Device Manager” button, expand the “View” menu and select the “Show Hidden Devices” command.
5. Start “cleaning” the system of “junk”: 5.1 Section “Disk devices” Every time you connect a new flash drive, a new driver is installed. Every time you connect the same flash drive, but to a different USB port, a new driver is installed. The drivers of all currently disabled removable media in this section can be safely removed - they will be installed again when you connect flash drives and other USB media. Among these hidden and unused drivers there will be a driver for “your device” (possibly “unsuccessful” and more than one). It should be called “Your device” USB Device, but it is not always detected correctly and therefore the name may be different. Feel free to delete everything related to “Your device” in this section. The first time you connect “your device,” the new driver from the current one will install itself or ask you to install it.
5.2 Section “Other devices” Here you can delete all HIDDEN (gray) devices - these are all your unsuccessful attempts to install “something”. You definitely don't need them.
5.3 Section “Storage volumes” Here you can delete HIDDEN (gray) “storage volumes” - these are the “letters” of your flash drives - you don’t need them, because will be assigned again when you connect the flash drive..
5.4 Section “Universal Serial Bus Controllers”: Here you can remove all HIDDEN (gray) devices: “Your device” Device USB Driver, USB storage device, Unknown device and others. 5.5 Restart your computer.
6. After all these deletions, try connecting “your device” again. It should be detected as a new device and Windows will install drivers for it or you will install them yourself (on some devices you need to install drivers without connecting via USB, i.e. connect after installing the driver). 6.1 Restart your computer. Typically, this procedure eliminates all problems in conflicting drivers of “your device.”
7. thanks for the information provided Alex_1959,
:yes2:
Usually the solution to the problem, directly or indirectly, is reflected in the header.
Source
Reasons why the computer does not see the phone via USB
This may be due to software incompatibility or technical problems. From time to time the cable gets damaged and the contacts in the smartphone break. In the first case, you need to try a different cord, and in the second, contact a service center to replace the connector. A broken port on your computer can also cause problems, so switch the wire to a different socket to fix the problem. These are the most common hardware failures.
With software errors it is more difficult, since there are many reasons for failures. These could be missing or outdated drivers, incorrect connection modes (when the computer charges the smart phone, but blocks the transposition of documentation into folders) and other incompatibilities, which we will discuss in detail below.
What to do if the computer does not see the phone?
Listed below are all the methods that can help solve the cable connection problem.
Check your USB connection settings
This method will help if charging occurs during pairing, but the information cannot be reset. To transfer documents, you must connect Android as a media device (MTP). To do this, follow these steps:
- When connecting your device to your PC, swipe the curtain.
- Tap on “Charge via USB”.
- In the dialog box, select File Transfer (MTP).
Attention! In some cases, you may have to connect your phone to your computer and switch between different options several times before the desktop recognizes the device as a media device.
If you have older versions of Android, try this.
- Launch "Settings - Storage".
- Click the three dots icon in the top right corner, open "USB Connection to Computer".
- From the list of options, select Media device (MTP).
Connect the device to your computer, it should be recognized.
Install the USB MTP driver
It happens that the smartphone does not display due to problems with the driver, so try updating it.
- Right-click on the desktop and select “Device Manager.”
- Find your Android smartphone in the list of connected ones, right-click on it and click “Update drivers...”.
- You will be presented with two options: install manually from your hard drive or automatically search the Internet for the latest version.
- Select “Search for drivers on this computer”, then click on “Select a driver from the list of already installed ones” and now click “USB MTP device”.
- You can also try using the second option and wait for the system to do everything itself.
Once the driver is installed, the PC should recognize the Android phone. You may need to restart your computer for the update to take effect.
Download and install Media Feature Pack for Windows 10
We have already mentioned that you must use the MTP protocol to transfer content. It is bundled with Windows Media Player, and some versions of Windows 10 do not have Windows Media Player or support for related technologies. If your version of Windows 10 does not recognize Android, download and install the Media Feature Pack from the official Microsoft website.
Use the included USB cable
We recommend using the original cable, since third-party ones are sometimes only intended for charging, and the PC does not display Android devices. To check this, connect a different USB cable.
Remove Android Drivers
Sometimes the system does not have the latest drivers or they are not installed correctly. It is recommended to remove them and install them again.
- Connect your device to your computer and open Device Manager.
- Find your device. Usually it is located in the “Other Devices” section or in the “Portable Devices” section, but sometimes the location is different.
- Right-click on it and click “Delete”.
- After the drivers are removed, disconnect your Android device.
- Reconnect it and wait while Windows reinstalls the drivers.
It remains to check whether the method worked.
Enable USB Debugging
From time to time, the connected gadget is recognized when USB debugging is active. If you are using Android 4.2 or later, this feature may be hidden. To enable it, do as follows.
- Go to “Settings - About phone”.
- Click on “Build Number” 7 times.
- Go back.
- Open Settings - Developers.
- There, scroll down and activate “USB Debugging”.
Sometimes it is already turned on, in which case it should be turned off.
Turn on airplane mode
If Windows stops seeing your phone, launch airplane mode through the quick settings panel in the curtain or by going to “Settings - More”. Often after this the device is recognized by the PC. This is a simple method, so don't be lazy to try it.
Reboot your phone in Recovery or Fastboot mode
Read about how to enter it in our other article, where we described the process for each manufacturer. After you enter Fastboot or recovery mode, connect your smartphone to your PC and wait until the necessary components are installed. After this, a guide should open in front of you with a suggestion of what to do with the connected device. When finished, reboot Android.
Install KIES from Samsung
If your Samsung gadget is not recognized by Windows, download the KIES software from the manufacturer’s official website and install it on your computer. With its help you can definitely connect your smartphone.
Use USB 2.0 ports
Try switching the cable from USB 3.0 to USB 2.0. Users reported that it worked for them sometimes.
Reinstall ADB
Windows occasionally does not recognize the smartphone due to problems with the Android Composite ADB interface, so you should reinstall it.
- Open Device Manager, find Android Composite ADB. Sometimes it is called, for example, ACER Composite ADB Interface or something like that, but it will definitely be “ADB”.
- Right-click on it and select “Delete”.
- Restart Windows and connect Android to PC again.
- Check if the device is recognized. If not, continue to the next step.
- Download the USB driver file from Google from this link https://dl-ssl.google.com//android/repository/latest_usb_driver_windows.zip and extract it to your computer. Remember the path to the folder - it will come in handy later.
- Open "Device Manager", hover over the outermost icon in the second line, click "Update hardware configuration".
- Find your Android Composite ADB and right click on it.
- Select "Update drivers...".
- Click "Browse this computer for driver software."
- Remember the location where you extracted the Google USB driver and check the "Include subfolders" checkbox.
- Click Next to install the driver.
- Open Command Prompt as an administrator: for Windows 10, press the Windows keys + X and select Command Prompt (Admin);
- for Windows 7, open “Start - All Programs - Accessories”, right-click on “Command Prompt” and select “Run as administrator”.
- adbkill-server;
This solution works with Android 5.0 and newer OS, but it can also be compatible with older versions of Android. Users have reported that it is not always worth downloading the USB driver from Google, and often the problem is resolved simply by following the first four steps.
Reboot your Android device
Sometimes this simple solution is the most effective. People have repeatedly reported that after rebooting the phone, the computer recognized the mobile phone without any problems.
Connect your phone directly to your computer
Some USB devices may not be recognized if you connect them to a USB hub or extender. Therefore, if you are using a USB hub, disconnect it and connect your Android directly to the PC to solve the problem.
Clear cache and data for external system storage and storage systems
This solution works on Android 6 and above. But if you have an older system, try this anyway.
- Open Settings - Applications.
- Tap the three dots in the top right corner and select Show system apps.
- Find "External storage" and "Media storage".
- Go to them one by one and delete the cache and data.
After deleting the cache and data, restart the gadget and connect it to the computer again.
Sync Android with PC using a third-party app
This does not guarantee 100% performance, but it often helps. Just install a synchronization application from the Play Market, which will help your computer recognize. Try, for example, Mobile Go to connect and transfer data from Android and iOS to PC.
There are many reasons why your computer can't see your Android phone. We hope these solutions will be useful for you and you will solve your problems.
If android adb does not see the smartphone
Katzimshar:
December 16, 2021 at 06:44 pm
If you have decided to get an instant loan, you need to decide on the microfinance organization where it is better to get a loan online. Today, not all organizations issue instant loans. If you are looking to get instant loans, you need to look through the list of companies that provide loans on favorable terms.
All-loans-here.rf contains a list of organizations that provide quick loans to clients. On the resource you can find different companies, read reviews and decide on loan terms. A large number of organizations provide funds on normal terms. You can get a loan today with your passport.
In order for a visitor to receive an urgent online loan, he must select an MFO and study the terms of the loan. Every man has found himself in a situation where funds may be needed very urgently. Brothers cannot always help financially. Because of this, you need to explore the chance of taking an online loan on a card.
If you want to apply for a loan on a card without refusals instantly online, you need to select the conditions. If you are a bona fide borrower, the funds will be transferred to you quickly. It is possible to receive money in rubles for a specific period. It should be noted that the service guarantees complete confidentiality. The resource contains MFOs that always meet people halfway. New clients will also not feel any discomfort. Loyal lending conditions also exist for many clients.
You have a chance to get microloans faster than in banking institutions. You don't need to collect documents. Instant loans are a unique solution if you need funds in a short time. To receive funds, you must fill out a form on the MFO portal. An administrator will contact you as soon as possible and discuss all the details.
If you are not sure where you can study the list of the best microfinance organizations, you can safely view it on the resource. The best microfinance organizations are posted on the portal. All microfinance organizations have technical support. You can get a loan using a bank card from any bank. You can also get financial savings in 10 minutes without any questions from bank managers.
Once your application is approved, you will receive a confirmation. More than 90% of applications are approved. You can even apply for a loan via your mobile phone. To do this you will need to have an Internet connection. You will also need a passport and a bank card where you will accept money.
Answer
What is this waiting for device?
This error “waiting for device” is not really an error; if we literally translate this phrase, it means waiting for the device to connect. That is, when you try to do something in ADB or FASTBOT and you get the message waiting for device in the command line, it means that your Android smartphone or tablet is not visible!
Message waiting for device - adb or fastboot does not see the connected Android device!
To make it clear what this article is about and to understand what we are talking about, it is advisable to read the following articles:
- USB debugging
- ADB commands and others
- What is Fastboot?
Although almost all the reasons for the message are solved in the same way, for convenience, the article will be divided into the solution “waiting for device in adb” and “waiting for device in fastboot”.
Solution waiting for device in ADB
1. The first thing you should pay attention to is whether you have the driver installed?
You can download the driver on this page , find out how to install it on this link . If the driver is unsigned, then Windows must be restarted by disabling verification. Certain devices require a special ADB driver.
Have you installed the driver? Restart your computer!
2. USB Debugging is not enabled! If you do not have USB debugging enabled, then working in ADB is not possible!
It is also worth noting that with Android 4.2 and higher, you must confirm trust in the connected computer on the device!
3. ADB only works when your Android is turned on!
4. Use an original and undamaged microUSB cable! Everything should be clear here, if the cable is damaged, hence the problem of visibility, perhaps you can transfer or receive files from this cable, but you won’t be able to work with ADB! Also, do not use a damaged USB port on your computer!
5. Use only USB 2.0 port! Despite the fact that the USB 3.0 standard has already existed for several years, it is still too early to talk about large-scale implementation. Working ADB with USB 3.0, although possible, is still not desirable!
6. Do not use USB hubs! Never, under any circumstances, use USB hubs; working with ADB becomes like luck - you'll be lucky or unlucky.
7. Try connecting Android to a different USB port.
9. Open a command prompt as “administrator”.
Solution waiting for device in Fastboot
Not all Androids have Fastboot mode (99% of all Samsung and Lenovo), therefore these models will not work in this mode and will always give the error waiting for device!
1. The first thing you should pay attention to is, do you have the driver installed? You can download the driver on this page ; you can find out how to install it by following this link .
Have you installed the driver? Restart your computer!
2. Make sure that the device is in bootloader mode, otherwise fastboot will not see your Android!
3. Use an original and undamaged microUSB cable! Everything should be clear here, if the cable is damaged, hence the visibility problem, perhaps you can transfer or receive files from this cable, but you won’t be able to work with Fastboot! Also, do not use a damaged USB port on your computer!
4.Use only USB 2.0 port! Despite the fact that the USB 3.0 standard has already existed for several years, it is still too early to talk about large-scale implementation. Fastboot working with USB 3.0, although possible, is still not desirable!
5. Do not use USB hubs! Never, under any circumstances, use USB hubs; working with Fastbot becomes like luck - you'll be lucky or unlucky.
7. Try connecting Android to a different USB port.
9. Open a command prompt as “administrator”.
If you once had a similar problem “waiting for device” and solved it in your own way, not from the methods listed, then do not hesitate to write in the comments!
That's all! Read more articles and instructions in the section Articles and Android Hacks . Stay with the Android +1 , it will be even more interesting!
Sources used:
- https://digphone.ru/esli-android-adb-ne-vidit-smartfon/
- https://phone-insider.com/fastboot.html
- https://4pda.biz/android-obshchee/1439-waiting-for-device-oshibka-v-adb-ili-fastboot-android.html
- https://androidtab.ru/pochemu-kompyuter-ne-vidit-telefon-i-chto-delat/
- https://androidp1.ru/android-waiting-for-device/
SHARE Facebook
- tweet
Previous articleViNTERA.TV (no advertising)
Next articleiPhone SE – Technical Specifications
How to exit Fastboot mode
As already mentioned, rebooting the device is often useless, including removing the battery. Reboot is triggered if the tool is accidentally activated. As a rule, these actions are unlikely to take the device out of the mode, but there are effective methods, using one of which you can return to normal work by leaving the Fastboot environment. Depending on the reason for putting the device into Fastboot Mode, the methods for exiting this mode are different; you can perform the procedure through a smartphone or using a computer.
Normal operation mode
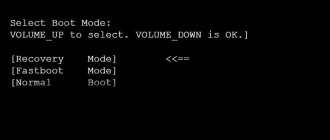
The first step is to try to select normal boot of the device, for which the following steps are performed:
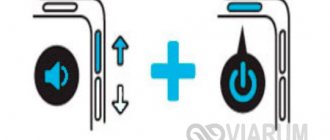
- Turn off the device and simultaneously hold down the power and volume down buttons until the Select Boot Mode menu appears or the OS boots normally (about 10 seconds);
- In the menu, scroll through the items using the volume up button;
- Select Normal Boot using the Volume Down button.
During normal operation, the device will turn on and boot into Android OS. In some cases, users notice the mode loading after the smartphone interacts with the computer, and nothing prevents them from performing any actions; the problem occurs when disconnected from the PC. Often the phenomenon is associated with disabling the option, for example, by service specialists after working with the device. You can fix this like this:
- We proceed to the settings after normal loading;
- In the “Display” or “Special Features” section, uncheck the “Fast Boot” checkbox.
Recovery Mode
To return the device to normal, you can use the Recovery mode, which allows you to reset to factory settings, backup data, update the firmware and other actions without booting the system. Recovery involves formatting all data, that is, returning the device to its out-of-the-box state, so it is better if you have a copy of it. To carry out the procedure, do the following:
- We activate the mode by holding down the power and volume up or down buttons (depending on the smartphone model), wait for loading;
- First, you should try to boot from here in normal mode, for which select “Reboot”;
- If it doesn’t help and the device enters Fastboot Mode again, activate Recovery and select “wipe data/factory reset” in the main menu;
- We wait for the task to complete, after which a reboot will follow.
This method helps in most cases, but the downside is that you will have to re-install the applications you need and return the device to its usual form, download a backup copy (if available), since after the reset everything will look the same as when you bought the device.
Exiting Fastboot using a computer
To exit Fastboot using a PC, you will need appropriate drivers that match the device model. It is better to download software from official resources to avoid penetration with malware files. So, you need to do the following:
- Unzip the downloaded firewood into a folder;
- We connect the smartphone to the PC using USB;
- From the Control Panel (or in any other way) call Device Manager;
- Select the “Other devices” item and right-click on “ADB Interface”;
- Select the “Update drivers” item from the menu that appears, and by clicking the corresponding button, perform a search on the computer, indicating the path to the directory where we unzipped the driver. The device should now change its name from “ADB Interface” to your device name.
After installing the appropriate drivers, follow these steps:
- Open the “Run” console on your computer (in any convenient way, for example, using the Win+R key combination);
- In the command line, enter fastboot reboot, confirm the action, after which the smartphone will reboot and exit this mode.
If none of the methods helped solve the problem, flashing the device is also possible as a drastic measure, but, as a rule, the solutions described above cope with the problem.